Crestron C2N-SSC-2 ILT Shade Controller Operations & Installation Guide
This document was prepared and written by the Technical Documentation department at: Crestron Electronics, Inc. 15 Volvo Drive Rockleigh, NJ 07647 1-888-CRESTRON All brand names, product names and trademarks are the property of their respective owners. ©2004 Crestron Electronics, Inc.
Crestron C2N-SSC-2 ILT Shade Controller Contents ILT Shade Controller: C2N-SSC-2 1 Introduction......................................................................................1 Features and Functions ..........................................................1 Specifications.........................................................................2 Physical Description ..............................................................3 Industry Compliance.................................................
Crestron C2N-SSC-2 ILT Shade Controller ILT Shade Controller: C2N-SSC-2 Introduction Features and Functions The Crestron® ILT Shade Controller, C2N-SSC-2, communicates with up to two Somfy ILT Intelligent Shade Motors via a serial interface. In a Crestron control system network (Cresnet®), the C2N-SSC-2 (herein called Shade Controller) sets the position and the direction of motion of each shade individually, with programmable settings for the upper and lower limits of travel for each shade.
ILT Shade Controller Crestron C2N-SSC-2 The upper and lower limits of travel for each shade are set up at the time of installation via the six pushbuttons on the face of the Shade Controller, or via a touchpanel, and are stored internally to each ILT motor. Shade presets, stored as values relative to the limits of travel, can be stored and recalled locally in the Shade Controller. Specifications The following table provides specifications for the Shade Controller.
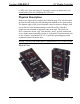
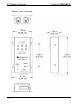
Crestron C2N-SSC-2 ILT Shade Controller (CAIP) only. New users may be required to register to obtain access to certain areas of the site (including the FTP site). Physical Description Refer to the figures below and on the following page. The unit is housed in a black metal enclosure with labeling and controls on the front surface. The bottom edges of the cover/faceplate extend to form two flanges with screw slots for convenient mounting on any flat surface.
ILT Shade Controller Crestron C2N-SSC-2 Physical Views (continued) 4 • ILT Shade Controller: C2N-SSC-2 Operations & Installation Guide - DOC.
Crestron C2N-SSC-2 ILT Shade Controller Controls The Shade Controller has six pushbuttons that are used to set the upper and lower limits of travel for each shade. These limits are set at time of installation and the values are stored in the ILT motor. Shade Limit Control Pushbuttons Pressing any one of the four outer pushbuttons puts the Shade Controller into the limit-setting mode for the selected shade and upper or lower limit. (Refer to “Setting Shade Limits and Direction of Travel” on page 13.
ILT Shade Controller Crestron C2N-SSC-2 − On for one second, then off when shade reversal is executed from buttons on the unit. SETUP LED and Pushbutton The SETUP pushbutton and its associated LED are used for setup of the unit’s network ID during the initial configuration of a Cresnet system or when the device is being added/replaced. Refer to “Method B (Touch Settable IDs)” on page 10 for detailed information.
Crestron C2N-SSC-2 ILT Shade Controller available from the Downloads | Product Manuals | Wiring Diagrams section of the Crestron website (www.crestron.com). NOTE: For larger networks (i.e., greater than 28 network devices), it may be necessary to add a Cresnet Hub/Repeater (CNXHUB) to maintain signal quality throughout the network. Also, for networks with lengthy cable runs or varying types of network devices, it may be desirable to add a hub/repeater after only 20 network devices.
ILT Shade Controller Crestron C2N-SSC-2 NOTE: All Cresnet wiring must consist of two twisted pairs. One twisted pair is the +24V conductor and the GND conductor, and the other twisted pair is the Y conductor and the Z conductor. NOTE: When daisy-chaining Cresnet units, strip the ends of the wires carefully to avoid nicking the conductors. Twist together the ends of the wires that share a pin on the network connector, and tin the twisted connection. Apply solder only to the ends of the twisted wires.
Crestron C2N-SSC-2 ILT Shade Controller requires that a single Shade Controller be the only network device connected to the control system. Method B (Touch Settable IDs), which begins on page 10, applies to Shade Controllers in a Cresnet system with 2-Series control system upgrade file (CUZ) version 3.008 or later.
ILT Shade Controller Crestron C2N-SSC-2 Method B (Touch Settable IDs) Before using this method, you should have a list of all current network devices and their Net IDs, to avoid assigning duplicate IDs. Set Net ID via D3 Pro or SystemBuilder Version 1.0 of this program includes procedures that enable setting the Net ID. Refer to the extensive help information provided with the software file for instructions.
Crestron C2N-SSC-2 ILT Shade Controller “Set Net ID by TSID” Window 4. As you enter either the serial number or TSID number of the device that requires a change, the corresponding TSID or serial number automatically appears in its appropriate field. The listing should show the device’s current Cresnet ID. CAUTION: This function does not prevent you from setting duplicate IDs. Be sure to check current assignments before entering the desired Cresnet ID number. 5.
ILT Shade Controller Crestron C2N-SSC-2 1. Open the Crestron Viewport. 2. From the Viewport menu, select Functions | Serial Number ÅÆ TSID Conversion Tool. The “Serial Number ÅÆTSID Conversion Tool” window is displayed. “Serial Number to TSID Conversion Tool” Window 3. Enter the serial number or TSID number as instructed; press the appropriate button to obtain the corresponding number. NOTE: Enter serial numbers, including spaces, exactly as they appear on the unit label.
Crestron C2N-SSC-2 ILT Shade Controller Overview Installation consists of mounting the Shade Controller (using either the Dual Lock fastener or screws, as desired) in a location that is out of casual reach, but within fifty feet of the shade(s) it controls; connecting a Cresnet cable to the NET port; connecting the interface cable(s) from the shade(s) to the RJ-11 port(s), and setting the upper and lower limits of travel for the shade(s). 1. Turn Cresnet system power OFF. 2.
ILT Shade Controller Crestron C2N-SSC-2 buttons on the Shade Controller are used to set these limits, as defined in the following table. Shade limits can also be set using the C2N-SSC-2 symbol. Shade Limit Control Pushbutton Functions Shade 1 Adjust Upper Limit Button Push to allow adjustment of Shade 1 upper limit. SETUP LED will be on during limit-setting mode. Push and hold for five seconds to open to upper limit. Shade 1 Adjust Lower Limit Button Push to allow adjustment of Shade 1 lower limit.
Crestron C2N-SSC-2 ILT Shade Controller NOTE: During the limit-setting procedures, if the shade moves opposite to the selected direction, refer to the direction reversing procedures given on the next page. NOTE: Perform limit or travel direction settings for each shade individually. NOTE: Do not press other buttons or touchpanel controls while setting shade limits. Doing so will terminate the limit-setting procedure. The following procedures apply to either shade.
ILT Shade Controller Crestron C2N-SSC-2 Reversing the Direction of Travel for a Shade Whether a shade rolls up or down when a particular button is pushed depends on the orientation of the shade during installation as well as how the shade material is mounted to the cylinder.
Crestron C2N-SSC-2 ILT Shade Controller You can create a program that allows you to set up the C2N-SSC-2 to operate in a Crestron control system using the Crestron programming tools: Crestron System Builder™, D3 Pro™ (for lighting and HVAC) and SIMPL Windows. These tools are intended for users with different levels of programming knowledge. The flexibility of each tool is proportional to the degree of programming expertise (i.e., the more flexible, the more a programmer needs to know and account for).
ILT Shade Controller Crestron C2N-SSC-2 Programming with Crestron SystemBuilder or D3 Pro The easiest method of programming, but does not offer as much flexibility as SIMPL Windows. Crestron SystemBuilder offers automatic programming for such residential and commercial applications as audio distribution, home theater, video conferencing, and lighting.
Crestron C2N-SSC-2 ILT Shade Controller SIMPL Windows offers drag and drop functionality in a familiar Windows environment. This section explains how to create a SIMPL Windows program that includes a Shade Controller. Configuration Manager is where programmers “build” a Crestron control system by selecting hardware from the Device Library. In Configuration Manager, drag the PRO2 from the Control Systems folder of the Device Library and drop it in the upper pane of the System Views.
ILT Shade Controller Crestron C2N-SSC-2 system tree displays the C2N-SSC-2 in Slot 9, with a default Net ID of 0C as shown in the following illustration. NOTE: The first C2N-SSC-2 in a system is preset with a Net ID of 0C when its symbol is dragged into the upper pane of System Views. Additional units are assigned different Net ID numbers as they are added. C2Net Device, Slot 9 Setting the Net ID in Device Settings Double-click the C2N-SSC-2 icon in the upper pane to open the “Device Settings” window.
Crestron C2N-SSC-2 ILT Shade Controller “C2N-SSC-2 Device Settings” Window NOTE: This procedure sets the Net ID for the C2N-SSC-2 in the program only. It does not automatically set the Net ID for the Shade Controller itself. NOTE: SIMPL Windows automatically changes Net ID values of a device added to a program if a duplicate device or a device with the same Net ID already exists in the program. Always ensure that the hardware and software settings of the Net ID match.
ILT Shade Controller Crestron C2N-SSC-2 C2N-SSC-2 Symbol in SIMPL Windows Programming Manager 22 • ILT Shade Controller: C2N-SSC-2 Operations & Installation Guide - DOC.
Crestron C2N-SSC-2 ILT Shade Controller The following table lists the symbol input and output signals and their functional descriptions. The table lists the signals and descriptions for shade 1 (Sh1); the same signals repeat for shade 2 (Sh2).
ILT Shade Controller Crestron C2N-SSC-2 C2N-SSC-2 Symbol Signal Descriptions (continued) Signal Type & Name Digital output: Digital output: Digital output: Digital input: Digital input: Description Indicates that Shade 1 is moving. The output remains high while the shade is moving. This does not apply in limit-setting mode. Note: Adjusting the upper or lower limit has no effect on the state of the output.
Crestron C2N-SSC-2 ILT Shade Controller C2N-SSC-2 Symbol Signal Descriptions (continued) Signal Type & Name Digital input: Digital input: Digital input: Digital input: Digital input: Digital input: Description Reports the position of Shade 1 (via ) with each rising edge of the input. Subsequent changes in position are reported for as long as the input remains high.
ILT Shade Controller Crestron C2N-SSC-2 C2N-SSC-2 Symbol Signal Descriptions (continued) Signal Type & Name Analog input: Analog input: Analog output: Analog input: Description Sets the preset number for which a position will be saved (on the rising edge of ) or recalled (on the rising edge of ). Valid values range from 1d to 20d. Out of range values will cause the save and recall inputs to have no effect.
Crestron C2N-SSC-2 ILT Shade Controller Uploading and Upgrading Assuming a PC is properly connected to the entire system, Crestron programming software allows the programmer to upload programs and projects to the system and touchpanel and firmware to the Shade Controllers after their development. However, there are times when the files for the program and projects are compiled and not uploaded. Instead, compiled files may be distributed from programmers to installers, from Crestron to dealers, etc.
ILT Shade Controller Crestron C2N-SSC-2 If a USB-to-serial adapter must be used, Crestron has tested the following devices with good results. Belkin (large model) F5U103 I/O Gear GUC232A (discontinued) Keyspan USA-19QW (discontinued) Other models, even from the same manufacturer, may not yield the same results. The procedure in this section provides details for RS-232 communication between the PC and the control system.
Crestron C2N-SSC-2 ILT Shade Controller 1. Open the Crestron Viewport. Either launch the stand-alone version of Viewport, or start SIMPL Windows and from the menu bar, select Tools | Viewport. 2. Refer to the figure after this step. From the Viewport menu, select Setup | Communications settings (alternatively, press Alt+D) to open the “Port Settings” window. Setup | Communications Settings Command 3. Select RS-232 as the connection type.
ILT Shade Controller Crestron C2N-SSC-2 “Port Settings” Window NOTE: The parameters shown in the illustration above are the port settings for a 2-Series control system. Consult the Operations Guide for the control system being used for exact parameter selection. 4. To verify communication, select Diagnostics | Establish Communications (Find Rack). This should display a window that gives the COM port and baud rate.
Crestron C2N-SSC-2 ILT Shade Controller Uploading a SIMPL Windows Program A control system source file has the extension .smw. A compiled SIMPL Windows file has the extension .spz for a 2Series control system, .bin for CNX generation, and .csz for CNX generation with SIMPL+. The SIMPL Windows file can be uploaded to the control system using SIMPL Windows or via the Crestron Viewport. Upload via SIMPL Windows 1. Start SIMPL Windows. 2.
ILT Shade Controller Crestron C2N-SSC-2 Guide for the control system for details about the other fields shown on the “Send Program” window. “Send Program” Window 4. To verify that the program has been transferred successfully, select Diagnostics | Report Program Information. This should display a window that provides details about the current program loaded into the control system. Firmware Upgrade A firmware upgrade file has the extension .upg.
Crestron C2N-SSC-2 ILT Shade Controller File Transfer | Update Network Device Firmware Command 3. As shown in the “Select Network ID” window, select the Net ID of the C2N-SSC-2, and then click OK. The “Open” window appears (refer to the graphics below and on the next page). “Select Network ID” Window NOTE: When transferring a Cresnet file (touchpanel project/ firmware), lower the port speed baud rate to 38400 to match the Cresnet bus speed. Operations & Installation Guide - DOC.
ILT Shade Controller Crestron C2N-SSC-2 “Open” Window 4. Browse to the desired [filename].upg file and click Open to begin the transfer. Serial Number Assignment These procedures are to be used for Shade Controllers that just received a firmware upgrade enabling TSID support where it was not previously available. 1. Open the Crestron Viewport. 2. From the Viewport menu, select Functions | Assign Serial Number. The “Serial Number Assignment” window appears.
Crestron C2N-SSC-2 ILT Shade Controller 3. Enter the device serial number exactly as it appears on the device label. 4. Use the drop-down list to change the current Cresnet ID. NOTE: Do not select the Broadcast check box unless your Shade Controller is the only one of its type on the network. 5. Click Send to store the serial number and Net ID information into the Shade Controller’s memory. Problem Solving Troubleshooting The table below provides corrective action for possible trouble situations.
ILT Shade Controller Crestron C2N-SSC-2 Further Inquiries If you cannot locate specific information or have questions after reviewing this guide, please take advantage of Crestron's award winning customer service team by calling the Crestron corporate headquarters at 1-888-CRESTRON [1-888-273-7876]. For assistance in your local time zone, refer to the Crestron website (www.crestron.com) for a listing of Crestron worldwide offices. You can also log onto the online help section of the Crestron website (www.
Crestron C2N-SSC-2 ILT Shade Controller Return and Warranty Policies Merchandise Returns / Repair Service 1. No merchandise may be returned for credit, exchange, or service without prior authorization from CRESTRON. To obtain warranty service for CRESTRON products, contact the factory and request an RMA (Return Merchandise Authorization) number. Enclose a note specifying the nature of the problem, name and phone number of contact person, RMA number, and return address. 2.
ILT Shade Controller Crestron C2N-SSC-2 This page intentionally left blank. 38 • ILT Shade Controller: C2N-SSC-2 Operations & Installation Guide - DOC.
Crestron C2N-SSC-2 ILT Shade Controller This page intentionally left blank. Operations & Installation Guide - DOC.
Crestron Electronics, Inc. 15 Volvo Drive Rockleigh, NJ 07647 Tel: 888.CRESTRON Fax: 201.767.7576 www.crestron.com Operations & Installation Guide - DOC. 6318 11.04 Specifications subject to change without notice.