Crestron, the Crestron logo, Cresnet, D3 Pro, Fusion RV, iLux, infiNET EX, and RoomView are either trademarks or registered trademarks of Crestron Electronics, Inc. in the United States and/or other countries. Outlook is either a trademark or registered trademark of Microsoft Corporation in the United States and/or other countries. UL and the UL logo are either trademarks or registered trademarks of Underwriters Laboratories, Inc. in the United States and/or other countries.
230 V Lighting Design Guide Contents Introduction................................................................................ 1 Design Requirements 4 Applied Control Strategies....................................................................................................................... 4 Static and Dynamic Elements................................................................................................................. 4 New and Existing Construction...................................
230 V Lighting Design Guide Appendix B: General Lighting Design Considerations..............66 Task Lighting for Specific Work Areas.................................................................................................... 66 Lighting for Mood and Highlights.......................................................................................................... 67 Appendix C: Glossary of Terms............................................... 68 ii Doc. 4859C | crestron.
230 V Lighting Design Guide Introduction Each lighting control system is unique; therefore, designing and constructing a lighting and automation system to fill the requirements of the client is challenging. Crestron® offers the equipment and flexibility of design required for every one-of-a-kind solution. The World’s Most Powerful Lighting Control Solution Crestron is the world's leading manufacturer of advanced control technologies.
230 V Lighting Design Guide Unmatched Design and Control Flexibility Cresnet® low-voltage wiring and RF control can be used throughout a wide range of system design possibilities, including traditional wiring with local intelligence or distributed, high-voltage wiring with centralized and distributed intelligence systems. The wide range of Crestron multifunction user interfaces replace large banks of traditional switches, dimmers, and timers.
230 V Lighting Design Guide A Crestron solution offers significant energy savings by providing daylight harvesting and automating lights, shades and drapery, thermostats, sprinklers, and fountains based on daylight, time, motion, occupancy, temperature, humidity, and other conditions. By integrating the disparate environmental systems, efficiencies are increased exponentially.
230 V Lighting Design Guide Design Requirements Applied Control Strategies The applied lighting control strategy determines the basic methods used to control the environment. When formulating an overall strategy there are some basic considerations: • Light level control is achieved through dimming controls and daylight controls, where applicable, to adjust the lighting to the appropriate level for different occupant activities.
230 V Lighting Design Guide Lighting and Automation System Design Types There are many ways in which a lighting control system can be organized. Construction type, client requirements, architectural restrictions, and many other factors determine the best solution. In general, retaining control design flexibility produces the most reliable results.
230 V Lighting Design Guide Decentralized Systems A decentralized system is the traditional wiring system of individual lighting circuits with local control. Crestron iLux devices provide the power and flexibility of automated control combined with local control. Decentralized System Example 6 Doc. 4859C | crestron.
230 V Lighting Design Guide Hybrid Systems The most efficient and attractive lighting system designs are a hybrid of centralized processing and distributed dimmers. This provides the reliability of local control along with sophisticated central control, and limits the amount of wall clutter created by too many different controls.
230 V Lighting Design Guide Lighting Product Features Crestron provides the ultimate lighting control solution for any application with dimming, switched control, and sensor activated control for daylight harvesting or security. Timed control can be combined with the ability to remotely manage or monitor any location securely and efficiently. Integrating lighting with A/V controls, shade control, security systems, and building management solutions through a single system has never been easier.
230 V Lighting Design Guide CAEN Installation The enclosure must be mounted by a licensed electrician in accordance with all national and local codes. When choosing components to place in the enclosure, refer to the table below to ensure that the maximum weight capacity is not exceeded. Refer to the module product page on the Crestron website for module weight. CAUTION: These enclosures house equipment that needs to be air-cooled. Therefore, mount in a well-ventilated area.
230 V Lighting Design Guide CAEN-UMP - Universal Mounting Plates Crestron Universal Mounting Plates (CAEN-UMP Series) are a complete line of accessory plates, which allow mounting of non-Crestron equipment to any Crestron Automation Enclosure (CAEN-Series). Third-party products such as phone and alarm systems can be mounted to these plates within an enclosure.
230 V Lighting Design Guide Cover Extension Kits CAEN-CK Cover Kits are designed to extend the depth of the Crestron CAEN and CAENIB automation enclosures, affording 1 1/2 inch (39 mm) additional depth to accommodate excess wiring and third-party devices. Cover Extension Kit Installation Example Doc. 4859C | crestron.
230 V Lighting Design Guide CAENIB Enclosures and Terminal Blocks The CAENIB Series automation enclosures are designed to house Crestron CLXI-Series lighting control modules accompanied by load-side circuit breakers, with space for a PAC2 or PAC2M control system. CAENIB enclosures are available in an assortment of sizes, suitable for surface or flush wall mount installation.
230 V Lighting Design Guide CAENIB-4X1 and CAENIB-4X2 Doc. 4859C | crestron.
230 V Lighting Design Guide CAENIB-7X1 14 Doc. 4859C | crestron.
230 V Lighting Design Guide CAENIB-7X2 Doc. 4859C | crestron.
230 V Lighting Design Guide CLTIBN Terminal Blocks CLTIBN series of terminal blocks with breakers provide an additional option when installing Crestron CLXI-series modules in a Crestron CAENIB automation enclosure. CLTIBN terminal blocks feature inline circuit protection to protect Crestron CLXI modules. CLTIBN terminal blocks ship separately to permit termination of the field wiring to the CLTIBN prior to installation of the corresponding CLXI lighting module.
230 V Lighting Design Guide CLTIBN Terminal Block Installation CAUTION: • RISK OF ELECTRIC SHOCK—MORE THAN ONE DISCONNECT SWITCH MAY BE REQUIRED TO DE-ENERGIZE THE EQUIPMENT BEFORE SERVICING. • This equipment is for indoor use only and needs to be air-cooled. Mount in a well-ventilated area. The ambient temperature must be 0° C to 40° C. The relative humidity must be 0% to 90% (non-condensing).
230 V Lighting Design Guide CAENIB Component Mounting Example 18 Doc. 4859C | crestron.
0 V Lighting Design Guide Lighting Control Modules Concealed in Crestron automation cabinets, the CLXI-Series devices are rigorously built using oversized heat sinks for ultimate reliability. • Split-bobbin transformers and ground-referenced electronics deliver superior performance. • Lamp flicker is minimized through the innovative Crestron zero-crossing detection technique, backed by proprietary firmware. • Low-maintenance convection cooling assures quiet and trouble-free operation.
230 V Lighting Design Guide 230 V Lighting Control Modules Air-gap relays are provided on every channel output allowing individual circuits to be serviced without disabling the entire module. Terminal blocks are sold separately to enable termination of the wiring anytime prior to installing the module.
230 V Lighting Design Guide Terminal Blocks and Modules for CAEN Enclosures The Crestron CLTI Terminal Blocks and Modules are considered a single entity and must be used together. They ship separately to permit termination of the field wiring to the terminal block prior to the installation of the module, and are mounted in any Crestron Automation Enclosure (CAEN-Series Enclosures).
230 V Lighting Design Guide Module Installation A licensed electrician, in accordance with all national and local codes, must mount the terminal blocks and modules in a Crestron Automation Enclosure. Terminal blocks are installed along the left side of single-wide enclosures and along the outside edges (left and right sides) of double-wide enclosures. Modules are installed along the right side of single-wide enclosures and side-by-side in the center of double-wide enclosures.
230 V Lighting Design Guide Double Width Enclosure Mounting The module and associated terminal block are installed in a double width enclosure. The PAC2 processor occupies the lowest module position. PAC2 Processor in Double Width Enclosure Mount Module Bypass Jumpers CAUTION: A bypass jumper is provided to allow testing and to protect the module during installation.
230 V Lighting Design Guide Crestron Network Block (CAEN-BLOCK) provides four termination ports for Cresnet wiring. The unit also has two 5-pin connections that provide communication to the modules. The contact closure override signals that produce an emergency override of the modules are also sent through these connections. The override connector provides external dry contact closure inputs directly to the 5-position Cresnet interconnect connectors, LEFT and RIGHT.
230 V Lighting Design Guide CAEN-BLOCK Location and Orientation in a Double-Wide Enclosure Two and Four Channel Inductor Modules The CLXI-2IND is a 2-inductor terminal block and module kit. The CLXI-4IND is a 4-inductor terminal block and module kit. Inductor modules reduce hum from incandescent lamps that are connected to dimmer modules in a Crestron lighting system. These kits are mounted in any Crestron Automation Enclosure (CAEN-Series and CAENIB-Series Enclosures).
230 V Lighting Design Guide PAC2 Lighting Control Processor • The PAC2 enables efficient control of lighting and other systems such as HVAC and security. • The PAC2 has been specifically designed for the Crestron automation enclosure and the Crestron lighting system, although other Crestron processors can also be used. • The PAC2 occupies one module space in single-width enclosures and two module spaces in double-width enclosures.
230 V Lighting Design Guide PAC2 Connections The PAC2 provides external connections for both a back-up processor and emergency override closure signals. In the absence of Cresnet or in case of a power failure, a signal is generated to switch power and communication of the Cresnet system to a back-up processor.
230 V Lighting Design Guide PAC2 Application Example PAC2 Power Management When power requirements exceed 50 watts, additional power supplies may be added. For example, each keypad in the CNX-B series uses 3 watts; therefore, only 15 keypads (allowing for a margin of safety) can be connected without adding an additional power supply.
230 V Lighting Design Guide Additional power supplies should not be mounted on CAEN-UMP plates in an enclosure that contains dimmer units because this introduces low-voltage in the high-voltage section of the enclosure. If required, an extra power supply, attached to a CAEN-UMP plate, can be added to a separate CAEN enclosure. Refer to the PAC2 Operations Guide (Doc. 5941) on the Crestron website for more information. CAUTION: Use only Crestron power supplies for Crestron equipment.
230 V Lighting Design Guide PAC2M Professional Automation Mini Control System The PAC2M is a compact, low-cost alternative to the PAC2. The PAC2M was designed for small lighting and automation applications and is half the size of a PAC2. Its smaller size makes it a perfect choice for apartments and smaller homes as well as individual meeting rooms, lecture halls, and MDU applications.
230 V Lighting Design Guide PAC2M Connections Example Doc. 4859C | crestron.
230 V Lighting Design Guide Cresnet Distribution Cresnet is the communications backbone for Crestron lighting modules, wall box dimmers, thermostats, keypads, and many other devices. This flexible 4-wire bus streamlines the wiring of a complete Crestron lighting system. The PAC2M provides connectivity for numerous Cresnet devices on multiple homeruns via eight separate Cresnet ports.
230 V Lighting Design Guide Override Input An override input is provided to allow an external contact closure to bypass the PAC2M and activate a preset override state in each connected lighting module. Override Input Example Memory Expansion A memory card slot allows for easy expansion of the PAC2M internal memory using any MMC-compatible memory card up to 1 GB. Doc. 4859C | crestron.
230 V Lighting Design Guide Double Width Enclosure Mounting The module and associated terminal block are installed in a double width enclosure. The PAC2M processor occupies the lowest module position in either the single or double enclosure. Refer to the PAC2M Operations Guide (Doc. 6507) on the Crestron website for more information. Double Width Enclosure Mounting Example 34 Doc. 4859C | crestron.
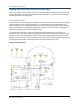
230 V Lighting Design Guide Basic Lighting System Interconnections An example of a Crestron lighting system that includes thermostat, security, shade and drapery control, and interfaces is shown below. Crestron Lighting System Interconnection Example Doc. 4859C | crestron.
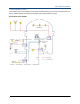
230 V Lighting Design Guide CLXI-Series Application Example NOTES: 36 • A module terminal block (CLTI-Series device) must also be ordered for each module. The corresponding CLTI terminal block is installed in the enclosure for high voltage wire termination. Each terminal block includes a terminal rail for mounting the terminal block in the enclosure. Terminal rails and blocks do not occupy a module space within an enclosure.
230 V Lighting Design Guide iLux iLux is a complete, integrated lighting system designed for wall mount installation in boardrooms, auditoriums, home theaters, or anywhere versatile and cost-effective control of lighting and shades is required.
230 V Lighting Design Guide Multi-Unit Expansion One CLSI-C6 master supports up to eight additional CLSI-C6 (or CLSI-C6M) units, enabling systems of up to 54 lighting zones and 54 shade groups. Commands for typical functions like scene recall, scene off, master dimming, and occupancy status are shared between the CLSI-C6 units. Each individual unit can still support a complete assortment of local devices including keypads, shade controllers, and motion detectors.
230 V Lighting Design Guide Control System Integration The CLSI-C6 features two separate Cresnet control networks, one for local devices and one for connection to a 2-Series control system. Connecting the CLSI-C6 to a control system allows its functions to be controlled from touch screens, RF wireless remotes, and even computers.
230 V Lighting Design Guide Wireless iLux Remote The CLS-IRHT8 is a compact IR wireless remote designed specifically for use with the Crestron iLux Integrated Lighting Systems. The CLS-IRHT8 provides buttons for master up/ down control, plus activation of scenes 1-4, ON, and OFF. The CLS-IRHT8 is non-programmable and operates on two AA batteries (included). CLS-IRHT8 iLux Application Diagrams Application 1: Standalone Simple control of up to six lighting loads and six shade control groups.
230 V Lighting Design Guide Application 2: Primary iLux Control with Secondary iLux Controls, for Large Rooms with More Than Six Lighting Loads Up to eight additional iLux controls, each with up to six lighting loads and six shade control groups. Scene recall and master dimmers affect the entire room. Each circuit can be adjusted individually. No external control system required. NOTES: • Shade and drapery control requires additional hardware.
230 V Lighting Design Guide Application 3: Primary iLux Control with Secondary iLux Controls and 2-Series Control System The control system can monitor and control the operation of the entire lighting system. Lighting scenes can be triggered from touch screens, RF wireless remotes, computers, or a real-time clock. The control system also enables alternate button functions for iLux devices. The lighting system operates independently if the control system is not running.
230 V Lighting Design Guide Application 4: Primary iLux Control with Secondary iLux Controls and 2-Series Control System for Large Rooms of More Than Six Lighting Loads The control system can monitor and control the operation of the entire lighting system. Lighting scenes can be triggered from touch screens, RF wireless remotes, computers, or a real-time clock. The control system also enables alternate button functions for iLux devices.
230 V Lighting Design Guide Application 5: 2-Series Control System with Multiple iLux Devices on Main Cresnet Network Monitor and control lighting in multiple independent rooms. Combine rooms in any arrangement under program control. Each individual iLux device can operate without a control system, with a control system, and even with RoomView remote asset management. NOTES: 44 • Shade and drapery control requires additional hardware.
230 V Lighting Design Guide iLux Designer The Crestron iLux Designer provides all the tools necessary to quickly program a complete 6-zone lighting and shade control solution based on the iLux CLSI-C6 and CLSI-C6M models. The iLux Designer provides easy programming of all front panel button functions and keypads, including scene recalls, scene toggles, fade times, ramp rate, master dim control, master shade control, and scene programming based on occupancy status.
230 V Lighting Design Guide Keypads View - add up to 16 keypads to the local CLSI-C6 network, and assign functions to the keypad buttons. 46 Finish View - send the project to the CLSI-C6, set network IDs, retrieves local settings from the CLSI-C6, and print reports. Doc. 4859C | crestron.
230 V Lighting Design Guide Shade and Drape Controllers C2N-SDC-DC The C2N-SDC-DC is a 2-channel shade and drapery controller designed to provide a convenient and cost-effective solution for controlling 24 Vdc motorized shades and drapes. The C2N-SDC-DC is a Cresnet device with two independently controlled 24 Vdc outputs, each designed to provide standard up and down or open and close control of a conventional two-wire bidirectional type motor.
230 V Lighting Design Guide Heat/Cool Systems • Radiant heat is a form of hydronic (hot water) heat that circulates hot water through pipes (baseboard radiation systems) or special tubing and installs on the perimeter of the house or underneath floors. • In a ducted heating and cooling system, a large fan (blower) forces heated air from the furnace into the ducts and enters the rooms through a register or grill in the floor or wall.
230 V Lighting Design Guide SLAB 4B: Same operation as SLAB 4A, but intended for a heat pump type second stage. Relay output connections are terminal W1 for slab heat, with heat pump-type connections on terminals Y1/O/G for cooling and heating calls. Auxiliary heat is on terminal W2. SLAB 5A: One stage space heat and cool with floor warming. Combines the operation of a space heating/cooling thermostat with a floor-warming thermostat.
230 V Lighting Design Guide Sensor Mounting for the CHV-RTS and CHV-RTHS NOTE: Crestron strongly recommends low-capacitance twisted pair wire such as CAT3 (up to 76 m) or CAT5 (up to 152 m) network cable when using remote sensors. The maximum distance from sensor to thermostat is 150 m. If multiconductor cables are used, the leftover conductors must NOT be used for other purposes and must be left unconnected at both ends.
230 V Lighting Design Guide User Interface Selection User interfaces (keypads, dimmers, switches, and touch screens) provide the link between the control devices in the enclosure and the user. Typically these interfaces are prominently and strategically located throughout a lighting design. The lighting designer or integration contractor specifies the type of user interface required for each location, based on function and user preference.
230 V Lighting Design Guide Touch Screen Interfaces Control any room, the entire home or facility, conveniently from any of the beautiful, stylish touch screen or remote control. With such a wide selection to choose from, Crestron provides the perfect piece to meet the needs of the customer and complement any space. Refer to the Crestron website for a complete list of current touch screen models.
230 V Lighting Design Guide Scheduling Panels Network scheduling via Outlook® on Crestron touch screens connects the right people, spaces, and technology so meetings go smoothly. Room status is clearly displayed on the panel. Complete connectivity is provided through a single high-speed Ethernet connection, containing all control and power signals within a single wire. TPMC-4SM-FD Smaller Format Touch Screens Small format touch screens access all the features within a very small footprint. Use the 4.
230 V Lighting Design Guide Specifying a Lighting System Load Schedule A lighting system design begins with a collection of complete information. This includes a detailed floor plan identifying all the required elements. The first element of design, the load schedule, is developed from the floor plan. Refer to "Appendix A: Load Schedule with Panel Terminations" on page 65 for a blank load schedule.
230 V Lighting Design Guide Load Schedule Example The numbered items in the load schedule example below correspond to and are explained in the numbered list that follows.
230 V Lighting Design Guide Equipment List Specification The equipment list is based on the requirements collected for the lighting system in the load schedule. This is a sequential step-by-step process. The information gathered in previous steps is required to complete following steps. Once all the steps are completed, a complete Bill of Materials (BOM) for the system is created: • Module selection is based on the number and type of loads.
230 V Lighting Design Guide Wiring Plan The wiring plan includes all enclosures and the interconnecting wiring. The designer determines the location of the enclosure(s), the route of keypad and touch screens connections to the enclosure(s), the route of the interconnecting cable from the processor to the other enclosure(s), and the high voltage load routes to the enclosure or dimmer. Ensure there are enough connectors and power (PAC2 offers 50 W) in the main enclosure for all the user interfaces.
230 V Lighting Design Guide Crestron Lighting Software D3 Pro Crestron D3 Pro software offers design, development, and documentation for a complete residential lighting system, with additional support for auxiliary devices such as security systems, motion detectors, and shades. Programming is accomplished through a series of simple but powerful system views designed for lighting professionals.
230 V Lighting Design Guide iLux Designer Screen Examples Doc. 4859C | crestron.
230 V Lighting Design Guide RoomView Express Crestron RoomView Express is a powerful AV asset management software that allows the user to keep track of all the rooms in the facility. While connected to each room, RoomView displays system and projector power status, lamp life, alerts, and other vital statistics. This graphic-rich interface empowers AV managers to intelligently manage and support every room.
230 V Lighting Design Guide Fusion RV Fusion RV® is the AV and technology management component of Crestron Fusion. View room status, track maintenance on devices, schedule end-of-day shutdown, book meetings in rooms, provide remote help desk assistance, capture and distribute multimedia presentations, and more—all from the web-based interface. Fusion RV Screen Example Doc. 4859C | crestron.
230 V Lighting Design Guide Ordering a Crestron Lighting Control System Hardware These are the steps for ordering a Crestron lighting control system, regardless of the size. Each system and module contains the appropriate installation literature and operation guide. Order a lighting system by following the steps below: STEP 1: Survey all controlled lights and loads.
230 V Lighting Design Guide Lighting System Example Doc. 4859C | crestron.
230 V Lighting Design Guide Bedroom Circuit Number Load Dim? Interface Module 001 002 003 004 005 016 017 018 Downlights Downlights Closet Downlights Downlights Drapery Motors Drapery Motors Drapery Motors Yes Yes Yes Yes Yes N/A N/A N/A Keypad Keypad Keypad iLUX iLUX iLUX iLUX iLUX CLXI-1DIM8 CKT DIM 1 CLXI-1DIM8 CKT DIM2 CLXI-1DIM8 CKT DIM3 CLSI-C6 CLSI-C6 C2N-SDC-DC C2N-SDC-DC C2N-SDC-DC Circuit Number Load Dim? Interface Module 006 007 008 009 022 Downlights Fan Motor Downlights Downligh
230 V Lighting Design Guide Appendix A: Load Schedule with Panel Terminations Project Creator Date Area Room Page Zone Voltage Doc. 4859C | crestron.
230 V Lighting Design Guide Appendix B: General Lighting Design Considerations Crestron provides many options for illumination control. The following general lighting design information can help formulate a complete, energy efficient lighting design plan. Light plays an essential role in the ability to perceive the world, playing a critical role in how space is perceived. Lighting can affect performance, mood, morale, safety, security, and decisions.
230 V Lighting Design Guide Lighting for Mood and Highlights There are several different types of mood lighting as described in the sections that follow. Ambient Lighting Ambient light is the general, overall light that fills in shadows, reduces contrast, and lights vertical lighting sets a dramatic or subtle mood within a living space. Use ambient lights to illuminate hallways, entryways, artwork and architectural highlights in the home.
230 V Lighting Design Guide Appendix C: Glossary of Terms A AMPERE: The standard unit of measurement for electric current that is equal to one coulomb per second. It defines the quantity of electrons moving past a given point in a circuit during a specific period, abbreviated amp. ANSI: Abbreviation for American National Standards Institute. ARC TUBE: A tube enclosed by the outer glass envelope of an HID lamp and made of clear quartz or ceramic that contains the arc stream.
230 V Lighting Design Guide C COLOR RENDITION: The appearance of colors when illuminated by a light source. Color rendition is generally considered to be a more important lighting quality than color temperature. Most objects are not a single color, but a combination of many colors. Light sources that are deficient in certain colors can change the apparent color of an object. The Color Rendition Index (CRI) is a 1–100 scale that measures a light source's ability to render colors the same way sunlight does.
230 V Lighting Design Guide E EFFICACY: A metric used to compare light output to energy consumption. Efficacy is measured in lumens per watt. Efficacy is similar to efficiency, but is expressed in dissimilar units. For example, if a 100-watt source produces 9000 lumens, then the efficacy is 90 lumens per watt.
230 V Lighting Design Guide H HID: Abbreviation for high intensity discharge. Generic term describing mercury vapor, metal halide, high-pressure sodium, and (informally) low-pressure sodium light sources and luminaires. HIGH BAY: Pertains to the type of lighting in an industrial application where the ceiling is 20 feet or higher. Also describes the application itself. HIGH OUTPUT (HO): A lamp or ballast designed to operate at higher currents (800 mA) and produce more light.
230 V Lighting Design Guide L LIGHT LOSS FACTOR (LLF): Factors that allow for a lighting system's operation at less than initial conditions. These factors are used to calculate maintained light levels. LLFs are divided into two categories, recoverable and nonrecoverable. Examples are lamp lumen depreciation and luminaire surface depreciation. LIFE-CYCLE COST: The total costs associated with purchasing, operating, and maintaining a system over the life of that system.
230 V Lighting Design Guide N NADIR: A reference direction directly below a luminaire, or straight down (0 degree angle). NPF (NORMAL POWER FACTOR): A ballast/lamp combination in which no components (e.g., capacitors) have been added to correct the power factor, making it normal (essentially low, typically 0.5 or 50%). O OCCUPANCY SENSOR: Control device that turns lights off after the space becomes unoccupied. May be ultrasonic, infrared, or other type.
230 V Lighting Design Guide R RADIO FREQUENCY INTERFERENCE (RFI): Interference to the radio frequency band caused by other high frequency equipment or devices in the immediate area. Fluorescent lighting systems generate RFI. RAPID START (RS): The most popular fluorescent lamp/ballast combination used today. This ballast quickly and efficiently preheats lamp cathodes to start the lamp. Uses a bi-pin base.
230 V Lighting Design Guide T T12 LAMP: Industry standard for a fluorescent lamp that is 12 1/8 inch (1 inch, 2.55 cm) in diameter. Other sizes are T10 and T8 lamps. TANDEM WIRING: A wiring option in which a ballast is shared by two or more luminaires. This reduces labor, materials, and energy costs. Also called master-slave wiring. THERMAL FACTOR: A factor used in lighting calculations that compensates for the change in light output of a fluorescent lamp due to a change in bulb wall temperature.
230 V Lighting Design Guide W WORK PLANE: The level at which work is done and at which illuminance is specified and measured. For office applications, this is typically a horizontal plane 76 cm above the floor (desk height). Z ZENITH: The direction directly above the luminaire (180° angle). 76 Doc. 4859C | crestron.
230 V Lighting Design Guide This page intentionally left blank. Doc. 4859C | crestron.
Crestron World Headquarters 15 Volvo Drive Rockleigh, NJ 07647 Tel: 888.CRESTRON Fax: 201.767.7576 crestron.com Refer to the listing of Crestron worldwide offices on the Crestron website (www.crestron.com/offices) for assistance within a particular geographic region. Printed in USA Doc.