
User Guide
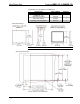
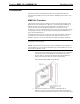
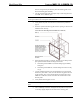
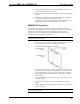

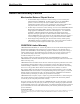
Table Of Contents
Crestron MMK-12L & WMKM-12L Mud Mount Kits
10. Apply drywall joint compound as needed to finish the cutout. Avoid
covering the four tapped mounting holes.
11. Run the necessary cables for the touchpanel and secure them behind the
drywall.
12. When dry, the touchpanel can be installed using the four tapped holes
in the PMK-12L. Refer to the latest revision of the
TPS-12L/15L/17L Operations Guide (Doc. 6355) or TPS-12G/15G-L
Operations Guide (Doc. 6356) for installation instructions.
WMKM-12L Procedure
The procedure in this section provides the necessary steps for the assembly and
installation of the WMKM-12L into a wall. Complete the steps in the order provided.
The only tools or materials required and not supplied are a drywall saw or
equivalent, a level, four standard drywall screws, #2 Phillips screwdriver, and
tools/material to apply drywall joint compound.
CAUTION: Allow an air gap of at least 12 inches in the wall cavity above the
touchpanel for heat dissipation.
1. Insert the two pins on one fastener plate into the top two outer holes on
the mounting plate, as shown in the following illustration.
Create the Fastener/Mounting Plate Assembly
2. Slide a push-on fastener over each pin on the fastener plate to loosely
secure the fastener plate and the mounting plate. Do not push the push-
on fasteners all the way down onto the pins. Slide them on enough to
keep the fastener plate and mounting plate as one fastener/mounting
plate assembly.
3. Use the second fastener plate and repeat steps 1 and 2 using the lower
two PMK-12L pins.
4. Locate an area on the wall that is free of miscellaneous wiring and
studs.
5. Make a small hole near the middle of the designated site; verify that the
location is suitable.
NOTE: Make the cutout as level as possible. The mounting plate allows for only
minor leveling adjustments.
Installation Guide – DOC. 6359 Mud Mount Kits: MMK-12L & WMKM-12L
• 5