
User Guide

Crestron MMK-4000L & WMKM-4000L Mud Mount Kits
Installation
This section provides an installation procedure for each Mud Mount Kit. The
procedure for the MMK-4000L starts below and the “WMKM-4000L Procedure”
starts on page 5.
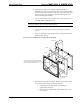
MMK-4000L Procedure
The procedure in this section provides the necessary steps for the assembly of the
MMK-4000L to either the PMK-4000L or BB-4000L. It is assumed that the
PMK-4000L or BB-4000L has been secured to the stud according to the procedures
in the latest revisions of their respective Installation Guides (Doc. 6304 and Doc.
6305, respectively). Also, it is assumed that drywall is in place and a rectangular
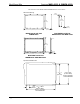
cutout for the touchpanel is made in the drywall (refer to the Drywall Cutout
dimensions on the previous page for cutout dimensions).
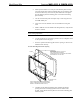
Complete the steps in the order provided. The only tools or materials required and
not supplied are a drywall saw or equivalent, four standard drywall screws, #2
Phillips screwdriver, a level, and tools/material to apply drywall joint compound.
NOTE: The illustrations in this procedure show the installation of the MMK-4000L
with the PMK-4000L. Even though the illustrations only show the PMK-4000L, they
are identical for the BB-4000L as well.
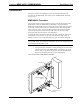
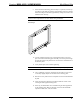
1. Pass a fastener plate through the opening and align its two center holes
with the top two pins on the PMK-4000L. Verify that the pins on the
fastener plate are not between the fastener plate and the PMK-4000L.
Refer to the illustration after this step for visual guidance.
Secure Fastener Plates to PMK-4000L (or BB-4000L)
PMK-4000L
(2004825)
(2) FASTENER PLATE
(2004121)
(4) PUSH-ON FASTENER
Installation Guide – DOC. 6303 Mud Mount Kits: MMK-4000L & WMKM-4000L
• 3