
User Guide

Mud Mount Kits Crestron MMK-4000L & WMKM-4000L
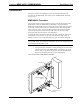
2. Slide a push-on fastener over each pin on the fastener plate to loosely
secure the fastener plate and the mounting plate. Do not push the push-
on fasteners all the way down onto the pins. Slide them on enough to
keep the fastener plate and mounting plate as one fastener/mounting
plate assembly.
3. Use the second fastener plate and repeat steps 1 and 2 using the lower
two PMK-4000L pins.
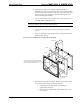
4. Locate an area on the wall that is free of miscellaneous wiring and
studs.
5. Make a small hole near the middle of the designated site; verify that the
location is suitable.
NOTE: Make the cutout as level as possible. The mounting plate allows for only
minor leveling adjustments.
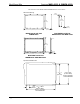
6. Use the drywall saw or equivalent to produce a level, rectangular cutout
in the drywall as shown on page 2.
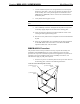
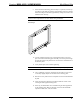
7. Insert the symmetrical mud ring plate into the opening, as shown in the
illustration after this step.
Insert the Mud Ring Plate into the Opening
MUD RING PLATE
DRYWALL THICKNESS BY MORE THAN 1/2"
)
.
OTHER), SCREW LENGTH SHOULD NOT EXCEED
HOLES FOR DRYWALL SCREWS (PROVIDED BY
IMPORTANT:
PLEASE MAKE DRYWALL CUTOUT AS
LEVEL AND CLEAN AS POSSIBLE.
THE MOUNTING PLATE ALLOWS FOR ONLY MINO
R
ADJUSTMENT OF THE TPS-4000L.
(2011517)
FLANGE
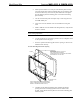
8. Carefully pass the fastener/mounting plate assembly through the
opening and rest the assembly against the interior surface of the
drywall. Verify that the fastener plates are between the mounting plate
and the drywall.
6
• Mud Mount Kits: MMK-4000L & WMKM-4000L Installation Guide – DOC. 6303