
User Guide

Crestron MMK-4000L & WMKM-4000L Mud Mount Kits
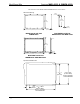
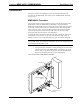
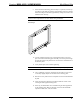
9. When the fastener/mounting plate assembly is in position, bend the top
two flanges of the mud ring upward (approximately 90 degrees) and the
bottom two flanges downward (approximately 90 degrees). Refer to the
illustration after this step.
NOTE: Fastener/mounting plate assembly will have slight play; this is normal. It
allows for minor adjustments to the TPS-4000L during installation.
Bend Flanges
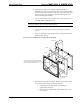
10. Use four standard drywall screws (of adequate length) to secure the
plate to the fastener/mounting plate assembly. The screws pass through
the clearance holes in the plate and are secured in the extruded holes of
the fastener plates.
11. Verify that the plate is level before tightening.
NOTE: Do not over tighten screws. Doing so may over-dimple or rip the plate.
12. Use a #2 Phillips screwdriver and tighten the drywall screws by hand
so that they slightly dimple into the holes in the mud ring plate.
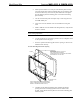
13. Run the necessary cables for the touchpanel and secure them behind the
drywall.
14. Apply drywall joint compound as needed to finish the cutout. Avoid
covering the four tapped mounting holes.
15. When dry, the TPS-4000L can be installed using the four tapped holes
in the mounting plate. Refer to the latest revision of the TPS-4000L
Operations Guide (Doc. 6301) for details.
Installation Guide – DOC. 6303 Mud Mount Kits: MMK-4000L & WMKM-4000L
• 7