Crestron NAT Network Address Translator Reference Guide
This document was prepared and written by the Technical Documentation department at: Crestron Electronics, Inc. 15 Volvo Drive Rockleigh, NJ 07647 1-888-CRESTRON All brand names, product names and trademarks are the property of their respective owners. 2002 Crestron Electronics. Inc.
Crestron NAT 2-Series Feature Contents Network Address Translator: NAT 1 Introduction ............................................................................................................................... 1 Features/Functions of Crestron NAT .......................................................................... 1 Crestron Implementation ............................................................................................. 2 Setup ......................................................
Crestron NAT 2-Series Feature Network Address Translator: NAT Introduction The purpose of this document is to describe Crestron’s implementation of the Network Address Translator (NAT) with respect to a 2-Series Control system with the optional Z-Bus card (C2ENET-2) installed.
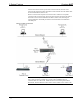
2-Series Feature Crestron NAT In local area networks, a node is any device connected to the LAN. The IP NAT protocol is a router protocol that allows transparent communication between nodes on an internal network and nodes on an external network. Since nodes on an internal network are not assigned globally unique IP addresses, Transparent, in this context, signifies transparent communication with an external network, without NAT, would be that the external devices are unaware impossible.
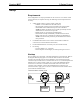
Crestron NAT 2-Series Feature Only one IP address is required if NAT is employed. The touchpanels on the LAN are recognized only by the single external IP address and distinguished by five unique external port numbers – one for each touchpanel on the LAN. From the “Crestron Viewport TCP/IP Connect” window, enter the single IP address, colon, and external port number, as shown below.
2-Series Feature Crestron NAT when an internal node sends a packet to the external network, the NAT router intercepts the packet and replaces all instances of the internal source IP address with the external IP address (68.42.78.12). When an external node responds to an internal node or initiates an acceptable connection with an internal node, the NAT router intercepts the packet and replaces all instances of the external destination IP address (68.42.78.
Crestron NAT 2-Series Feature Setup Requirements NAT configuration can only be performed via the web server of a 2-Series control system. Therefore, to complete the setup, the following network requirements are necessary. • Z-Bus Capable 2-Series Crestron control system with - C2ENET-2 card installed into the Z-Bus (slot 8) - the appropriate operating system (C2-2004.
2-Series Feature Crestron NAT IP Setup It is necessary to configure the control system NAT (C2ENET-2 card installed) to communicate over Ethernet using standard IP. The control system and router for the internal network are assigned IP numbers using Viewport. The instructions assume that the C2ENET-2 is installed, and the PC and control system are powered up. NOTE: It is assumed that your PC is communicating with the powered control system via RS-232 and the appropriate update file has been loaded.
Crestron NAT 2-Series Feature 5. Open the Crestron Viewport and select Functions | Set Control System IP Information from the menu bar. The “Set Control System IP Address” window opens. Pulldown from Menu Bar “Set Control System IP Address” Window 6. Reference Guide – DOC. 6001 Enter the external (LAN A) and internal (LAN B) IP numbers in the New IP Address fields and the router number in the New Default Router field. The subnet mask numbers (New IP Mask fields) are set automatically.
2-Series Feature Crestron NAT 7. Click OK to accept the values. The “Success” window opens. “Success” Window 8. Click OK to enable the control system to reboot. 9. Disconnect the RS-232 cable from your PC and the control system. Configuration From a PC access the control system (C2ENET-2 card installed) web server via a browser. The web server contains SETUP, PORTMAP, and PASSWORD pages, which enable NAT. Open the browser and enter the address http://xxx.xxx.xxx.xxx/setup/admin.ssi where xxx.xxx.
Crestron NAT 2-Series Feature Configure the following values: Host Name Assign an easy-to-remember identifier in the Host Name field. Rather than having to recall IP address of the control system, the Host Name identifies the system. Host name assignment is completely arbitrary, therefore be descriptive as possible. However, valid characters are ‘0’ to ‘9’, ‘A’ to ‘Z’, ‘a’ to ‘z’, and ‘-‘. The maximum length is 64 characters. Leaving the field blank will not deter operation.
2-Series Feature Crestron NAT Portmap Page The PORTMAP page, shown below, permits public access from the external network onto the internal network. The IP address of the internal network is protected by reassignment of port numbers via NAT. Port numbers are used to route the packets to the correct process, or program running on the network-aware device.
Crestron NAT 2-Series Feature installed), colon (:), and external port (number for the item) from the Crestron Viewport. For example, to upload to the touchpanel in Conference Room 1, select Remote | TCP/IP | Connect and enter 68.42.78.12:1003 in the window as shown below. Click on the Connect button to access the touchpanel on the internal network. Crestron Viewport TCP/IP Connect Window Protocol Options for protocol are: TCP, UDP, or Both.
2-Series Feature Crestron NAT Password Page The PASSWORD page, shown below, protects the NAT administrative rights from other users. Enter the same password in both fields and click the Apply button. PASSWORD Page Once a password is applied, the “Enter Network Password” window appears so that the user can verify the password. Although the User Name field is not implemented at this time, Crestron suggests that “admin” be entered so that users become accustomed to entering something into the field.
Crestron NAT 2-Series Feature NAT Related Console Commands (for 2 Series only) COMMAND ADDPORTMAP NATENABLE NATREMOTE PASSWORD REMPORTMAP SHOWPORTMAP WEBPORT XPUTFILE Reference Guide – DOC.
2-Series Feature Crestron NAT Software License Agreement This License Agreement (“Agreement”) is a legal contract between you (either an individual or a single business entity) and Crestron Electronics, Inc. (“Crestron”) for software referenced in this guide, which includes computer software and, as applicable, associated media, printed materials, and “online” or electronic documentation (the “Software”).
Crestron NAT 2-Series Feature If You are a business or organization, You agree that upon request from Crestron or its authorized agent, You will within thirty (30) days fully document and certify that use of any and all Software at the time of the request is in conformity with Your valid licenses from Crestron of its authorized agent. Without prejudice to any other rights, Crestron may terminate this Agreement immediately upon notice if you fail to comply with the terms and conditions of this Agreement.
2-Series Feature Crestron NAT Return and Warranty Policies Merchandise Returns / Repair Service 1. No merchandise may be returned for credit, exchange, or service without prior authorization from CRESTRON. To obtain warranty service for CRESTRON products, contact the factory and request an RMA (Return Merchandise Authorization) number. Enclose a note specifying the nature of the problem, name and phone number of contact person, RMA number, and return address. 2.
Crestron NAT 2-Series Feature This page intentionally left blank. Reference Guide – DOC.
Crestron Electronics, Inc. 15 Volvo Drive Rockleigh, NJ 07647 Tel: 888.CRESTRON Fax: 201.767.7576 www.crestron.com Reference Guide – DOC. 6001 12.02 Specifications subject to change without notice.