
Specifications

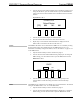

PROCISE™ Surround Sound Processor Crestron PSPHD
NOTE: If you change the position of the NETWORK/DIRECT
switch again on the PROAMP-7X400, you must then power cycle the
device in order for the new setting to take effect.
4. On the PSPHD, open the Network Setup section as described on page
35.
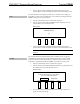
5. Turn the selection knob until “Pair Crestron Amplifier” is displayed.
Press the selection knob to open the Amplifier Pairing Control.
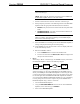
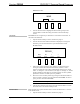
Amplifier Pairing Control
AMPLIFIER PAIRING
Crestron Amplifier Connection
Network Direct
SOURCE MODE SETUP INFO
6. Turn the selection knob to highlight Direct as the connection type
between the PSPHD and the PROAMP amplifier.
NOTE: The PSPHD and the PROAMP amplifer must be set to the
same connection type.
7. Press the selection knob to select the “Direct” connection type.
8. The PSPHD automatically reboots. After the PSPHD reboots, the
PSPHD and the PROAMP amplifier are paired.
Unpairing:
To unpair the PSPHD from the PROAMP amplifier, perform the following:
1. On the PSPHD, open the Network Setup section as described on page 35.
2. Turn the selection knob until “Pair Crestron Amplifier” is displayed, and
then press the selection knob to open the Amplifier Pairing Control.
3. When prompted, turn the selection knob to highlight the “Clear” option,
and then press the selection knob.
4. When prompted by the PSPHD display as to whether you are sure that you
want to clear the pairing information, turn the selection knob to “Yes”, and
then press the selection knob. The PSPHD automatically reboots. After the
PSPHD reboots, it is unpaired.
5. On the PROAMP amplifier, press and hold the RESET button on the front
panel while you power cycle the device. The LEDs on the front panel blink,
indicating that the PROAMP amplifier is unpaired.
IP Address
The PSPHD’s IP address can be displayed and changed. To display and change the
PSPHD’s IP address:
1. Open the Network Setup section described on page 35.
38 • PROCISE™ Surround Sound Processor: PSPHD Operations Guide – DOC. 6837B