Crestron QM-MD16X16 16X16 QuickMedia™ Matrix Switcher Operations Guide
This document was prepared and written by the Technical Documentation department at: Crestron Electronics, Inc. 15 Volvo Drive Rockleigh, NJ 07647 1-888-CRESTRON All brand names, product names and trademarks are the property of their respective owners. ©2007 Crestron Electronics, Inc.
Crestron QM-MD16X16 16X16 QuickMedia™ Matrix Switcher Contents 16X16 QuickMedia™ Matrix Switcher: QM-MD16X16 1 Introduction ............................................................................................................................... 1 Features and Functions ................................................................................................ 1 Applications.................................................................................................................
Crestron QM-MD16X16 16X16 QuickMedia™ Matrix Switcher 16X16 QuickMedia™ Matrix Switcher: QM-MD16X16 Introduction Features and Functions • • • • • • • • 16 input by 16 output QuickMedia matrix switcher QuickMedia technology carries high-resolution RGB, video, stereo audio and microphone signals up to 450 feet using either Crescat-QM-P or Crescat-QM-NP QuickMedia cable from Crestron® Audio breakaway can route audio signals independent of video signals Expands number of inputs and outputs of existing Quick
16X16 QuickMedia™ Matrix Switcher Crestron QM-MD16X16 Complete system operation can be made transparent to the end-user with all signal routing occurring under the command of the MediaManager control system. Control and monitoring of the QM-MD16X16 is also possible independent of the control system using its front panel pushbuttons and LEDs. Customizable label strips are provided to easily designate inputs and outputs by name using Crestron Engraver software or standard 3/8" tape labels.
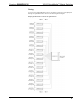
Crestron QM-MD16X16 16X16 QuickMedia™ Matrix Switcher For more information on this and other QM applications, refer to the latest revision of the Crestron MediaManager Applications Guide (Doc. 6244) which is available from the Crestron website (http://www.crestron.com/manuals). Block Diagrams The following diagrams represent the switching abilities of the QM-MD16X16, the internal hub functions of the QM-MD16X16, and the tiering abilities of multiple QM-MD16X16s in a QucikMedia environment.
16X16 QuickMedia™ Matrix Switcher Crestron QM-MD16X16 Internal Cresnet Hub The QM-MD16X16 has an internal four-segment Cresnet hub for routing Cresnet data. Each segment operates independent of each other to allow the QM-MD16X16 to continue functioning in the event of a hub segment experiencing an electrical short or a device error.
Crestron QM-MD16X16 16X16 QuickMedia™ Matrix Switcher Tiering Up to two tiers of QM-MD16X16s can be cascaded to provide up to 256 QM inputs through one QM-MD16X16 as shown in the following block diagram. Multiple QM-MD16X16s Cascaded to One QM-MD16X16 Operations Guide – DOC.
16X16 QuickMedia™ Matrix Switcher Crestron QM-MD16X16 Specifications Specifications for the QM-MD16X16 are listed in the following table. QM-MD16X16 Specifications SPECIFICATION DETAILS Video/RGB Switcher 16X16 crosspoint matrix; routes any of (16) QM video input signals to any of (16) QM outputs Gain 0 dB Audio Switcher 16X16 crosspoint matrix; routes any of (16) QM audio input signals to any of (16) QM outputs Gain 0 dB Power Requirements Cresnet Power Usage 45 Watts (1.
Crestron QM-MD16X16 16X16 QuickMedia™ Matrix Switcher Physical Description This section provides information on the connections, controls and indicators available on your QM-MD16X16. QM-MD16X16 Physical View (Front) QM-MD16X16 Physical View (Rear) Operations Guide – DOC.
16X16 QuickMedia™ Matrix Switcher Crestron QM-MD16X16 QM-MD16X16 Overall Dimensions 16.90 in 42.93 (cm) 10.03 in (25.48 cm) 10.42 in (26.47 cm) 17.03 in (43.24 cm) 1 3 4 5 6 7 8 3.47 in (8.81 cm) 2 9 11 11 10 11 11 14 15 12 8 • 16X16 QuickMedia™ Matrix Switcher: QM-MD16X16 13 Operations Guide – DOC.
Crestron QM-MD16X16 16X16 QuickMedia™ Matrix Switcher Connectors, Controls & Indicators # CONNECTORS1, CONTROLS & INDICATORS 1 PWR LED Indicates 24 Volts DC power supplied from Cresnet control network via main NET connector. 2 NET LED Indicates communication with Cresnet system via the main NET port. 3 AUDIO BREAK 4 AUDIO (1) pushbutton & red LED, selects audio routing in Local mode when audio breakaway is enabled, selects audio routing view in System mode.
16X16 QuickMedia™ Matrix Switcher Crestron QM-MD16X16 Connectors, Controls & Indicators (Continued) # CONNECTORS1, CONTROLS & INDICATORS DESCRIPTION 10 OUT 1 through 16 (16) pushbuttons & red LEDs, select output destination(s) in Local mode, select routing view for a given output in System mode.
Crestron QM-MD16X16 16X16 QuickMedia™ Matrix Switcher RJ-45 PIN NUMBER WIRE COLORS (EIA 568B) QM ASSIGNMENT: RGB QM ASSIGNMENT: COMPOSITE, S-VIDEO, COMPONENT AND AUDIO 1 WHITE/ORANGE - RGB RED - CHROMINANCE (- Pr) 2 ORANGE + RGB RED + CHROMINANCE (+ Pr) 3 WHITE/GREEN - RGB GREEN - LUMINANCE (- Y) 4 BLUE + DIGITAL AUDIO + DIGITAL AUDIO 5 WHITE/BLUE - DIGITAL AUDIO - DIGITAL AUDIO 6 GREEN + RGB GREEN + LUMINANCE (+ Y) 7 WHITE/BROWN - RGB BLUE - COMPOSITE (- Pb) 8 BROWN + RG
X16 QuickMedia™ Matrix Switcher Crestron QM-MD16X16 Setup Network Wiring When wiring the network, consider the following: • Use Crestron Certified Wire. • Use Crestron power supplies for Crestron equipment. • Provide sufficient power to the system. CAUTION: Insufficient power can lead to unpredictable results or damage to the equipment. Please use the Crestron Power Calculator to help calculate how much power is needed for the system (http://www.crestron.com/calculators).
Crestron QM-MD16X16 16X16 QuickMedia™ Matrix Switcher When connecting multiple QM devices, the route between a QM origination point (transmitter) and a QM endpoint (receiver) cannot have more than two midpoints (e.g. QM-MD16X16 or other QM switchers). Refer to the following diagram when configuring a QM network. NOTE: The aggregate length from transmitter to receiver cannot have a delay skew or more than 22 ns.
16X16 QuickMedia™ Matrix Switcher Crestron QM-MD16X16 WARNING: To prevent bodily injury when mounting or servicing this unit in a rack, take special precautions to ensure that the system remains stable. The following guidelines are provided to ensure your safety: • When mounting this unit in a partially filled rack, load the rack from the bottom to the top with the heaviest component at the bottom of the rack.
Crestron QM-MD16X16 16X16 QuickMedia™ Matrix Switcher Hardware Hookup Connect the Device Make the necessary connections as called out in the illustration that follows this paragraph. Refer to “Network Wiring” on page 12 before attaching the 4-position terminal block connector. Apply power after all connections have been made. When making connections to the QM-MD16X16, use Crestron power supplies.
16X16 QuickMedia™ Matrix Switcher Crestron QM-MD16X16 NOTE: The QM-MD16X16 can only be powered by the 4-position terminal block connector labeled NET. Power cannot be supplied from network devices that are connected to the mini-terminal block connectors. NOTE: The Y and Z Cresnet data lines from the network are connected to the NET connector, which is internally wired to the 4-position mini-terminal block connector for each QM connector.
Crestron QM-MD16X16 16X16 QuickMedia™ Matrix Switcher Programming Software Have a question or comment about Crestron software? Answers to frequently asked questions (FAQs) can be viewed in the Online Help section of the Crestron website. To post a question or view questions you have submitted to Crestron’s True Blue Support, log in at http://support.crestron.com. First-time users will need to establish a user account.
16X16 QuickMedia™ Matrix Switcher Crestron QM-MD16X16 Programming with SIMPL Windows NOTE: While SIMPL Windows can be used to program the QM-MD16X16, it is recommended to use SystemBuilder QM Tools software for configuring a QuickMedia system. SIMPL Windows is Crestron’s premier software for programming Crestron control systems. It is organized into two separate but equally important “Managers”.
Crestron QM-MD16X16 16X16 QuickMedia™ Matrix Switcher • Additional QM-MD16X16 devices are assigned different Net ID numbers as they are added. • If necessary, double click a device to open the “Device Settings” window and change the Net ID, as shown in the following figure. “QM-MD16X16 Device Settings” Window • Program Manager The ID code specified in the SIMPL Windows program must match the Net ID of each unit. Refer to “Identity Code” on page 13.
16X16 QuickMedia™ Matrix Switcher Crestron QM-MD16X16 Uploading and Upgrading Crestron recommends using the latest programming software and that each device contains the latest firmware to take advantage of the most recently released features. However, before attempting to upload or upgrade it is necessary to establish communication. Once communication has been established, files (for example, programs or firmware) can be transferred to the control system (and/or device).
Crestron QM-MD16X16 16X16 QuickMedia™ Matrix Switcher Program Checks To view a list of actions that can be performed on the QM-MD16X16, use Crestron Toolbox to display the network device tree (Tools | Network Device Tree), which shows all network devices connected to the control system. Right-click on the QM-MD16X16 to display actions that can be performed on the QM-MD16X16. Operations Guide – DOC.
16X16 QuickMedia™ Matrix Switcher Crestron QM-MD16X16 Operation Operating Modes The QM-MD16X16 operates in either the System mode or the Local mode. System Mode Switching functions controlled by control system program. While in the Local mode, press the SYS button to activate System mode. The SYS LED will light. • Local Mode When in System mode, pressing input or output buttons shows source/destination information. Switching functions controlled by front panel buttons.
Crestron QM-MD16X16 16X16 QuickMedia™ Matrix Switcher To disable routing to a specific output, press the corresponding output button again. The LED will turn off. If a button press will result in changing the current routing, the ENTER LED will flash rapidly. 5. Press ENTER to make the connection(s) shown on the front panel. The ENTER LED will turn off. Changes made on the front panel are made only after the ENTER button is pressed. If you do not press ENTER, the connection is not made.
16X16 QuickMedia™ Matrix Switcher Crestron QM-MD16X16 Problem Solving Troubleshooting The following table provides corrective action for possible trouble situations. If further assistance is required, please contact a Crestron customer service representative. QM-MD16X16 Troubleshooting TROUBLE POSSIBLE CAUSE(S) CORRECTIVE ACTION Device is not communicating with the network. Use Crestron Toolbox to poll the network. Verify network connection to the device.
Crestron QM-MD16X16 Calculate Power 16X16 QuickMedia™ Matrix Switcher CAUTION: Use only Crestron power supplies for Crestron equipment. Failure to do so could cause equipment damage or void the Crestron warranty. CAUTION: Provide sufficient power to the system. Insufficient power can lead to unpredictable results or damage to the equipment. Please use the Crestron Power Calculator to help calculate how much power is needed for the system (http://www.crestron.com/calculators).
16X16 QuickMedia™ Matrix Switcher Crestron QM-MD16X16 Reference Documents The latest version of all documents mentioned within the guide can be obtained from the Crestron website (http://www.crestron.com/manuals). This link will provide a list of product manuals arranged in alphabetical order by model number.
Crestron QM-MD16X16 16X16 QuickMedia™ Matrix Switcher Return and Warranty Policies Merchandise Returns / Repair Service 1. No merchandise may be returned for credit, exchange or service without prior authorization from CRESTRON. To obtain warranty service for CRESTRON products, contact an authorized CRESTRON dealer. Only authorized CRESTRON dealers may contact the factory and request an RMA (Return Merchandise Authorization) number.
Crestron Electronics, Inc. 15 Volvo Drive Rockleigh, NJ 07647 Tel: 888.CRESTRON Fax: 201.767.7576 www.crestron.com Operations Guide – DOC. 6538A (2016467) 05.07 Specifications subject to change without notice.