
Installation guide


Media & Computer Centers Crestron QM-WMC/WMC-VCC/WCC-2
Installation
NOTE: If the QM-WMIC is to be used, refer to the installation
instructions in the latest revision of the QM-WMIC Operations and
Installation Guide (Doc. 6245) which is available from the Crestron
website.
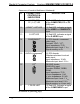
The QM-WMC/WMC-VCC/WCC-2 should be used in a well-ventilated
area. The venting holes should not be obstructed under any
circumstances.
To prevent overheating, do not operate this product in an area that
exceeds the environmental temperature range listed in the table of
specifications.
The following items and tools are required for installation:
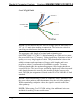
• CresCAT-QM QuickMedia cable or equivalent (not supplied)
terminated with RJ-45 connector for media signals and mini-
phoenix connector for Cresnet signals. Refer to “Network Wiring”
on page 21 and “QuickMedia Wiring” which starts on page 21.
• Phillips screwdriver (not supplied)
• Four #06-32 x 3/4” pan head Phillips screws (supplied)
• Standard two or three-gang electrical box (not supplied)
• Decorator style or equivalent faceplate
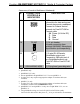
After Cresnet and QM wiring has been installed and verified, use the
following procedure to install the QM-WMC/WMC-VCC/WCC-2 in a
standard, two-gang electrical box. (When using the QM-WMIC option,
install in a three-gang electrical box.)
1. Turn Cresnet system power OFF.
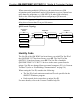
2. Connect the Cresnet cable with the supplied connector plug to the
QM-WMC/WMC-VCC/WCC-2’s Cresnet port and the other end
to the control system. Refer to illustration on page 27 for location
of the Cresnet ports.
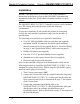
3. Connect the terminated QuickMedia cable to the
QM-WMC/WMC-VCC/WCC-2’s RJ-45 QuickMedia (QM) port
and the other end to an available QuickMedia port on a
QuickMedia device. Refer to illustration on page 27 for location of
the QuickMedia port.
24 • Wall Plate Media & Computer Centers Operations & Installation Guide – DOC. 6237C