Crestron QM-AMP3x80 Series QuickMedia™ 3-Channel Amplifiers Operations Guide
This document was prepared and written by the Technical Documentation department at: Crestron Electronics, Inc. 15 Volvo Drive Rockleigh, NJ 07647 1-888-CRESTRON Important Safety Instructions • Read and keep these instructions. • Heed all warnings. • Clean only with a dry cloth. • To prevent shock or fire hazard, do not expose the device to rain or moisture. • Install in accordance with the included instructions. • Do not block any ventilation openings.
Crestron QM-AMP3x80 Series QuickMedia™ 3-Channel Amplifiers Contents QuickMedia™ 3-Channel Amplifiers: QM-AMP3x80 Series 1 Introduction ............................................................................................................................... 1 Features and Functions ................................................................................................ 1 Applications............................................................................................................
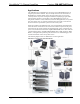
Crestron QM-AMP3x80 Series QuickMedia™ 3-Channel Amplifiers QuickMedia™ 3-Channel Amplifiers: QM-AMP3x80 Series Introduction Features and Functions The Crestron® QM-AMP3x80 (hereinafter referred to as AMP3x80) series of threechannel amplifiers deliver exceptional audio performance as part of a complete MediaManager™ AV system or anywhere multi-channel amplification is required.
QuickMedia™ 3-Channel Amplifiers Crestron QM-AMP3x80 Series Applications The AMP3x80 series of amplifiers are part of the Crestron MediaManager line of integrated presentation solutions. They are ideally suited to work with Crestron’s MediaManager wall plate media centers, FlipTop media centers, receivers and control processors to provide an integrated solution for amplifying program audio and microphone signals in a presentation system.
Crestron QM-AMP3x80 Series QuickMedia™ 3-Channel Amplifiers Specifications The following table provides specifications for the QM-AMP3x80 series of amplifiers. QM-AMP3x80 Series Specifications SPECIFICATION DETAILS Cresnet Power Requirements 3 Watts (24VDC @ 0.125A) Default Net ID 09 Control System Update Files 2-Series Control System 1, 2 Channels Version C2-V3.093.
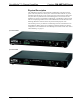
QuickMedia™ 3-Channel Amplifiers Crestron QM-AMP3x80 Series Physical Description The AMP3x80 is housed in a black enclosure with labeling on the front and rear panels. The front panel has a master power switch and LED to indicate AC power. All audio input and output, Cresnet system, and power connections are made on the rear panel. The rear panel also has a switch that bypasses Cresnet control so the amplifier can operate in a stand-alone configuration.
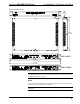
Crestron QM-AMP3x80 Series QuickMedia™ 3-Channel Amplifiers QM-AMP3x80 Physical Views 1.96 in (4.99 cm) 12.53 in (31.82 cm) 17.01 in (43.21 cm) AMP3x80SR 18.52 in (47.04 cm) 19.00 in (48.26 cm) AMP3x80MM NOTE: The rear panel of the AMP3x80MM, which has different connectors than the AMP3x80SR, is shown on the bottom of the diagram. For a detailed view, refer to “Hardware Hookup” on page 13. Ports All connections to the AMP3x80 are made through the ports on the rear panel.
QuickMedia™ 3-Channel Amplifiers Crestron QM-AMP3x80 Series INPUTS The AMP3x80 contains three sets of balanced/unbalanced, line-level audio inputs. On the QM/QMI-AMP3x80MM, two of the inputs are reserved for program audio and one input is reserved for speech audio. The inputs are labeled to designate program and speech audio. On the QM/QMI-AMP3x80SR, all of the inputs are designated for speech audio.
Crestron QM-AMP3x80 Series QuickMedia™ 3-Channel Amplifiers Switches, Buttons, and Indicators POWER This two-position switch, located on the front panel, turns operating power to the AMP3x80 circuitry on and off. A built-in LED indicates when the switch is in the “ON” position. The switch must be in the “ON” position when the unit is to be controlled by the "control system or when it is operating as a stand-alone unit.
QuickMedia™ 3-Channel Amplifiers Crestron QM-AMP3x80 Series NOTE: This device complies with part 15 of the FCC rules. Operation is subject to the following two conditions: (1) this device may not cause harmful interference, and (2) this device must accept any interference received, including interference that may cause undesired operation. This equipment has been tested and found to comply with the limits for a Class B digital device, pursuant to part 15 of the FCC Rules.
Crestron QM-AMP3x80 Series QuickMedia™ 3-Channel Amplifiers the run should be used in the following resistance equation to calculate the value on the right side of the equation. Resistance Equation R < 40,000 L x PF Where: R = Resistance (refer to table below). L = Length of run (or chain) in feet. PF = Power factor of entire run (or chain). The required wire gauge should be chosen such that the resistance value is less than the value calculated in the resistance equation.
QuickMedia™ 3-Channel Amplifiers Crestron QM-AMP3x80 Series There are two different methods—Method A or Method B—for setting the Net ID: Method A (Cresnet address-settable ID), described below, applies to devices in a Cresnet system with a 2-Series control system that require a single unit be the only network device connected to the control system.
Crestron QM-AMP3x80 Series QuickMedia™ 3-Channel Amplifiers 3. From the Viewport menu, select Functions | Assign Cresnet ID by Serial Number. The “Set Net ID by TSID” window appears, shown below. The window is first displayed with the data fields empty. 4. Click on the Search for Touch Settable Devices button. The system searches the network and lists all TSID-enabled devices found.
QuickMedia™ 3-Channel Amplifiers Crestron QM-AMP3x80 Series “Serial Number to TSID Conversion Tool” Window 3. Enter the serial number or TSID number as instructed; press the appropriate button to obtain the corresponding number. NOTE: Enter serial numbers, including spaces, exactly as they appear on the unit label. Alpha characters in serial numbers or TSID numbers may be entered in upper or lower case.
Crestron QM-AMP3x80 Series QuickMedia™ 3-Channel Amplifiers 2. Position a rack ear so that its mounting holes align with the holes vacated by the screws in step 1. 3. Secure the ear to the unit with the two screws from step 1, as shown in the following diagram. Ear Attachment for Rack Mounting USE COVER SCREWS 4. Repeat procedure (steps 1 through 3) to attach the remaining ear to the opposite side.
QuickMedia™ 3-Channel Amplifiers Crestron QM-AMP3x80 Series Hardware Connections for the QM-AMP3x80MM (Back of the Unit is Shown) AUDIO INPUTS: FROM AUDIO SOURCES STEREO OUTPUT: TO 4/8 OHM SPEAKERS CRESNET: TO CONTROL SYSTEM AND OTHER CRESNET DEVICES FROM LINE VOLTAGE SPEECH OUTPUT: TO LOUDSPEAKER NOTE: The QMI-AMP3x80MM speech output is rated at 100V.
Crestron QM-AMP3x80 Series QuickMedia™ 3-Channel Amplifiers The QM-AMP3x80SR has three outputs that are rated for use with three 70V public address speakers. The outputs on the QMI-AMP3x80SR are rated for use with 100V public address speakers. WARNING: The audio outputs operate at high voltage/current. Disconnect power prior to connecting speakers to avoid damage to equipment.
QuickMedia™ 3-Channel Amplifiers Crestron QM-AMP3x80 Series The following are the earliest useable software version requirements for the PC: • (Optional) SystemBuilder (Requires SIMPL Windows). • SIMPL Windows version 2.05.08 or later with library update file 291. Requires SIMPL+® Cross Compiler version 1.1. • Crestron Database version 16.2.0 or later. Required by SIMPL Windows. • Digital Media Tools software version 3.01.00 or later.
Crestron QM-AMP3x80 Series QuickMedia™ 3-Channel Amplifiers .ir projectname.ir (user IR) .umc projectname.umc (user macro) .ush projectname.ush (completed SIMPL+) SIMPL Windows is the Crestron graphical, Windows®-based development tool for programming control systems.
QuickMedia™ 3-Channel Amplifiers Crestron QM-AMP3x80 Series C2Net-Device Slot in Configuration Manager To incorporate an AMP3x80 into the system, drag the QM-AMP3x80 from the Cresnet Control Modules | QM Series folder of the Device Library and drop it in System Views. The QM-RMCRX system tree displays the QM-AMP3x80 in Slot 5, with a default Net ID of 09 as shown in the following illustration.
Crestron QM-AMP3x80 Series QuickMedia™ 3-Channel Amplifiers QM-AMP3x80 Symbol in Programming Manager Programming Manager is where programmers “program” a Crestron control system by assigning signals to symbols. The following describes the AMP3x80 symbol in the SIMPL Windows Programming Manager.
QuickMedia™ 3-Channel Amplifiers Crestron QM-AMP3x80 Series Uploading and Upgrading Assuming a PC is properly connected to the entire system, Crestron programming software allows the programmer to upload programs and projects after their development to the system and network devices. However, there are times when the files for the program and projects are compiled and not uploaded. Instead, compiled files may be distributed from programmers to installers, from Crestron to dealers, etc.
Crestron QM-AMP3x80 Series QuickMedia™ 3-Channel Amplifiers Typical Connection Diagram When Uploading 1. Open the Crestron Viewport. Either launch the stand-alone version of Viewport or start SIMPL Windows and from the menu bar, select Tools | Viewport. 2. Refer to the following figure after this step. From the Viewport menu, select Setup | Communications settings (alternatively, press Alt+D) to open the “Port Settings” window. Setup | Communications Settings Command 3. Operations Guide – DOC.
QuickMedia™ 3-Channel Amplifiers Crestron QM-AMP3x80 Series “Port Settings” Window NOTE: The parameters shown in the illustration above are the port settings for a 2Series control system. Consult the Operations Guide for the control system being used for exact parameter selection. 4. To verify communication, select Diagnostics | Establish Communications (Find Rack). This should display a window that gives the COM port and baud rate.
Crestron QM-AMP3x80 Series QuickMedia™ 3-Channel Amplifiers File Transfer | Send Program Command 3. The “Send Program” window appears, as shown after this step. Click Browse, locate the compiled file (.spz for PRO2) and click Open. This will display the program's header information and enable one or both of the What to Send check boxes. If the program does not contain any SIMPL+ modules, only the SIMPL Program check box will be enabled.
QuickMedia™ 3-Channel Amplifiers Crestron QM-AMP3x80 Series Firmware Upgrade A firmware upgrade file has the extension .upg. To take advantage of all the AMP3x80 features, it is important that the unit contains the latest firmware available. Therefore, please check the Crestron website (http://www.crestron.com/downloads/software_updates.asp) for the latest version of firmware.
Crestron QM-AMP3x80 Series QuickMedia™ 3-Channel Amplifiers “Open” Window 4. Browse to the desired .upg file and click Open to begin the transfer. Problem Solving Troubleshooting The following table provides corrective action for possible trouble situations. If further assistance is required, please contact a Crestron customer service representative. QM-AMP3x80 Troubleshooting TROUBLE Operations Guide – DOC. 6272 POSSIBLE CAUSE(S) CORRECTIVE ACTION POWER LED does not illuminate.
QuickMedia™ 3-Channel Amplifiers Crestron QM-AMP3x80 Series Further Inquiries If, after reviewing this Operations Guide for the AMP3x80, you cannot locate specific information or have questions, please take advantage of Crestron's award winning customer service team in your area. Dial one of the following numbers. • In the US and Canada, call Crestron's corporate headquarters at 1-888-CRESTRON [1-888-273-7876]. • In Europe, call Crestron International at +32-15-50-99-50.
Crestron QM-AMP3x80 Series QuickMedia™ 3-Channel Amplifiers Return and Warranty Policies Merchandise Returns / Repair Service 1. No merchandise may be returned for credit, exchange, or service without prior authorization from CRESTRON. To obtain warranty service for CRESTRON products, contact the factory and request an RMA (Return Merchandise Authorization) number. Enclose a note specifying the nature of the problem, name and phone number of contact person, RMA number, and return address. 2.
Crestron Electronics, Inc. 15 Volvo Drive Rockleigh, NJ 07647 Tel: 888.CRESTRON Fax: 201.767.7576 www.crestron.com Operations Guide – DOC. 6272 05.04 Specifications subject to change without notice.