
User Guide


Crestron ST-1700C 1-Way Wireless RF Touchpanel
SCREEN SETTINGS -
BRIGHTNESS
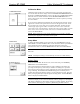
Brightness
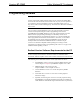
From the SETUP MENU, press the Brightness button to open the SCREEN
SETTINGS – BRIGHTNESS screen. The UP and DOWN buttons increase and
decrease screen brightness, respectively. The display to the right of the buttons
shows the relative brightness from 0% to 100%.
Select the Return button to return to the SETUP MENU.
STARTUP PREFERENCE
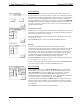
Startup Preference
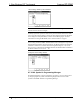
The Startup Preference feature allows (when the touchpanel is off or in standby) the
display to come on or stay off when a “quick” pushbutton is pressed. From the
SETUP MENU, press the Startup Preferences button to open the STARTUP
PREFERENCE screen.
NOTE: The “Display On From Hardkey” feature applies only to units with the
1700C-BTNB-BEZEL or 1700C-BTNB-BEZEL-BLANK option installed. These
options provide for installation of a new bezel and ten “quick” pushbuttons, five on
each side of the LCD screen. You can use these buttons to access any frequently used
commands. For detailed information, refer to the latest version of the manual supplied
with the options, Doc. 6224.
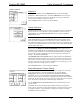
When pressed, the DISPLAY ON FROM HARDKEY button toggles between
ENABLED and DISABLED. With ENABLED selected, the display comes on when
one of the “quick” pushbuttons is pressed. With DISABLED selected, the display
stays off when a “quick” pushbutton is pressed (if touchpanel was off, it goes to
standby). The default is DISABLED.
The POWER UP ON LAST PAGE button also toggles between ENABLED and
DISABLED. Enabling this option causes the unit to “remember” the last page and
which “joins” were active when the unit was last powered down, and return to that
state when next powered on. If the option is disabled, the unit will always go to the
first page of the project and all “joins” are cleared.
Select the Return button to return to the SETUP MENU.
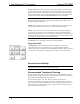
Power Management Timeout Settings
POWER MANAGEMENT TIMEOUT
SETTINGS
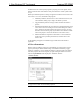
The Power Management feature is intended to conserve energy and to extend the
service life of the battery. From the STARTUP screen, press the Power
Management button to display the POWER MANAGEMENT TIMEOUT
SETTINGS Screen. Use the STANDBY and POWER DOWN UP and DOWN
buttons to set the respective timeouts from 0 through 120 minutes, where 0 disables
the timeout. The time settings are in single-minute increments from 0 to ten minutes,
and in 10-minute increments from 10 minutes through 120 minutes.
Use the Standby Now and Power Down Now buttons to immediately enter the
respective mode.
STANDBY timeout turns the display and backlight off when the touchpanel is
inactive for the specified time. When the touchpanel is reactivated, the last screen to
be displayed reappears. The specified time is displayed in minutes. The default
STANDBY timeout is 10 minutes.
Operations Guide – DOC. 6225A 1-Way Wireless RF Touchpanel: ST-1700C • 9