
Specifications


Crestron STX-1700CXP 2-Way RF Wireless Touchpanel
Operations Guide – DOC. 6227A 2-Way RF Wireless Touchpanel: STX-1700CXP • 11
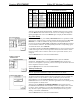
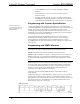
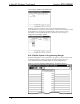
1234567891011121314
0 2400-2474
USA (original)
•••••••••••••
1 2448-2474
France
•••••••
2 2448-2474
Spain
•••••••
3 2471-2497
Japan
••••
4 2452-2477
Canada
•••••••
5 2400-2425
USA (comp 1)
•••••
6 2409-2435
USA (comp 2)
•••••••
7 2419-2445
USA (comp 3)
••••••••
8 2430-2455
USA (comp 4)
•••••••••
9 2440-2465
USA (comp 5)
•••••••••
Occupied 802.11b Channels
Band
#
Freq.
Range
(MHz) Band Name
In the table, a bullet (•) indicates channels that are used by the STX-1700CXP. The unmarked channels
can be used by other devices communicating near the Cresnet system, thus minimizing interference.
After the Cresnet ID, RF ID, RF CHANNEL, and Band settings have been verified,
touch the Return button at the bottom of the screen to save settings and display the
SELECT INTERFACE screen. Touch Return again to display the SETUP MENU.
KEY CLICK SETUP
Key Click Setup
From the SETUP MENU, press the Key Click Enabled button to open KEY CLICK
SETUP screen. (If the function is currently disabled, the button legend is “Key Click
Disabled.”) To enable an audible tone (beep) when the touchpanel buttons are
pressed, select among the Short, Med, or Long KEY CLICK ENABLE/LEN buttons
to set the duration of the tone. The touchpanel responds with a corresponding signal.
To disable the feature, select Click Off.
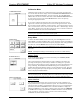
Use the KEY CLICK VOLUME UP and DOWN buttons to increase and decrease the
volume of the signal. The area to the right of the buttons shows the relative volume
from 0% to 100%, both as a numeric value and, for a quick visual reference, as an
analog bar.
Select the Return button to return to the SETUP MENU.
SCREEN SETTINGS
- BRIGHTNESS
STARTUP PREFERENCE
Brightness
From the SETUP MENU, press the Brightness button to open the SCREEN
SETTINGS – BRIGHTNESS screen. The UP and DOWN buttons increase and
decrease screen brightness, respectively. The area to the right of the buttons shows the
relative brightness from 0% to 100%.
Select the Return button to return to the SETUP MENU.
Startup Preference
NOTE: This feature applies only to units with the optional pushbuttons installed.
Refer to “Appendix B: Installation of Optional Pushbuttons” for details.
The Startup Preference feature allows (when the touchpanel is off or in standby) the
display to come on or stay off when a “quick” pushbutton is pressed. From the
SETUP MENU, press the Startup Preferences button to open the STARTUP
PREFERENCE screen. In either case, the button signal will be sent to the RF gateway
if the touchpanel is in standby mode.
When pressed, the DISPLAY ON FROM HARDKEY button toggles between
ENABLED and DISABLED. With ENABLED selected, the display comes on when
one of the “quick” pushbuttons is pressed. With DISABLED selected, the display
stays off when a “quick” pushbutton is pressed (if touchpanel was off, it goes to
standby). The default is DISABLED.
Select the Return button to return to the SETUP MENU.