
Specifications


Crestron e-control Vote SW-VOTE
21 •• Basic Server Setup Installation & Reference Guide — DOC. 5822
In the following, the indented, italicized paragraphs contain advice on setting up the
server and a control system specifically to run the supplied demo files. You will find that
most of the steps have already been accomplished because they are specified by the
supplied demo configurations.
Communications Setup
Server Side
1. Run server application by selecting Database Manager from the Crestron
folder of your Start menu.
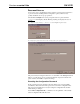
2. Select config file. Specify a Configuration Settings file (.ini file) by selecting
File | Configuration File…. Refer to “Specifying a Configuration File,” page
26.
The server is installed with a demomail.ini pre-selected as the default
configuration file. (This is intended to simplify the Quick Start Guide.)
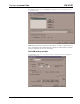
3. Set communications mode. Select Server | Configure and enter a password to
open the Configuration Options window. (Refer to “Password Access” on
page 27). Select the COM Settings tab. The settings for each connection to a
control system must match those on the other end (the control system side) of
the actual connections. Click on each connection in turn, click the Modify…
button, and choose either RS-232 (and select the port and speed) or TCP/IP
(and set the IP address and IP ID). Click OK to make the changes for each
connection.
The demos are pre-configured to use RS-232.
Control System Side, RS-232
Serial communication requires wiring the server directly to the control system.
NOTE: Serial communications requires neither the CNX Gateway software nor the use of an
Ethernet network.
1. Connect PC for programming purposes. For each control system to be
connected to the server, temporarily connect the PC containing the control
system and touchpanel project files to the control system via a serial cable
between any available COM port of the server and the COMPUTER port of
the CNX control system. (This could be — but need not be — the same
physical machine that runs the Software Server.) Refer to the CNMSX manual
(latest revision of Doc. 8118) for instructions. This connection can be
removed once the control system is programmed.
2. Install control system program. Upload the compiled SIMPL Windows
program file (.bin file) to each control system.
As supplied, the demo programs are configured for a CNMSX-PRO control system.
For other models, using SIMPL Windows, convert the program as described below
and recompile.
3. Install touchpanel pages. Upload the compiled VT Pro-e project file (.hex
file) to each control system.
As supplied, the demo touchpanel file, which contains pages for all the demos, is
configured for a LC-3000 touchpanel; and the accompanying .hex file is compiled
for same. This file however also works fine with an CT-3000, CT-3500, and a
VT-3500. If you have one of these models, go ahead and upload the .hex file as is.
If you are working with another panel, convert the file to your target panel and
recompile.