
Specifications


Crestron SWAMP(I)-24X8 Sonnex Multiroom Audio System
Operations Guide – DOC. 7049D Sonnex Multiroom Audio System: SWAMP(I)-24X8
•
25
NOTE: If using Cresnet for communications between the SWAMP-24x8 and a
control system, only one expander can be connected.
NOTE: The maximum cable length between a SWAMP-24X8 and an expander is
200 feet (61 meters). If additional length is needed, the S-EXT1-S can extend the
Sonnex link up to 2000 feet (610 meters) over one multimode fiber strand.
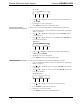
Fuse Replacement
If the SWAMP-24X8 does not power up when it is plugged into an AC outlet, the
fuse may need to be replaced. The fuse holder is located on the rear panel, above the
IEC socket assembly. To replace the fuse, perform the following procedure:
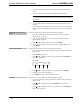
1. Disconnect power to the SWAMP-24X8.
2. Use a flat head screwdriver to push in the fuse holder.
3. While pushing in the fuse holder, turn screwdriver counterclockwise until
the fuse holder pops out.
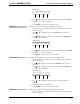
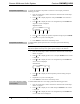
4. Remove the fuse from the fuse holder and insert a new fuse.
CAUTION: Use only the specified type of fuse. Failure to do so may
cause damage to the SWAMP-24X8.
NOTE: Two spare fuses are included.
SWAMP-24X8 MODEL REQUIRED FUSE TYPE
SWAMP-24X8
(US and Canada)
T15AH (1/4” x 1-1/4”, 250 V, 15 A,
time-lag, high-rupture rated)
SWAMPI-24X8
(International/220-240 VAC)
T8AH (5 mm x 20 mm, 250 V, 8 A,
time-lag, high-rupture rated)
5. Insert the fuse holder into the SWAMP-24X8.
6. Push in the fuse holder with a flat head screwdriver. While pushing in the
fuse holder, turn the screwdriver clockwise until the fuse holder sets into
place.
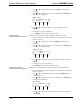
7. Push in the fuse holder a little further and turn the screwdriver clockwise
until the fuse holder locks in place.
8. Connect power to the SWAMP-24X8.
Label the Buttons
Use Crestron Engraver software to print custom labels for the SWAMP-24X8’s front
panel buttons and LEDs. Crestron recommends printing on 100-pound paper. Paper
weighing less than 100 pounds tends to crumple while sliding in, while paper
weighing more than 100 pounds may not fit.