
Installation guide


Crestron TPMC-8X-DSW Wall Mount Docking Station for TPMC-8X Series
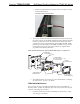
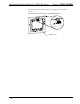
e. Slide the assembled connector back into its slot on the bezel, as shown
in the illustration below.
Assembled Connector in Slot on Bezel
6. To cover the mounted unit with the bezel, make sure the lip near the top of
the bezel is inserted into the TPMC-8X-DSW just below the latch that locks
onto the top of the touch screen. Then make sure the bottom of the bezel
engages the four clips on the bottom edge of the TPMC-8X-DSW. Finally,
push the top of the bezel fully into the TPMC-8X-DSW, secure it with the
two supplied screws and cover the screws with the two supplied rubber
caps. Refer to the following illustration.
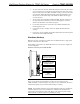
TPMC-8X-DSW Mounting Using (Optional) BB-8X-DSW Back Box – Exploded View
TPMC-8X-DSW
(Bezel Removed)
Drywall
BB-8X-DSW
(sold separately)
Clips for Bezel
Bezel
Touch Screen
(Sold Separately
Screws (2)
Rubber Caps (2)
)
TPMC-8X-DSW
Screws (4) #06-32 x 1 1/2"
(2 On Each Side)
7. The TPMC-8X Series touch screen can now be docked. Refer to “Docking
the Touch Screen” on page 11 for details.
TPMC-8X-DSW Removal
If it is necessary to remove the TPMC-8X-DSW after it has been installed into a
mounting surface, complete the following steps in the order provided. The only tool
required is a #2 Phillips tip screwdriver.
1. Undock the touch screen. Refer to “Undocking the Touch Screen” which
starts on page 11 for details.
Operations & Installation Guide – DOC. 7080B Wall Mount Docking Station for TPMC-8X: TPMC-8X-DSW • 9