Crestron TPMC-4SM ® RoomView Interface Operations Guide
This document was prepared and written by the Technical Documentation department at: Crestron Electronics, Inc. 15 Volvo Drive Rockleigh, NJ 07647 1-888-CRESTRON All brand names, product names and trademarks are the property of their respective owners. ©2009 Crestron Electronics, Inc.
Crestron TPMC-4SM Isys i/O® Wall Mount Touchpanel Media Center Contents RoomView® Interface for TPMC-4SM 1 Introduction ............................................................................................................................... 1 Panel Configuration ................................................................................................................... 2 Hard Button Controls....................................................................................................
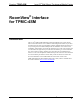
Isys i/O® Wall Mount Touchpanel Media Center Crestron TPMC-4SM ® RoomView Interface for TPMC-4SM Introduction The Isys i/O® TPMC-4SM Wall Mount Touchpanel Media Center works directly with Crestron® RoomView® Server Edition room management software to provide a powerful enterprise-wide room scheduling solution.
Isys i/O® Wall Mount Touchpanel Media Center Crestron TPMC-4SM Panel Configuration The TPMC-4SM touchpanel supports a direct connection to Crestron’s RoomView software application. To connect to RoomView, first enter the “Panel Setup Options” screen by touching the screen while booting the touchpanel. Set the desired Ethernet configuration for the panel using the “Ethernet Setup” screens and make note of the panel’s IP address.
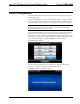
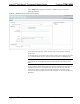
Crestron TPMC-4SM Isys i/O® Wall Mount Touchpanel Media Center The TPMC-4SM must now be added to the RoomView application and associated with a room. Using a web browser, navigate to your facility’s RoomView SE web site. The RoomView login page, shown in the following illustration, will be displayed. RoomView Login Page NOTE: If the application has not yet been configured, the Username and Password are both “admin”.
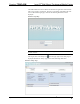
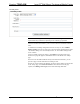
Isys i/O® Wall Mount Touchpanel Media Center Crestron TPMC-4SM Select Add Room to display the RoomView “Add Room” page, shown in the following illustration. RoomView “Add Room” Page (Top Sections of Page Shown) On the right side of the page, within Associate with a node (optional), select the Rooms node. In the Room Details section of the page, for Room Name, enter a name for your room (e.g. Conference Room 100). For Location, enter the location (e.g. Building 100).
Crestron TPMC-4SM Isys i/O® Wall Mount Touchpanel Media Center Scheduling Details NOTE: The following instructions are specific to MS Exchange with EWS. The required fields may be different, depending on the calendar type specified. Enter the Calendar Email Address, your Username and Password and the Domain name. To validate the scheduling configuration has been correctly set, select Validate mailbox settings.
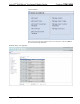
Isys i/O® Wall Mount Touchpanel Media Center Crestron TPMC-4SM Assets & Contracts Select the type of asset being managed, in this case Touchpanel. Then click Edit, as shown in the following illustration. RoomView Setup – Asset Types Page 6 • RoomView® Interface for TPMC-4SM Operations Guide – DOC.
Crestron TPMC-4SM Isys i/O® Wall Mount Touchpanel Media Center The RoomView “Edit Asset Type” page will open, as shown in the following illustration. RoomView Edit Asset Type Page In the Drivers section of the page, click Add Driver. An “Upload Driver File” window will open, as shown in the following illustration. “Upload Driver File” Window Browse to the location of the driver file and click Upload to add it to the database. NOTE: The driver is located in the installation directory.
Isys i/O® Wall Mount Touchpanel Media Center Crestron TPMC-4SM On the left side of the “Setup” page, click Assets & Contracts to expand this section, then click Add Asset to open the RoomView “Add Asset” page, shown in the following illustration. RoomView “Add Asset” Page Enter a Name for the asset. From the Type dropdown list, select Touchpanel. In the Make field, click on the ellipsis (…) and from the list that appears, select Crestron.
Isys i/O® Wall Mount Touchpanel Media Center Crestron TPMC-4SM Hard Button Controls Once RoomView has successfully connected to the touchpanel, the screen should look something like the following illustration. Main Screen The following table explains the function of the TPMC-4SM’s hard button controls. NOTE: For any button press that results in a page flip away from the main screen, the panel will revert to the main view after a timeout period.
Isys i/O® Wall Mount Touchpanel Media Center Crestron TPMC-4SM Main Screen Controls In addition to the hard button controls on the TPMC-4SM, there are four on screen controls on the main screen. Main Screen The following table explains the function of the TPMC-4SM’s main screen controls. BUTTON Meeting Info Day View Reserve Now Available Rooms 10 • RoomView® Interface for TPMC-4SM FUNCTION Displays the “Current Meeting Information” screen.
Isys i/O® Wall Mount Touchpanel Media Center Crestron TPMC-4SM Meeting Information Controls “Current Meeting Information” Screen The following tables explain the function of the TPMC-4SM’s CLOSE and MORE hard button controls, when the “Current Meeting Information” screen is displayed. NOTE: The panel will revert to the main view after a timeout period. BUTTON CLOSE MORE Operations Guide – DOC. 6846A FUNCTION Returns to the main screen.
Isys i/O® Wall Mount Touchpanel Media Center Crestron TPMC-4SM “Current Meeting Information” Screen After Pressing MORE BUTTON CLOSE 12 • RoomView® Interface for TPMC-4SM FUNCTION Returns to the previous “Current Meeting Information” screen. Operations Guide – DOC.
Isys i/O® Wall Mount Touchpanel Media Center Crestron TPMC-4SM Day View Controls “Day View” Screen The following table explains the function of the TPMC-4SM’s “Day View” screen controls. BUTTON TODAY DAY ◄ DAY ► TIME ▲ TIME ▼ CLOSE MORE ▲ ▼ SELECT Active Meeting Field Inactive Meeting Field Operations Guide – DOC. 6846A FUNCTION Displays the current workday schedule. The time period shown will be based on the current local time. Displays the previous day schedule.
Isys i/O® Wall Mount Touchpanel Media Center Crestron TPMC-4SM Add Appointment Controls When an inactive meeting field (i.e. an open time slot) is selected from the “Day View” screen, the “Add Appointment” screen is displayed. Add Appointment “Add Appointment” Screen The following table explains the function of the TPMC-4SM’s “Add Appointment” screen controls. BUTTON CLOSE Edit + Save FUNCTION Returns to the “Day View” screen. The meeting will not be added to the room calendar.
Isys i/O® Wall Mount Touchpanel Media Center Crestron TPMC-4SM Edit Subject The Edit button on the “Add Appointment” screen displays the “Edit Subject” screen. “Edit Subject” Screen The following table explains the function of the TPMC-4SM’s “Edit Subject” screen controls. BUTTON CLOSE Save Operations Guide – DOC. 6846A FUNCTION Returns to the “Add Appointment” screen. The subject text will not be updated. Saves the current text as the subject and returns to the “Add Appointment” screen.
Isys i/O® Wall Mount Touchpanel Media Center Crestron TPMC-4SM Tools A hidden “Tools Main Menu” screen is provided on the TPMC-4SM to display and configure features of the scheduling user interface. To access the “Tools Main Menu” screen, touch and hold the room name on the main screen for five seconds. “Tools Main Menu” Screen The following table explains the function of the TPMC-4SM’s “Tools Main Menu” screen controls.
Isys i/O® Wall Mount Touchpanel Media Center Crestron TPMC-4SM About “About” Screen The following table explains the function of the TPMC-4SM’s “About” screen controls. BUTTON CLOSE Return FUNCTION Returns to the main screen. Returns to the “Tools Main Menu” screen. On the “About” screen, the Push Capable indicator is green if the touchpanel has the capability to dynamically receive meeting events from RoomView.
Isys i/O® Wall Mount Touchpanel Media Center Crestron TPMC-4SM UI Configuration “UI Configuration” Screen The following table explains the function of the TPMC-4SM’s “UI Configuration” screen controls. BUTTON CLOSE Return Edit Enable Meeting Information Edit Enable Day View Edit Enable Available Rooms Edit Enable Reserve Now 18 • RoomView® Interface for TPMC-4SM FUNCTION Returns to the main screen. Returns to the “Tools Main Menu” screen. Displays the configuration screen for the Meeting Info button.
Isys i/O® Wall Mount Touchpanel Media Center Crestron TPMC-4SM Edit Meeting Info “Edit Meeting Info” Screen The following table explains the function of the TPMC-4SM’s “Edit Meeting Info” screen controls. BUTTON CLOSE Return Enable Show Button Operations Guide – DOC. 6846A FUNCTION Returns to the main screen. Returns to the “UI Configuration” screen. Enables the Meeting Info button.
Isys i/O® Wall Mount Touchpanel Media Center Crestron TPMC-4SM Edit Day View “Edit Day View” Screen The following table explains the function of the TPMC-4SM’s “Edit Day View” screen controls. BUTTON CLOSE Return Enable Show Button Enable Get Info Enable Reserve Meeting 20 • RoomView® Interface for TPMC-4SM FUNCTION Returns to the main screen. Returns to the “UI Configuration” screen. Enables the Day View button.
Isys i/O® Wall Mount Touchpanel Media Center Crestron TPMC-4SM Edit Available Rooms “Edit Available Rooms” Screen The following table explains the function of the TPMC-4SM’s “Edit Available Rooms” screen controls. BUTTON CLOSE Return Enable Show Button Operations Guide – DOC. 6846A FUNCTION Returns to the main screen. Returns to the “UI Configuration” screen. Enables the Available Rooms button.
Isys i/O® Wall Mount Touchpanel Media Center Crestron TPMC-4SM Edit Reserve Now “Edit Reserve Now” Screen The following table explains the function of the TPMC-4SM’s “Edit Reserve Now” screen controls. BUTTON CLOSE Return Enable Show Button + - 22 • RoomView® Interface for TPMC-4SM FUNCTION Returns to the main screen. Returns to the “UI Configuration” screen. Enables the Reserve Now button. Increases the maximum duration of the meeting in 30 minute increments.
Isys i/O® Wall Mount Touchpanel Media Center Crestron TPMC-4SM Room Configuration “Room Configuration” Screen The following table explains the function of the TPMC-4SM’s “Room Configuration” screen controls. BUTTON CLOSE Return Edit Enable Decline for No Show Edit Privacy Level Operations Guide – DOC. 6846A FUNCTION Returns to the main screen. Returns to the “Tools Main Menu” screen. Displays the “Edit Decline for No Show” screen. Displays the “Edit Privacy Level” screen.
Isys i/O® Wall Mount Touchpanel Media Center Crestron TPMC-4SM Edit Decline for No Show “Edit Decline for No Show” Screen The following table explains the function of the TPMC-4SM’s “Edit Decline for No Show” screen controls. BUTTON CLOSE Return Enable Function + Applies to Meetings… - Applies to Meetings… + Decline Meetings After… - Decline Meetings After 24 • RoomView® Interface for TPMC-4SM FUNCTION Returns to the main screen. Returns to the “Room Configuration” screen.
Isys i/O® Wall Mount Touchpanel Media Center Crestron TPMC-4SM Edit Privacy Level “Edit Privacy Level” Screen The following table explains the function of the TPMC-4SM’s “Edit Privacy Level” screen controls. BUTTON CLOSE Return Enable Room is Public Enable Room is SemiPrivate Enable Room is Fully-Private Operations Guide – DOC. 6846A FUNCTION Returns to the main screen. Returns to the “Room Configuration” screen. Sets the room privacy level to Public. Sets the room privacy level to Semi-Private.
Isys i/O® Wall Mount Touchpanel Media Center Crestron TPMC-4SM Software License Agreement This License Agreement (“Agreement”) is a legal contract between you (either an individual or a single business entity) and Crestron Electronics, Inc. (“Crestron”) for software referenced in this guide, which includes computer software and as applicable, associated media, printed materials and “online” or electronic documentation (the “Software”).
Crestron TPMC-4SM Isys i/O® Wall Mount Touchpanel Media Center If You are a business or organization, You agree that upon request from Crestron or its authorized agent, You will within thirty (30) days fully document and certify that use of any and all Software at the time of the request is in conformity with Your valid licenses from Crestron of its authorized agent.
Crestron Electronics, Inc. 15 Volvo Drive Rockleigh, NJ 07647 Tel: 888.CRESTRON Fax: 201.767.7576 www.crestron.com Operations Guide – DOC. 6846A (2024511) 11.09 Specifications subject to change without notice.