Crestron TPMC-9L 9” Wall Mount Touch Screen Operations & Installation Guide
Regulatory Compliance As of the date of manufacture, the TPMC-9L has been tested and found to comply with specifications for CE marking. Federal Communications Commission (FCC) Compliance Statement CAUTION: Changes or modifications not expressly approved by the manufacturer responsible for compliance could void the user’s authority to operate the equipment. NOTE: This equipment has been tested and found to comply with the limits for a Class B digital device, pursuant to part 15 of the FCC Rules.
Crestron TPMC-9L 9” Wall Mount Touch Screen Contents 9” Wall Mount Touch Screen: TPMC-9L 1 Introduction ............................................................................................................................... 1 Features and Functions ................................................................................................ 1 Applications................................................................................................................. 4 Specifications .........
Crestron TPMC-9L 9” Wall Mount Touch Screen 9” Wall Mount Touch Screen: TPMC-9L Introduction The TPMC-9L Wall Mount Touch Screen from Crestron® delivers high end style and performance in a compact, cost effective flush mount design. Featuring a generous 9” (~229 mm) widescreen display, advanced touch screen graphics, H.264 video, audio feedback and Rava® SIP Intercom, the TPMC-9L delivers a world of control capability, yet leaves a very small footprint.
9” Wall Mount Touch Screen Crestron TPMC-9L Advanced Touch Screen Control A Crestron touch screen offers an ideal user interface for controlling all the technology in a home, boardroom, classroom, courtroom or command center. Touch screens do away with piles of remote controls, cluttered wall switches and cryptic computer screens, simplifying and enhancing the technology.
Crestron TPMC-9L 9” Wall Mount Touch Screen Rava SIP Intercom Rava SIP Intercom technology enables hands free VoIP communication between any two Rava-enabled Crestron touch screens. Rava works over Ethernet, supporting 2-way intercom, video intercom*, and paging, without any special wiring.
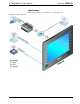
9” Wall Mount Touch Screen Crestron TPMC-9L Applications The following diagram shows a TPMC-9L in a typical application. TPMC-9L in a Typical Application 4 • 9” Wall Mount Touch Screen: TPMC-9L Operations & Installation Guide – DOC.
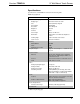
Crestron TPMC-9L 9” Wall Mount Touch Screen Specifications Specifications for the TPMC-9L are listed in the following table. TPMC-9L Specifications SPECIFICATION DETAILS Touch Screen Display Display Type TFT active matrix color LCD Size 9 inch (229 mm) diagonal Aspect Ratio 15:9 WVGA Resolution 800 x 480 pixels Brightness 350 nits Contrast 700:1 Color Depth 24-bit, 16.
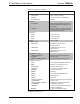
9” Wall Mount Touch Screen Crestron TPMC-9L TPMC-9L Specifications (Continued) SPECIFICATION DETAILS Environmental Temperature 32º to 112ºF (0º to 45ºC) Humidity 10% to 90% RH (non-condensing) Heat Dissipation 78 Btu/h Enclosure Construction Plastic, flush mountable using (4) clips provided (additional mounting kits sold separately) Faceplate Plastic, button and no-button faceplates included (optional solid or backlit button engraving sold separately) Dimensions Height 7.
Crestron TPMC-9L 9” Wall Mount Touch Screen TPMC-9L Specifications (Continued) SPECIFICATION DETAILS Available Accessories (Continued) * WMKM-9L Post-Construction Wall Mount Kit with Mud Ring WMKT-9L Lectern or Post-Construction Wall Mount Kit with Trim Ring Refer to “Identity Code” which starts on page 12 for details. Operations & Installation Guide – DOC.
9” Wall Mount Touch Screen Crestron TPMC-9L Physical Description This section provides information on the connections, controls and indicators available on the TPMC-9L. TPMC-9L Physical View TPMC-9L Physical View (With No-Button Faceplate) 8 • 9” Wall Mount Touch Screen: TPMC-9L Operations & Installation Guide – DOC.
Crestron TPMC-9L 9” Wall Mount Touch Screen TPMC-9L Overall Dimensions (Front and Side Views, with Faceplate) 1.86 in (48 mm) 0.38 in (10 mm) 1 Light Sensor Microphone 0.39 in (10 mm) 7.52 in (191 mm) 10.83 in (275 mm) TPMC-9L Overall Dimensions (Front and Side Views) 10.69 in (272 mm) 1.68 in (43 mm) 10.63 in (270 mm) 1.47 in (38 mm) 7.32 in (186 mm) 7.39 in (188 mm) 2 3 Operations & Installation Guide – DOC.
9” Wall Mount Touch Screen Crestron TPMC-9L TPMC-9L Overall Dimensions (Rear View) 9.99 in (254 mm) 9.92 in (252 mm) 5.85 in (149 mm) 6.66 in (169 mm) 6.58 in (168 mm) 6.89 in (175 mm) 6.00 in (153 mm) 9.
Crestron TPMC-9L 9” Wall Mount Touch Screen Connectors, Controls,and Indicators (Continued) # CONNECTORS, CONTROLS, AND 1 INDICATORS DESCRIPTION 6 NET (1) 4-pin 3.
9” Wall Mount Touch Screen Crestron TPMC-9L Setup Network Wiring When wiring the Cresnet network, consider the following: • Use Crestron Certified Wire. • Use Crestron power supplies for Crestron equipment. • Provide sufficient power to the system. CAUTION: Insufficient power can lead to unpredictable results or damage to the equipment. Use the Crestron Power Calculator to help calculate how much power is needed for the system (www.crestron.com/calculators).
Crestron TPMC-9L 9” Wall Mount Touch Screen Configuring the Touch Screen The TPMC-9L is configured from the setup menu. NOTE: The only connection required to configure the touch screen is power. Refer to “Hardware Hookup” which starts on page 31 for details. NOTE: The TPMC-9L can take up to 45 seconds to boot to a display after initial power up. NOTE: If no project has been loaded or if an invalid project has been loaded, the touch screen displays an error message and defaults to the setup menu screen.
9” Wall Mount Touch Screen Crestron TPMC-9L The main Setup menu opens, as shown in the illustration that follows. The functions provided by each button are detailed in subsequent paragraphs. TPMC-9L Setup Menu The Setup menu provides access to all basic functions and parameters. There are buttons for Ethernet, IP Table, Video, Audio, Cresnet, Diagnostics, About, Display and Keypad.
Crestron TPMC-9L 9” Wall Mount Touch Screen DNS and secondary DNS. It also has an IP Address Settings button used to access the submenus for setting up IP address and DNS servers. Touch IP Address Settings to enter the IP Address screen, shown in the illustration below. Touch Return to go back to the main Setup menu. “P Address Screen DHCP is enabled by default. To enter a Static IP Address, Static Subnet Mask or Static Default gateway, first touch the DHCP Enabled button.
9” Wall Mount Touch Screen Crestron TPMC-9L IP Address Screen (Showing DNS and WINS Servers) Touch the appropriate button for the address to be entered (or changed). The numeric keypad opens. Touch CLEAR to remove any previous entry. Then enter the address required. Touch OK to accept the entry or CANCEL to cancel the entry. This hides the numeric keypad and returns the display to the IP Address screen.
Crestron TPMC-9L 9” Wall Mount Touch Screen The Control System Interface menu contains buttons for eight IP Table slots as well as Add IP, Edit IP and Remove IP buttons to facilitate editing entries. Touch the Auto Discovery Enabled button to toggle to Auto Discover Disabled. A Control Connection indicator lights in green to show a control system connection. Touch Cresnet to enter a Cresnet ID and to enable or disable Cresnet. (Refer to “Cresnet” which starts on page 20 for details.
9” Wall Mount Touch Screen Crestron TPMC-9L On the Edit IP Table Entry screen, touch Save to keep the change or Cancel to cancel the change and return to the Control System Interface menu. To edit the port, CIP ID or Device ID, touch the appropriate button. Touching the Port (41794) button opens the numeric keypad. Touching the CIP ID or Device ID buttons opens a hex keypad, shown in the illustration below. Hex Keypad Touch CLEAR to remove any previous entry. Then enter the ID required.
Crestron TPMC-9L 9” Wall Mount Touch Screen On the Control System Interface menu, touch Return to go back to the main Setup menu. Video From the main Setup menu, touch Video to enter the Video Setup screen, shown in the illustration below. Video Setup Screen The Video Setup screen contains buttons for adjustment of Brightness, Contrast, Hue, Saturation, Translucency, type of Deinterlacing and amount of Overscan.
9” Wall Mount Touch Screen Crestron TPMC-9L Touch Hide Controls to remove the controls. The button text changes to Show Controls. Touch Return to go back to the Video Setup screen. From the Video Setup screen, touch Return to go back to the main Setup menu. Audio From the main Setup menu, touch Audio to enter the Audio Setup screen, shown in the illustration below.
Crestron TPMC-9L 9” Wall Mount Touch Screen The Cresnet Interface screen contains buttons for setting the Cresnet ID and for enabling or disabling Cresnet. A Control Connection indicator lights in green to show a control system connection. Touch Return to go back to the main Setup menu. Diagnostics From the main Setup menu, touch Diagnostics to enter the Diagnostics menu, shown in the illustration below.
9” Wall Mount Touch Screen Crestron TPMC-9L Test Patterns Screen Test pattern options include Display Color Bars, Display Vertical Lines, Display Gray Scale, Display Test Pattern, Display Grid Pattern, Display RGB Gradient and Display White. From any of these, touch the screen to return to the Touch Patterns screen. From the Touch Patterns screen, touch Return to go back to the Diagnostics menu.
Crestron TPMC-9L 9” Wall Mount Touch Screen From the Diagnostics menu, touch Keypad Test to display the Diagnostics – Keypad Test screen, shown in the illustration below. Diagnostics – Keypad Test Screen The Diagnostics – Keypad Test screen allows testing of the hard keys on the touch screen faceplate (assuming the button faceplate and not the no-button faceplate is installed).
9” Wall Mount Touch Screen Crestron TPMC-9L From the Diagnostics menu, touch Mic Test to display the Diagnostics - Mic Test screen, as shown in the illustration below. Diagnostics – Mic Test Screen This screen performs a test of the TPMC-9L’s built-in microphone. The touch screen records audio for five seconds and then plays back the recorded sound. Speak into the microphone on the front of the TPMC-9L and the recording is played back to confirm the microphone is functioning.
Crestron TPMC-9L 9” Wall Mount Touch Screen Display From the main Setup menu, touch Display to enter the Display Settings screen, shown in the illustration below. Display Settings Screen The Display Settings screen contains buttons for turning the TPMC-9L’s Auto Brightness Control on or off, controls for pre-setting the Screen Brightness Level – HIGH and Screen Brightness Level – LOW, as well as HIGH and LOW buttons for instantly activating these presets.
9” Wall Mount Touch Screen Crestron TPMC-9L Use the Sensor Threshold controls to set the level at which the Auto Brightness Control, when set to ON, adjusts screen brightness. The Sensor Level meter is provided as a guide to setting the threshold. Touch Return to go back to the main Setup menu. Keypad From the main Setup menu, touch Keypad to enter the Keypad Backlight Settings screen, shown in the illustration below.
Crestron TPMC-9L 9” Wall Mount Touch Screen Brightness Level – LOW controls to set the high and low preset brightness levels. Press the HIGH and LOW buttons to check each level. With the Auto Key Backlight Control set to White Bezel, Almond Bezel or Black Bezel, the Current Light Sensor Level meter changes to show the amount of ambient light reaching the sensor. The internal light sensor adjusts the key backlighting to accommodate for the current room ambience.
9” Wall Mount Touch Screen Crestron TPMC-9L NOTE: There is also a rack mount kit (RMK-9L) available for the TPMC-9L. Refer to the RMK-9L Installation Guide (Doc. 7035). If the BB-9L or PMK-9L are to be used and a touch screen is not available, the installer can either leave the hole in the mounting surface open (if permitted by local building codes) or attach the cover plate supplied with the mounting kit.
Crestron TPMC-9L 9” Wall Mount Touch Screen TPMC-9L Cutout Dimensions (4511860, 1 of 2) 3/16 in (4 mm) 10 1/16 in (255 mm) TEMPLATE – OV40110 FOR TPMC-9L MOUNTING CLIPS ONLY 1 OF 2 (DO NOT USE FOR BB-9L, PMK-9L, TMK-9L, MMK-9L, WMWM-9L OR WMKT-9L) 7 1/4 in (183 mm) 6 15/16 in (175 mm) CUT ALONG THIS EDGE 3 5/16 in (84 mm) 3 1/2 in (88 mm) TPMC-9L Cutout Dimensions (4511860, 2 of 2) 12 in (305 mm) 15/16 in (23 mm) TEMPLATE – OV40110 FOR TPMC-9L MOUNTING CLIPS ONLY 2 OF 2 CUT ALONG THIS EDGE EDGE
9” Wall Mount Touch Screen Crestron TPMC-9L 1. Locate an area on the wall that is free of miscellaneous wiring and studs. 2. Make a small hole near the middle of the designated site, and verify that the location is suitable. 3. Using masking tape (or equivalent), fasten the template to the wall; verify that the template is level, and trace the opening shape on the wall. 4. Remove the template, and then cut out and remove the traced shape to produce the required opening.
Crestron TPMC-9L 9” Wall Mount Touch Screen 7. Tighten the mounting screws evenly and only enough to compress the mounting clips and secure the TPMC-9L squarely in the mounting surface. Do not over-tighten the screws. Installing the Faceplate Use the Crestron Engraver software package to obtain a custom-engraved faceplate for the TPMC-9L. Install the faceplate as follows. 1. Carefully position the faceplate over the face of the touch screen. 2.
9” Wall Mount Touch Screen Crestron TPMC-9L Hardware Connections for the TPMC-9L (Front View) USB: To Computer Hardware Connections for the TPMC-9L (Rear View) VIDEO: From Balanced Video Source VIDEO: From Unbalanced Video Source NET: To Control System and Other Cresnet Devices LAN: 10/100BASE-T to LAN Recommended Cleaning Keep the surface of the touch screen free of dirt, dust or other materials that could degrade optical properties.
Crestron TPMC-9L 9” Wall Mount Touch Screen Uploading and Upgrading Crestron recommends using the latest programming software and that each device contains the latest firmware to take advantage of the most recently released features. However, before attempting to upload or upgrade it is necessary to establish communication. Once communication has been established, files (for example, programs, projects or firmware) can be transferred to the control system (or device).
9” Wall Mount Touch Screen Crestron TPMC-9L NOTE: If no address book entry is listed for the control system, click Address Book… to create an entry. For details, refer to the Crestron Toolbox help file. 6. TCP/IP Click OK. Communications are confirmed when the device information is displayed. Ethernet Communication The TPMC-9L connects to PC via Ethernet: USB 1.
Crestron TPMC-9L 9” Wall Mount Touch Screen the Crestron Studio help file, SIMPL Windows help file, VT Pro-e® help file or the Crestron Toolbox help file. Crestron Studio or SIMPL Windows If a Crestron Studio (or SIMPL Windows) program is provided, it can be uploaded to the control system using Crestron Studio (or SIMPL Windows) or Crestron Toolbox. Crestron Studio or VT Pro-e Upload the Crestron Studio (or VT Pro-e) file to the touch screen using Crestron Studio (or VT Pro-e) or Crestron Toolbox.
9” Wall Mount Touch Screen Crestron TPMC-9L Problem Solving Troubleshooting The following table provides corrective action for possible trouble situations. If further assistance is required, please contact a Crestron customer service representative. TPMC-9L Troubleshooting TROUBLE POSSIBLE CAUSE(S) CORRECTIVE ACTION Device is not communicating with the network. Use Crestron Toolbox to poll the network. Verify network connection to the device.
Crestron TPMC-9L 9” Wall Mount Touch Screen Check Network Wiring Use the Right Wire Calculate Power To ensure optimum performance over the full range of the installation topology, use Crestron Certified Wire only. Failure to do so may incur additional charges if support is required to identify performance deficiencies because of using improper wire. CAUTION: Use only Crestron power supplies for Crestron equipment. Failure to do so could cause equipment damage or void the Crestron warranty.
9” Wall Mount Touch Screen Crestron TPMC-9L Reference Documents All documents mentioned in the guide are available at www.crestron.com/manuals.
Crestron TPMC-9L 9” Wall Mount Touch Screen This page is intentionally left blank. Operations & Installation Guide – DOC.
Crestron Electronics, Inc. 15 Volvo Drive Rockleigh, NJ 07647 Tel: 888.CRESTRON Fax: 201.767.7576 www.crestron.com Operations & Installation Guide – DOC. 7030F (2028354) 12.14 Specifications subject to change without notice.