Crestron Isys™ TPS-5000L 12 Inch Lectern/Wall Mounted Touchpanel Operations Guide
This document was prepared and written by the Technical Documentation department at: Crestron Electronics, Inc. 15 Volvo Drive Rockleigh, NJ 07647 1-888-CRESTRON All brand names, product names and trademarks are the property of their respective owners. ©2003 Crestron Electronics, Inc.
Crestron Isys™ TPS-5000L 12 Inch Lectern/Wall Mounted Touchpanel Contents 12 Inch Lectern/Wall Mount Touchpanel: Crestron Isys™ TPS-5000L 1 Introduction ............................................................................................................................... 1 Features and Functions ................................................................................................ 1 Specifications ........................................................................................
Crestron Isys™ TPS-5000L 12 Inch Lectern/Wall Mounted Touchpanel 12 Inch Lectern/Wall Mount Touchpanel: Crestron Isys™ TPS-5000L Introduction Features and Functions The TPS-5000L series packs all the power and performance of an Isys panel in a stylish lectern or wall-mount model. Its size and capabilities make it perfect for the conference room and home theater. These touchpanels are available with two different faceplate colors: black, or white. The suffixes ‘B’ or ‘W’ respectively denotes color; i.e.
12 Inch Lectern/Wall Mounted Touchpanel Crestron Isys™ TPS-5000L TPS-5000L Functional Summary (continued) • • • • • • • • • • • Displays two NTSC/PAL/composite video (or one S-video source) with 256,000 colors with optional TPS-VIDL-2 expansion card 10/100 BaseT (full/half duplex) Ethernet capabilities with optional TPS-ENETL expansion card.
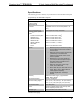
Crestron Isys™ TPS-5000L 12 Inch Lectern/Wall Mounted Touchpanel Specifications The following provides a summary of specifications for the TPS-5000L touchpanel. Specifications for the TPS-5000L Touchpanel SPECIFICATION DETAILS Power Requirements (without cards)1 20 Watts (0.83 Amp @ 24 VDC) Default NET ID 03 Timeout Adjustable from 0 to 120 minutes (Default = 15 min.
12 Inch Lectern/Wall Mounted Touchpanel Crestron Isys™ TPS-5000L Specifications for the TPS-5000L Touchpanel (continued) SPECIFICATION DETAILS Enclosure Black metal enclosure with injection-molded plastic faceplate in black or white. CPU 63MIPs Coldfire processor running Isys generation firmware Cresnet Via 4-position Cresnet connector RS-232 RJ11 connector for console, telestrator, etc. Default settings: 115200, 8 bit, parity none, stop bit 1.
Crestron Isys™ TPS-5000L 12 Inch Lectern/Wall Mounted Touchpanel NOTE: Video, RGB, and Ethernet connections are available after installing the appropriate expansion card(s) into the TPS-5000L touchpanel. TPS-5000L shown in black Physical Views of the TPS-5000L Touchpanel (Front & Side) 2.70 in (6.85 cm) 13.43 in (34.11 cm) 11.04 in 7.26 in (18.44 cm) (28.05 cm) 9.68 in (24.59 cm) NOTE: For lectern cutout dimensions, refer to “Appendix B: Cutout Detail of Supplied Template” on page 47.
12 Inch Lectern/Wall Mounted Touchpanel Crestron Isys™ TPS-5000L Physical Views of the TPS-5000L Touchpanel (Rear & Bottom) 3.25 in (8.26 cm) 4.45 in (11.31 cm) 9.46 in (24.03 cm) 3.25 in (8.26 cm) 10.22 in (25.97 cm) 12.49 in (31.71 cm) Expansion Slots The TPS-5000L’s functionality can be expanded by installing optional cards into the expansion slots. Each card has a specific function and is sold separately. Installation instructions are provided with each card.
Crestron Isys™ TPS-5000L 12 Inch Lectern/Wall Mounted Touchpanel Industry Compliance As of the date of manufacture, the touchpanel have been tested and found to comply with specifications for CE marking and standards per EMC and Radiocommunications Compliance Labelling (N11785). NOTE: This device complies with part 15 of the FCC rules.
Inch Lectern/Wall Mounted Touchpanel Crestron Isys™ TPS-5000L NOTE: All network wiring must consist of two twisted pairs. One twisted pair is the +24V conductor and the GND conductor. The other twisted pair is the Y and Z conductors. NOTE: When daisy-chaining Cresnet units, strip the ends of the wires carefully to avoid nicking the conductors. Twist together the ends of the wires that share a pin on the network connector, and tin the twisted connection.
Crestron Isys™ TPS-5000L 12 Inch Lectern/Wall Mounted Touchpanel Calibration Menu CALIBRATION MENU Calibration of the touchscreen is required if the active touch area of a button does not coincide with the button's image. Select the Touch Screen Calibration button to display the CALIBRATION MENU, shown to the left. The CALIBRATION MENU offers the choice to initiate calibration with the Perform Calibration button or return to the previous screen with the Return button.
12 Inch Lectern/Wall Mounted Touchpanel Crestron Isys™ TPS-5000L MENU, can change the brightness level of the display. The current brightness setting is shown as a percentage in the SETUP MENU (e.g., 99% brightness is shown in the illustration). Percentage can vary from 0% (low brightness) to 100% (full brightness). DOWN and UP buttons decrease and increase the brightness, respectively.
Crestron Isys™ TPS-5000L 12 Inch Lectern/Wall Mounted Touchpanel Select the Return button located on the INTERFACE MENU to accept the changes and return to the SETUP MENU. RS-232 Menu RS-232 MENU The touchpanel allows for five RS-232 communication methods: • Console (i.e. loading programs) • Control (i.e.
12 Inch Lectern/Wall Mounted Touchpanel Crestron Isys™ TPS-5000L from the "Button Properties" window. It is possible to enable/disable all audio types (WAV, line, and key click) with the press of a single button. The All Audio On and All Audio Off buttons allow for global muting. Select the All Audio On button to enable audio; select the All Audio Off button to disable audio.
Crestron Isys™ TPS-5000L 12 Inch Lectern/Wall Mounted Touchpanel unstable or noisy. Selecting the RGB button, located to the right on the top row of the SETUP MENU, displays the RGB Menu, shown after this paragraph. RGB Menu (Vertical Lines Portray RGB Sample) The user has the option to manually select the incoming format or have the touchpanel detect one automatically. On the rare occasion, the user may want to choose the Manual Select button to force an incoming format.
12 Inch Lectern/Wall Mounted Touchpanel Crestron Isys™ TPS-5000L 1. Select a preset button (numbered 1 through 16). For the sake of this procedure, select 11. 2. Select the Return button in the lower right corner of the Preset Menu to display the RGB Menu. 3. While viewing the sample of the input signal, use the double arrow buttons to the left and then the other set of double arrow buttons to position and compress/expand the sample so that it fills the entire screen.
Crestron Isys™ TPS-5000L 12 Inch Lectern/Wall Mounted Touchpanel Video Setup (Horizontal Lines Portray Video Sample) Use this screen to select one of the video inputs and adjust the brightness, contrast, saturation, and hue, if necessary. The user has the option to force the video image to a certain mode (i.e., composite video or S-video if using the TPS-VIDL-1 or TPS-VIDL-2 in S-video configuration) or switch modes automatically after checking the image for colors.
12 Inch Lectern/Wall Mounted Touchpanel Crestron Isys™ TPS-5000L Select the Return button, located at the lower right corner of the Video Menu, after video parameters have been set. Diagnostics Menu DIAGNOSTICS MENU The Diagnostics button from the MAIN MENU contains controls for enabling an Ethernet card (if installed) and diagnostic tools. The diagnostic tools should only be used under supervision from a Crestron customer service representative during telephone support.
Crestron Isys™ TPS-5000L 12 Inch Lectern/Wall Mounted Touchpanel AUDIO Pinouts-Balanced PIN # DESIGNATION DESCRIPTION 1 S Shield (no connection) 2 R+ Right Input (Positive) 3 R- Right Input (Negative) 4 L+ Left Input (Positive) 5 L- Left Input (Negative) 6 S Shield (no connection) NOTE: When sending balanced audio from a CNX-BIPAD8, only the Positive (+) and Negative (-) wires are to be connected to the touchpanel. Do not connect the Shield (S) wires.
12 Inch Lectern/Wall Mounted Touchpanel Crestron Isys™ TPS-5000L MIC Pinouts-Balanced PIN # DESIGNATION DESCRIPTION 1 M+ Mic Output (Positive) 2 M- Mic Output (Negative) 3 S Shield NOTE: For unbalanced line level microphone output, connect pins 1 & 3. No connection should be made to pin 2. NET This 4-position Cresnet connector provides Cresnet network connection from the touchpanel as well as power to the touchpanel. A description of the pinouts is shown in the table after this paragraph.
Crestron Isys™ TPS-5000L 12 Inch Lectern/Wall Mounted Touchpanel PC to TPS-5000L Cable Specifications (Crestron Cable Number STCP-502PC) Other Connections When using the optional expansion cards, the following optional connectors are available for use: • RGB INPUT – These five connectors allow PC video to be displayed and are made available with the purchase and installation of the TPS-XVGAL, a computer display card. Consult the latest revision of the TPS-XVGAL Operations & Installation Guide (Doc.
12 Inch Lectern/Wall Mounted Touchpanel Crestron Isys™ TPS-5000L Direct Mounting The TPS-5000L is a low-voltage unit that can be installed directly into a mounting surface. Each touchpanel is provided with mounting hardware and accessories, as shown in the table after this paragraph.
Crestron Isys™ TPS-5000L 12 Inch Lectern/Wall Mounted Touchpanel Securing Two Plates to Top and Bottom Edges of Opening LARGE METAL MOUNTING PLATE SMALL METAL MOUNTING PLATE TWO PAN HEAD SCREWS (MOUNTS PLATES IN TWO CENTER TAPPED HOLES) DRYWALL 10. Repeat steps 7 through 9 for the bottom horizontal edge of the opening. 11. Attach the network cable and other RS-232, audio, video, or Ethernet cables in the wall to the appropriate connector on the back of the touchpanel.
12 Inch Lectern/Wall Mounted Touchpanel Crestron Isys™ TPS-5000L Cover Touchpanel with Faceplate COVER TOUCHPANEL WITH BEZEL NOTE: WIRING NOT SHOWN FOR CLARITY DRYWALL NOTE: If it is necessary to remove the touchpanel, secure and label the attached cables before disconnecting them from the back of the touchpanel.
Crestron Isys™ TPS-5000L 12 Inch Lectern/Wall Mounted Touchpanel Programming Software Have a comment about Crestron software? Setup is easy thanks to Crestron’s Windows-based programming software. Crestron Application Builder™ (AppBuilder) creates a complete project, with no special programming required. Crestron AppBuilder completes all necessary programming Direct software related suggestions for a base system including all touchpanel screens and the control system program.
12 Inch Lectern/Wall Mounted Touchpanel Crestron Isys™ TPS-5000L Programming with the Crestron AppBuilder The easiest method of programming, but does not offer as much flexibility as SIMPL Windows. Crestron AppBuilder offers automatic programming for such residential and commercial applications as audio distribution, home theater, video conferencing, and lighting.
Crestron Isys™ TPS-5000L 12 Inch Lectern/Wall Mounted Touchpanel Expanded PRO2 System Tree C2Net-Device Slot in Configuration Manager To incorporate the TPS-5000L touchpanel into the system, drag the TPS-5000 from the Touchpanels | Touchpanels (Cresnet) folder of the Device Library and drop it in the System Views. The PRO2 system tree displays the touchpanel in slot 9 with a default NET ID of 03 as shown in the following illustration.
12 Inch Lectern/Wall Mounted Touchpanel Crestron Isys™ TPS-5000L “Device Settings” Window for the TPS-5000L NOTE: SIMPL Windows automatically changes NET ID values of a device added to a program if a duplicate device or a device with the same default NET ID already exists in the program. Always ensure that the hardware and software settings of the NET ID match. For NET ID hardware settings details, refer to “Interface Menu” on page 10.
Crestron Isys™ TPS-5000L 12 Inch Lectern/Wall Mounted Touchpanel NOTE: “Other” signals are a combination of the three basic types (e.g. many symbols accept either analog or serial signals; the combination is shown as a green signal). The signal type is displayed on the Status Bar when the signal is highlighted. For additional information, refer to Doc. 6120, Crestron SIMPL Windows Symbol Guide. It may be downloaded from the Downloads | Product Manuals | Software section of the Crestron website (www.
12 Inch Lectern/Wall Mounted Touchpanel Crestron Isys™ TPS-5000L Analog Output Signal Descriptions OUTPUT DESCRIPTION an_act 1 through an_act 4000 Notifies control system of an action (1 - 4000). Any value from 0 through 65535 Analog Input Signal Descriptions INPUT DESCRIPTION an_fb 1 through an_fb 4000 Notifies panel of analog action (1 - 4000). Serial Input Signal Descriptions INPUT DESCRIPTION text-01 through text-999 Notifies panel of text string (1 - 999). Also called indirect text.
Crestron Isys™ TPS-5000L 12 Inch Lectern/Wall Mounted Touchpanel PROM via the File | Upload Project command. The touchpanel uses the programmed project until another project is uploaded from the PC. Programs cannot be extracted from the touchpanel. The PC may be disconnected from the control system or panel except during reprogramming. VT Pro-e also allows users the option to generate projects destined for web browsers rather than for physical touchpanels.
12 Inch Lectern/Wall Mounted Touchpanel Crestron Isys™ TPS-5000L NOTE: WAV files (for the TPS-5000L touchpanel) can be obtained from the Crestron FTP site (ftp.crestron.com/Wave LC/). Since the CT/LC-1000 touchpanel accepts the same WAV file formats, only use those WAV files designated for the CT/LC-1000, TPS-2000L, or TPS-5000 touchpanels. These WAV files are different than those made available for the CNXTA, Crestron CNX Telephone Audio Interface Card.
Crestron Isys™ TPS-5000L 12 Inch Lectern/Wall Mounted Touchpanel 2. Each WAV file must have the correct audio format and attributes for the TPS-5000L target type selected in VT Pro-e. The correct audio format is PCM, 8 or 16 KHz, 8 bit, mono. 3. There are three system-wide join numbers that the designer can define. The first, sound playing from panel, differs from the other two in that it is triggered from the panel. a.
12 Inch Lectern/Wall Mounted Touchpanel Crestron Isys™ TPS-5000L NOTE: To remove a WAV file from the Sound List table, highlight the file and click on the Remove button. The Properties button opens the “Sound Properties” window for a highlighted WAV file in the Sound List table. The designer can assign a join number either automatically with the Auto button or by scrolling down to the desired number. Select Description to enter comments about the WAV file.
Crestron Isys™ TPS-5000L 12 Inch Lectern/Wall Mounted Touchpanel Audio Digital Reserved Join Numbers for TPS-5000L Touchpanels JOIN # FUNCTION VALUE IN/OUT 17300 Audio On INPUT/OUTPUT 17301 Audio Off INPUT/OUTPUT 17302 Key Click On INPUT/OUTPUT 17303 Key Click Off INPUT/OUTPUT 17304 Key Click Volume Increase INPUT 17305 Key Click Volume Decrease INPUT 17306 Audio Line On INPUT/OUTPUT 17307 Audio Line Off INPUT/OUTPUT 17308 Audio Line Volume Increase INPUT 17309 Au
12 Inch Lectern/Wall Mounted Touchpanel Crestron Isys™ TPS-5000L Video and XGA Digital Reserved Join Numbers for TPS-5000L Touchpanels JOIN # FUNCTION 1, 2 17101 Video 1 1, 2 17102 Video 1 17103 Video 11, 2 17104 1, 2 Video 1 1, 2 VALUE IN/OUT Video Composite TP INPUT S-Video TP INPUT Auto Detect TP INPUT Video Composite BNC INPUT 17105 Video 1 17106 Video 11, 2 17107 Video 11, 2 Still INPUT 17108 Video 11, 2 Motion INPUT 17109 Video 11, 2 Sharp INPUT 17110 1, 2 V
Crestron Isys™ TPS-5000L 12 Inch Lectern/Wall Mounted Touchpanel Video and XGA Digital Reserved Join Numbers for TPS-5000L Touchpanels (continued) JOIN # 17166 17167 17168 17169 FUNCTION Video 2 Saturation 2 VALUE IN/OUT Decrease INPUT 2 Increase INPUT 2 Decrease INPUT Video 2 Hue Video 2 Hue 2 Video 2 No Input Flag INPUT 17170 2 Video 2 AGC On INPUT 17171 Video 22 AGC Off INPUT 17172 2 3 INPUT Video 2 Defaults 17011 4 XGA Auto Detect On INPUT 17012 XGA Auto Detect4
12 Inch Lectern/Wall Mounted Touchpanel Crestron Isys™ TPS-5000L Uploading and Upgrading Assuming a PC is properly connected to the entire system, Crestron programming software allows the programmer to upload programs and projects to the system and touchpanel after their development. However, there are times when the files for the program and projects are compiled and not uploaded. Instead, compiled files may be distributed from programmers to installers, from Crestron to dealers, etc.
Crestron Isys™ TPS-5000L 12 Inch Lectern/Wall Mounted Touchpanel Typical Connection Diagram when Uploading a Project Directly to the Touchpanel RS-232 via Crestron Cable Number STCP-502PC or equivalent 1. Start SIMPL Windows or VT Pro-e. 2. From the menu bar, select Tools | Viewport to open the Crestron Viewport. (If communication settings are correct, the prompt should be TPS for direct communications). 3. Refer to the following figure.
12 Inch Lectern/Wall Mounted Touchpanel Crestron Isys™ TPS-5000L “Port Settings” Window NOTE: Different control systems may require different communication settings. Refer to each control system’s Operations Guide for proper communication settings. NOTE: If connecting to the touchpanel through a control system, the baud rate may need to be set to 38400 baud (Cresnet speed) for a successful transfer.
Crestron Isys™ TPS-5000L 12 Inch Lectern/Wall Mounted Touchpanel Upload via Crestron Viewport 1. Verify that the procedure for “Communication Settings” that begins on page 36 has been performed. 2. As shown after this step, select File Transfer | Send Program (alternatively, press Alt+P) from the Viewport menu. File Transfer | Send Program Command 3. The “Send Program” window appears, as shown after this step. Click Browse, locate the compiled file (.spz) and click Open.
12 Inch Lectern/Wall Mounted Touchpanel Crestron Isys™ TPS-5000L Uploading a VT Pro-e Project The TPS-5000L touchpanel source file has the extension .vtp. A compiled VT Pro-e file has the extension .vtz. The VT Pro-e file can be uploaded to the touchpanel using VT Pro-e or via the Crestron Viewport. Upload via VT Pro-e 1. Start VT Pro-e. 2. Select File | Open | Project to view the “Open” window, navigate to the VT Pro-e file (.vtz), and click Open. 3. Select File | Upload Project.
Crestron Isys™ TPS-5000L 12 Inch Lectern/Wall Mounted Touchpanel “Touch Panel Transfer” Window Each time a project is selected using the Browse command, that project is added to the File Name dropdown list. This makes it convenient to recall projects without need to browse to a directory. To delete the list click Clear History. All Files in Project: sends the entire project. Only Changed Files: sends only the files that are different from those that are currently stored in the panel.
12 Inch Lectern/Wall Mounted Touchpanel Crestron Isys™ TPS-5000L File Transfer | Update Touchpanel Firmware Command 3. As shown after this step, select the NET ID of the TPS-5000L touchpanel and then click OK. The “Open” window appears (refer to the subsequent graphic). “Select Network ID” Window Check Send Direct to Wired Touchpanel if connected via RS-232 directly to touchpanel. Select CSF File 4. Browse to the .csf file and click Open to begin the transfer.
Crestron Isys™ TPS-5000L 12 Inch Lectern/Wall Mounted Touchpanel Problem Solving Troubleshooting The table after this paragraph provides corrective action for possible trouble situations. If further assistance is required, please contact a Crestron customer service representative. TPS-5000L Touchpanel Troubleshooting TROUBLE POSSIBLE CAUSE(S) Touchpanel does not function. Touchpanel is not communicating with the network. Use Performance Viewport (via SIMPL Windows or VT Pro-e) to poll the network.
12 Inch Lectern/Wall Mounted Touchpanel Crestron Isys™ TPS-5000L Further Inquiries If after reviewing this Operations Guide, you cannot locate specific information or have questions, please take advantage of the Crestron award winning customer service team by calling: • In the US and Canada, call the Crestron corporate headquarters at 1-888-CRESTRON [1-888-273-7876]. • In Europe, call Crestron International at +32-15-50-99-50. • In Asia, call Crestron Asia at +852-2341-2016.
Crestron Isys™ TPS-5000L 12 Inch Lectern/Wall Mounted Touchpanel Appendix A: RS-232 Protocol TPS-5000L touchpanels support panel operation via a host computer through the RS-232 port. Crestron recommends that the following serial data format is set.
12 Inch Lectern/Wall Mounted Touchpanel Crestron Isys™ TPS-5000L Codes may be sent to the touchpanel in the same form as they are received. The 'P' form turns on a function and the 'R' form turns off a function; sending back information received from the touchpanel (i.e., jumping pins 2 and 3 on the RS-232 port) makes the buttons momentary. Notice that the touchpanel responds to P and R commands even when configured for other interface modes.
Crestron Isys™ TPS-5000L 12 Inch Lectern/Wall Mounted Touchpanel Appendix B: Cutout Detail of Supplied Template Use the alphanumeric codes in the illustration and table to obtain the cutout dimensions for the lectern mount models when mounting without the BB-5000. However, Crestron recommends that the supplied template be used to avoid error. VERTICAL MEASUREMENTS V1 V2 V3 Operations Guide - DOC. 5783A = = = 0.320 in (0.813 cm) 0.230 in (0.584 cm) 9.583 in (24.
12 Inch Lectern/Wall Mounted Touchpanel Crestron Isys™ TPS-5000L Appendix C: Configuring the RS-232 Port for Use To configure the RS-232 port of the TPS-5000L, a local PC that contains a Crestron Viewport is required. The Viewport is one of the development tools that is part of Crestron SIMPL® Windows or VisionTools® Pro-e (VT Pro-e) software. Obtaining Communications Refer to “Communication Settings” on page 36 for detailed instructions on connecting a PC to the touchpanel.
Crestron Isys™ TPS-5000L 12 Inch Lectern/Wall Mounted Touchpanel CONTROL – activates special control mode. RF – RF wireless interface. TOUCHOUT – touchscreen output sent to RS232 port. MOUSE – rs232 port used for mouse input EXT_TOUCH – rs232 port used for ext. touchscreen input No parameter – display current setting 3. Enter a command that chooses one of the RS-232 communication options. Use the same spelling as shown in the last touchpanel response. 4.
12 Inch Lectern/Wall Mounted Touchpanel Crestron Isys™ TPS-5000L Software License Agreement This License Agreement (“Agreement”) is a legal contract between you (either an individual or a single business entity) and Crestron Electronics, Inc. (“Crestron”) for software referenced in this guide, which includes computer software and, as applicable, associated media, printed materials, and “online” or electronic documentation (the “Software”).
Crestron Isys™ TPS-5000L 12 Inch Lectern/Wall Mounted Touchpanel If You are a business or organization, You agree that upon request from Crestron or its authorized agent, You will within thirty (30) days fully document and certify that use of any and all Software at the time of the request is in conformity with Your valid licenses from Crestron of its authorized agent.
12 Inch Lectern/Wall Mounted Touchpanel Crestron Isys™ TPS-5000L Return and Warranty Policies Merchandise Returns / Repair Service 1. No merchandise may be returned for credit, exchange, or service without prior authorization from CRESTRON. To obtain warranty service for CRESTRON products, contact the factory and request an RMA (Return Merchandise Authorization) number. Enclose a note specifying the nature of the problem, name and phone number of contact person, RMA number, and return address. 2.
Crestron Isys™ TPS-5000L 12 Inch Lectern/Wall Mounted Touchpanel This page intentionally left blank. Operations Guide - DOC.
12 Inch Lectern/Wall Mounted Touchpanel Crestron Isys™ TPS-5000L This page intentionally left blank. 54 • 12 Inch Lectern/Wall Mount Touchpanel: Crestron Isys™ TPS-5000L Operations Guide - DOC.
Crestron Isys™ TPS-5000L 12 Inch Lectern/Wall Mounted Touchpanel This page intentionally left blank. Operations Guide - DOC.
Crestron Electronics, Inc. 15 Volvo Drive Rockleigh, NJ 07647 Tel: 888.CRESTRON Fax: 201.767.7576 www.crestron.com Operations Guide – DOC. 5783A 03.03 Specifications subject to change without notice.