
User Guide


UPX-2 1GB Memory & OS Upgrade Crestron UPX-OS1GB(-MSO)
Installation
NOTE: Prior to beginning the installation procedure, it is recommended
that you note all of the UPX-2’s configuration settings. All settings need
to be reentered after completing the upgrade procedure.
Required Equipment
• Flat-head screwdriver
• Compact flash card
• USB or PS/2
®
mouse
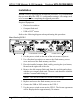
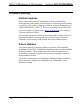
Refer to the following diagram when performing this procedure.
Rear Panel of UPX-2
FLASH MEMORY ACCESS POWER SWITCHMOUSE PORTS
1. Use the power switch on the rear of the unit to turn off power.
2. Use a flat-head screwdriver to remove the flash memory access
cover and reveal the flash memory card slot.
3. Eject the installed compact flash card by pressing the eject button,
located on the right-side of the slot.
4. Remove the old compact flash card from the card slot and replace
with the new compact flash card. The new card should be installed
with the Crestron label facing up.
NOTE: The old card cannot be reused for data storage.
5. Replace and secure the flash memory access cover.
6. Connect the USB or PS/2 mouse to the UPX-2.
7. Use the power switch to turn on the UPX-2. The license agreement
will be displayed after approximately 30 minutes.
2 • 1GB Memory & OS Upgrade: UPX-OS1GB(-MSO) Installation Guide - DOC. 6443