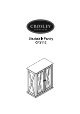
HARDWARE LIST (Wetness O O w( Srim$5/32x25mm $3x14mm $3x14mm #3.5x15 mm Bolt Round Head Screw Round Head Long Screw Bolt Screw 8 PCS 2 PCS 22 PCS (Extra 1) PCS 8 PCS $1/4" Spring Washer Flat Washer Knob Shelf Holder Magnet 8 PCS 8 PCS PCS 8 PCS (Extra 1) 1PC $8x30mm Wood Dowel Connecting Bar | Allen Wrench | Safety Strap Kit PCS PCS 1PC 1 SET ADDITIONAL TOOLS (Not Provided) Note: It is not recommended to use power tools during assembly.
Step 1. Attach knobs (parts #8) to door panels (parts G & H) using round head bolts (part #2) and fillips head screwdriver. Attach magnet (part #10) to top panel (part A) using round head screws (part #4) and fillips head screwdriver. #1062 X1 Step 2. Attach bottom panel (part D) to panels (parts B & C) using wood dowels (part #11), bolts (part #1), spring washers (part #6), flat washers (part #7) and Allen wrench (part #13).
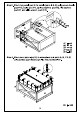
Step 3. Attach top panel (part A) to panels (parts B & C) using wood dowels (part #11), bolts (part #1), spring washers (part #6), flat washers (part #7) and Allen wrench (part #13). #11e= X4 #13 1X1 Step 4. Attach back panel (part F) to assembled unit (parts using screws (part #3) and fillips head screwdriver.
Step 5. Carefully turn unit upright. Place shelf holders (part #9) into desired position and slide adjustable shelves (part E) into place. #8x8 Step 6. Attach door panels (parts placing bottom pin hinge (preinstalled in door) in the per-drilled hole of bottom panel (part D). Then depress the top spring-loaded pin hinge so it can be placed in the per-drilled hole of top panel (part A). Note: Be sure top and bottom pin hinges are fully extended to secure doors in place.
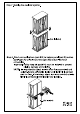
Step 7. Overlay the cabinets together. (Not Included) / Step 8. Attach connecting bars (part #12) to bottom panel (part D) and top panel (part A) using long screws (part #5) and fillips head screwdriver. Important: Safety strap kit (part #14) must be installed to prevent tipping, damage and/or injury. NOTE: It is important to adjust levelers once fully assembled and upright. Extend adjustable leveler until it's firmly in contact with the floor.
5/8"x #3xD8 $4xD8 Safety Strap | Wall Anchor Bracket Short Screw | Long Screw | Safety Wall Kit Strap 18ET 1PC PCS 1PC 1PC 1PC SAFETY WALL STRAP INSTALLATION Note: It is highly recommended to install this safety strap kit to prevent tipping, damage and/or injury. 1. Insert short screw (C) and safety wall strap (E) through bracket (B) and attach to top panel (part A} using fillips head screwdriver. 2. Drill a 11/32" hole where you want to secure the unit.