Corner Hall Tree CF6033
Top Shelf 1 PC Upper Left Panel 1 PC Upper Right Panel 1 PC Seat Panel 1 PC Lower Left Panel 1 PC Lower Right Panel Lower Back Panel 1 PC 1 PC Bottom Panel 1 PC Lower Side Panel 2 PCS #1 #2 ∅1/4"X1" Bolt 16 PCS (Extra 2) #6 #3 Long Screw 27 PCS (Extra 3) #4 Hook 4 PCS Wood Dowel 14 PCS (Extra 2) #8 Adjustable Shelf 1 PC #5 Screw 8 PCS (Extra 1) #9 3X12mm Short Screw 24 PCS (Extra 2) Right Back Panel 1 PC ∅3X12mm 8X30mm #7 3X19mm Left Back Panel 1 PC Allen Wrench 1 PC 2 Safet
Step 1. Attach upper panels (parts B & C) to top shelf (part A) using wood dowels (part #2), bolts (part #1) and allen wrench (part #8). #8 A #2 #2 #8 #1 #1 #2 #2 #1 B #2 #2 C #1 x2 #2 x4 #8 x1 Step 2. Attach seat panel (part F) to upper panels (parts B & C) using wood dowels (part #2), bolts (part #1) and allen wrench (part #8).
Step 3. Attach hooks (part #3) to back panels (parts D & E) using screws (part #4) and phillips head screwdriver. #4 #4 #4 #4 #3 #4 E #4 D #3 x4 #4 x8 Step 4. Attach right back panel (part E) to assembled unit (parts A, B & F) using long screws (part #6) and phillips head screwdriver.
Step 5. Attach left back panel (part D) to assembled unit (parts A, C, E & F) using long screws (part #6) and phillips head screwdriver. #6 E #6 #6 A #6 #6 #6 D #6 #6 #6 C #6 F #6 #6 #6 #6 #6 #6 #6 #6 #6 x 16 Step 6. Attach lower panels (parts G, H & I) to seat panel (part F) using wood dowels (part #2), bolts (part #1) and allen wrench (part #8).
Step 7. Attach bottom panel (part K) to assembled unit (parts G, H & I) using wood dowels (part #2), bolts (part #1) and allen wrench (part #8). K #1 E #1 D G #2 I #2 F #8 #1 #2 #1 K #1 H #2 #1 #1 #8 #1 x5 #2 x4 #8 x1 Step 8. Attach lower side panels (part L) to assembled unit (parts F, G, H, I & K) using short screws (part #7) and phillips head screwdriver.
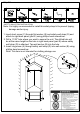
Step 9. Carefully turn unit upright. Insert shelf holders (part #5) into desired position and slide adjustable shelf (part J) into place. Important: Safety strap kit (part #9) must be installed to prevent tipping, damage and/or injury.
Step 10 SAFETY WALL STRAP INSTALLATION Note: It is highly recommended to install this safety strap kit to prevent tipping, damage and/or injury. 1. Insert short screw (C) through flat washer (E) and safety wall strap (D) and attach to right back panel (part E) using phillips head screwdriver. 2. Drill a 11/32" hole where you want to secure the unit. The drilled hole will be at the same height as the hole in right back panel (part E) where safety wall strap (D) is attached.