se Guide Guia Care Guide 'utilisation et 'entret=en m e Uso y Cuidado Printed in U.S.A. www.crosley.
Table of Contents Product Registration .............................................................. 2 Important Safety Instructions ............................................ 2-4 Drying Procedures ............................................................. 4-5 Operating Instructions ....................................................... 5-7 Features ................................................................................ 8 Dryer Settings Chart .................................................
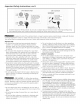
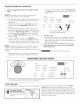
Important Safety Instructions, con't 240 v Electric Dryer 120 v Gas Dryer Grounding type wall receptacle 14-30 R 4-wire UL-approved service cord must be installed j_ Do not, under on electric dryers (not provided with unit except those manufactured for sale in Canadak s_ ] anYcut, clrcums_anCeSremove, or bypass the grounding prong. J (fused 30 amp) Power cord with 3-prong grounded plug Avoid fire hazard or electrical shock.
Important Safety Instructions, con't A thermal limiter switch automatically turns off the motor in the unlikely event of an overheated situation (electric dryers only). A service technician must replace the thermal limiter switch after correcting the fault. Failure to comply with these warnings could result in serious personal injuries. • ALWAYS disconnect the dryer from the electrical supply before attempting any service or cleaning. Failure to do so can result in electrical shock or injury.
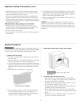
4. Select the appropriate load. cycle and settings To return to factory settings, press the Pause/Cancel and Select buttons at the same time and hold until the for each signal sounds. Over-drying can cause wrinkles, shrinkage, lint, harshness and a build up of static electricity. o Hills • Turn the cycle selector knob in either direction to select the cycle desired. The indicator for that cycle will be illuminated.
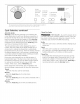
This manual covers many models and not all cycles, options, or features listed are available on every modek Console shown above for reference only, Your model may differ, Cycle Selection, continued Auto Dry Cycles Auto Dry cycles take the guesswork out of selecting the correct drying time for each load. Moisture sensing bars at the back of the dryer drum sense the moisture level of the load as it tumbles through the heated air.
Cycle Settings return to factory settings, press the Pause/Cancel and Select buttons at the same time and hold until the signal sounds. For best results Follow the fabric care label instructions on items to be washed. To change the Dryness level once the cycle has begun, press the Pause/Cancel button once, make the new selection and press Start again. Select the Normal Appropriate Temperature, Dryness level and Options will automatically be displayed for each cycle.
Features End of Cycle Signal A signal will sound at the end of the cycle and periodically during Extended Tumble (some models) at the volume level selected. Drum Light (some models) The drum light will come on whenever the door is opened to illuminate the drum during loading and unloading. Closing the door turns off the light.
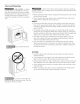
Care and Cleaning - FIRE HAZARD - A clothes dryer produces combustible lint. The dryer must be connected to an outdoors exhaust. Regularly inspect the outdoor exhaust opening and remove any accumulation of lint around the opening and in the surrounding area. To reduce risk of fire or serious injury to persons or property, comply with the basic warnings listed in the Important Safety Instructions and those listed below.
Common Drying Problems Many drying problems involve poor cleaning results, poor soil and stain removal, residues of lint and scum, and fabric damage. For satisfactory drying results, follow these suggestions provided by The Soap and Detergent Association. PROBLEM POSSIBLECAUSES Greasy, oily stains o Fabricsoftener sheet. Lint _ Overloading. o Overdrying causes static electricity. o Lint screen not clean when o Pilling (Fibers break off, ball up and cling to fabric.) o cycle began.
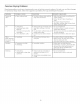
Avoid Service Checklist Before calling for service, review this list. It may save both time and expense. The list includes common occurrences that are not the result of defective workmanship or materials in this dryer. OCCURRENCE POSSIBLECAUSE SOLUTION Dryer does not start. Electrical power cord is not securely plugged in or plug may be loose. Make sure the plug fits tightly in wall outlet. House fuse blown or circuit breaker tripped. Reset circuit breaker or replace fuse.
Yourapplianceiscoveredby aoneyearlimitedwarranty.Foroneyearfromyouroriginaldateof purchase, CrosleyCorproationwill payallcostsfor repairingor replacinganypartsof thisappliancethat proveto bedefectivein materialsorworkmanshipwhensuchapplianceis installed,usedandmaintainedin accordance with the providedinstructions. Exclusions This warranty does not cover the following: 1. Products with original 2. Product that has been transferred Canada. serial numbers that have been removed, from its original 3.