Crosley ® OWNERS GUIDE TUMBLE ACTION LAUNDRY CENTER MANUAL DEL USUARIO LAVADORAY SECADORASUPERPUESTAS DE ACCIÓN GIRATORIA P/N 134888800 (0706) 1 www.crosley.
Contents The symbol on the product or on its packaging indicates that this product may not be treated as household waste. Instead it shall be handed over to the applicable collection point for the recycling of electrical and electronic equipment. By ensuring this product is disposed of correctly, you will help prevent potential negative consequences for the environment and human health, which could otherwise be caused by inappropriate waste handling of this product.
This Owner's Guide provides general operating instructions for your laundry center. It also contains information about features for several other models. Your laundry center may not have every feature included. Use the laundry center only as instructed in this Owner's Guide. Avoid fire hazard or electrical shock. Do not use an adaptor plug or extension cord or remove grounding prong from electrical power cord. Failure to follow this warning can cause serious injury, fire or death.
Important Safety Instructions (Con't) • Do not use any type of spray cleanser when cleaning dryer interior. Hazardous fumes or electrical shock could occur. • To prevent injury, do not reach into the washer while parts are moving. Before loading, unloading or adding items, push in the cycle selector knob and allow the tub to coast to a complete stop before reaching inside. • To prevent injury, do not reach into the dryer if the drum is moving.
. Add detergent, bleach and fabric softener to automatic dispenser following these steps: B. DETERGENT • Add measured detergent to the detergent compartment of the dispenser drawer. • Detergent is flushed from the dispenser at the beginning of the cycle. Either powdered or liquid detergent can be used. Note: Liquid detergent will drain into the washer drum as it is added. • Low sudsing detergent is recommended for this washer. Use the manufacturer's recommended amount.
Washing Procedures (continued) 6. Set cycle selector knob and washer controls according to type, size, and soil level of each load. (See Operating Instructions card for your specific model controls.) 7. Start the washer. Close the washer door and pull out the cycle selector knob. For your safety, the door will automatically lock during the entire wash cycle. The Door Lock indicator light will remain lit until the cycle ends. • • • • • Washer will fill and tumble.
For successful stain removal: • Remove stains promptly. • Determine the kind of stain, then follow the recommended treatment in the stain removal chart below. • To pretreat stains, use a prewash product, liquid detergent, or a paste made from granular detergent and water. • Use cold water on unknown stains because hot water can set stains. • Check care label instructions for treatments to avoid on specific fabrics. • Check for colorfastness by testing stain remover on an inside seam.
Common Washing Problems Many washing problems involve poor soil and stain removal, residues of lint and scum, and fabric damage. For satisfactory washing results, follow these suggestions provided by The Soap and Detergent Association. PROBLEM POSSIBLE CAUSES SOLUTIONS PREVENTIVE MEASURES Blue stains •Undiluted liquid detergent or fabric softener dispensed directly onto fabric. •If caused by detergent, mix 1 cup (240 ml) white vinegar with 1 quart (.95 L) water in a plastic container.
Drying Procedures • Follow the guidelines below for preparing the load for drying. • Read the Dryer Operating Instructions for operating your specific model. • Always read and follow fabric care labels and laundry product labels. To reduce the risk of fire, electrical shock, or injury to persons, read Important Safety Instructions before operating this dryer. 1. Prepare items for drying. • Dry items of similar fabric, weight and construction in the same load.
Cycle Signal Control (some models) When the Cycle Signal Control is ON, a signal will sound at the end of each cycle and during the Press Saver setting (some models). The volume is adjustable on some models. Features Drum Light (some models) A drum light will come on whenever the door is opened to illuminate the dryer drum during loading and unloading. Closing the door turns off the light. Drying Rack (some models) Use the drying rack to dry items which should not be tumble dried. 1.
Care and Cleaning To reduce risk of fire or serious injury to persons or property, comply with the basic warnings listed in Important Safety Instructions and those listed below. • Before cleaning the washer or dryer interior, unplug the electrical power cord to avoid electrical shock hazards. • Do not use any type of spray cleanser when cleaning the dryer interior. Hazardous fumes or electrical shock could occur.
Care and Cleaning Clean lint screen after every load. Inside the Dryer • Clean the dryer lint screen after every load. Lint build-up in the screen restricts air flow, which causes longer drying times. The screen is located at the bottom of the door opening. Remove by pulling straight up. Remove the lint and replace the screen. • Occasionally a waxy build-up may form on the lint screen from using dryer-added fabric softener sheets. To remove this build-up, wash the lint screen in warm, soapy water.
Winterizing Instructions Follow Winterizing Instructions for cold weather care. If the laundry center is stored in an area where freezing can occur or moved in freezing temperatures, follow these winterizing instructions to prevent damage to the laundry center: 1. 2. 3. 4. 5. 6. 7. 8. Turn off water supply faucets. Disconnect hoses from water supply and drain water from hoses. Plug electrical cord into a properly grounded electrical outlet.
OCCURRENCE OPERATING Washer does not start. POSSIBLE CAUSE / SOLUTION • Electrical power cord may not be plugged in or connection may be loose. Make sure plug fits tightly in wall outlet. • House fuse blown, circuit breaker tripped, or a power outage has occurred. Reset circuit breaker or replace fuse. Do not increase fuse capacity. If problem is a circuit overload, have it corrected by a qualified electrician. If problem is a power outage, call local electric company.
OCCURRENCE POSSIBLE CAUSE SOLUTION Electrical power cord is not securely plugged in or plug may be loose. Make sure the plug fits tightly in wall outlet. House fuse blown or circuit breaker tripped. Reset circuit breaker or replace fuse. DRYER Dryer does not start. Make sure electrical line is not overloaded and the dryer is on a separate circuit. Dryer runs but won't heat. Drying cycle takes too long, outside of the dryer feels too hot or smells hot. Thermal limiter tripped.
® CROSLEY WARRANTY Your appliance is covered by a one year limited warranty. For one year from your original date of purchase, Electrolux will pay all costs for repairing or replacing any parts of this appliance that prove to be defective in materials or workmanship when such appliance is installed, used and maintained inaccordance with the provided instructions. Exclusions This warranty does not cover the following: 1.
Crosley ® OWNERS GUIDE TUMBLE ACTION LAUNDRY CENTER MANUAL DEL USUARIO LAVADORAY SECADORASUPERPUESTAS DE ACCIÓN GIRATORIA www.crosley.
Table of Contents Important Safety Instructions..............................................................................................................................2-4 Washing Procedures.............................................................................................................................................5-7 Stain Removal ......................................................................................................................................................
For your safety, the information in this manual must be followed to minimize the risk of fire or explosion or to prevent property damage, personal injury or loss of life. - Do not store or use gasoline or other flammable vapors and liquids in the vicinity of this or any other appliance. - WHAT TO DO IF YOU SMELL GAS: • Do not try to light any appliance. • Do not touch any electrical switch; do not use any phone in your building. • Clear the room, building or area of all occupants.
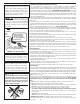
Important Safety Instructions (Con't) Avoid fire hazard or electrical shock. Do not use an adaptor plug or extension cord or remove grounding prong from electrical power cord. Failure to follow this warning can cause serious injury, fire or death. GAS LAUNDRY CENTERS: Grounding type wall receptacle Grounding type Do not under Do Not under any any circumstances wall circumstances cut, remove,cut, receptacle remove, or bypass or bypass the prong thegrounding grounding prong from plug fromthis this plug.
Washing Procedures • Follow the guidelines below for preparing the wash load. • Read the Washer Operating Instructions for operating your specific model. • Always read and follow fabric care and laundry product labels. To reduce the risk of fire, electrical shock, or injury to persons, read Important Safety Instructions before operating this washer. 1. Sort laundry into loads that can be washed together. Sort laundry into loads that can be washed together.
5. Add detergent, bleach and fabric softener to automatic dispenser following these steps: B. DETERGENT • Add measured detergent to the detergent compartment of the dispenser drawer. • Detergent is flushed from the dispenser at the beginning of the cycle. Either powdered or liquid detergent can be used. Note: Liquid detergent will drain into the washer drum as it is added. • Low sudsing detergent is recommended for this washer. Use the manufacturer's recommended amount.
Washing Procedures (continued) 6. Set cycle selector knob and washer controls according to type, size, and soil level of each load. (See Operating Instructions card for your specific model controls.) 7. Start the washer. Close the washer door and pull out the cycle selector knob. For your safety, the door will automatically lock during the entire wash cycle. The Door Lock indicator light will remain lit until the cycle ends. • • • • • Washer will fill and tumble.
For successful stain removal: • Remove stains promptly. • Determine the kind of stain, then follow the recommended treatment in the stain removal chart below. • To pretreat stains, use a prewash product, liquid detergent, or a paste made from granular detergent and water. • Use cold water on unknown stains because hot water can set stains. • Check care label instructions for treatments to avoid on specific fabrics. • Check for colorfastness by testing stain remover on an inside seam.
Common Washing Problems Many washing problems involve poor soil and stain removal, residues of lint and scum, and fabric damage. For satisfactory washing results, follow these suggestions provided by The Soap and Detergent Association. PROBLEM POSSIBLE CAUSES SOLUTIONS Blue stains •Undiluted liquid detergent or fabric softener dispensed directly onto fabric. •If caused by detergent, mix 1 cup (240 ml) white vinegar with 1 quart (.95 L) water in a plastic container. Soak item 1 hour. Rinse.
Drying Procedures • Follow the guidelines below for preparing the load for drying. • Read the Dryer Operating Instructions for operating your specific model. • Always read and follow fabric care labels and laundry product labels. To reduce the risk of fire, electrical shock, or injury to persons, read Important Safety Instructions before operating this dryer. 1. Prepare items for drying. • Dry items of similar fabric, weight and construction in the same load.
Cycle Signal Control (some models) Features When the Cycle Signal Control is ON, a signal will sound at the end of each cycle and during the Press Saver setting (some models). The volume is adjustable on some models. Drum Light (some models) A drum light will come on whenever the door is opened to illuminate the dryer drum during loading and unloading. Closing the door turns off the light. Drying Rack (some models) Use the drying rack to dry items which should not be tumble dried. 1.
Care and Cleaning To reduce risk of fire or serious injury to persons or property, comply with the basic warnings listed in Important Safety Instructions and those listed below. • Before cleaning the washer or dryer interior, unplug the electrical power cord to avoid electrical shock hazards. • Do not use any type of spray cleanser when cleaning the dryer interior. Hazardous fumes or electrical shock could occur.
Care and Cleaning Clean lint screen after every load. Wash lint screen occasionally. Follow Winterizing Instructions for cold weather care. Inside the Dryer • Clean the dryer lint screen after every load. Lint build-up in the screen restricts air flow, which causes longer drying times. The screen is located at the bottom of the door opening. Remove by pulling straight up. Remove the lint and replace the screen.
OCCURRENCE OPERATING Washer does not start. POSSIBLE CAUSE / SOLUTION • Electrical power cord may not be plugged in or connection may be loose. Make sure plug fits tightly in wall outlet. • House fuse blown, circuit breaker tripped, or a power outage has occurred. Reset circuit breaker or replace fuse. Do not increase fuse capacity. If problem is a circuit overload, have it corrected by a qualified electrician. If problem is a power outage, call local electric company.
OCCURRENCE POSSIBLE CAUSE SOLUTION Electrical power cord is not securely plugged in or plug may be loose. Make sure the plug fits tightly in wall outlet. House fuse blown or circuit breaker tripped. Reset circuit breaker or replace fuse. DRYER Dryer does not start. Make sure electrical line is not overloaded and the dryer is on a separate circuit. Dryer runs but won't heat. Drying cycle takes too long, outside of the dryer feels too hot or smells hot. Thermal limiter tripped.
® CROSLEY WARRANTY Your appliance is covered by a one year limited warranty. For one year from your original date of purchase, Electrolux will pay all costs for repairing or replacing any parts of this appliance that prove to be defective in materials or workmanship when such appliance is installed, used and maintained inaccordance with the provided instructions. Exclusions This warranty does not cover the following: 1.