Use & Care Manual Top Mount Refrigerator Welcome 2 Safety Instructions 3 Installation -- Includes Connecting Household Water Supply to Refrigerator 4 - 5 Door Removal & Reversal 6-9 Features at a Glance 9 Temperature Controls 10 Looking Inside 11 - 12 Ice Service 13 Food Storage & Energy Saving Tips 14 Normal Operating Sounds 15 Care & Cleaning Español 16 - 17 Warranty 18 Before You Call 19 20 READ AND SAVE THESE INSTRUCTIONS P/N 241824301 (June 2007)
WELCOME & CONGRATULATIONS Congratulations on your purchase of a new refrigerator! We here at Crosley Corporation are very proud of our product and we are completely committed to providing you with the best service possible. Your satisfaction is our #1 priority. FOR PRODUCT INFORMATION CONTACT: 336-761-1212 Crosley Corporation 111 Cloverleaf Dr. Winston-Salem, NC 27103 www.crosley.com Please read this Use & Care Manual very carefully.
IMPORTANT SAFETY INSTRUCTIONS PROPER DISPOSAL OF YOUR REFRIGERATOR OR FREEZER WARNING Please Read All Instructions Before Using This Refrigerator. Risk of child entrapment Child entrapment and suffocation are not problems of the past. Junked or abondoned refrigerators or freezers are still dangerous – even if they will sit for “just a few days.” If you are getting rid of your old refrigerator or freezer, please follow the instructions below to help prevent accidents.
INSTALLATION This Use & Care Manual provides specific operating instructions for your model. Use the refrigerator only as instructed in this Use & Care Manual. Before starting the refrigerator, follow these important first steps. DOOR OPENING Your refrigerator should be positioned to allow easy access to a counter when removing food. To make this possible, the direction in which the doors open can be reversed. See Door Removal & Reversal Instructions.
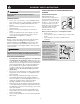
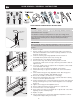
CONNECTING HOUSEHOLD WATER SUPPLY TO REFRIGERATOR To Connect Water Supply Line To Ice Maker Inlet Valve WARNING 1. 2. Disconnect refrigerator from electric power source. Place end of water supply line into sink or bucket. Turn ON water supply and flush supply line until water is clear. Turn OFF water supply at shutoff valve. 3. Unscrew plastic cap from water valve inlet and discard cap. 4. Slide brass compression nut, then ferrule (sleeve) onto water supply line, as shown. 5.
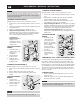
DOOR REMOVAL / REVERSAL INSTRUCTIONS DOOR REMOVAL AND REVERSAL INSTRUCTIONS: NOTE Top Hinge Cover If you have stainless steel doors -- go to the Removing Stainless Steel Doors and Handles Section on page 8. The direction in which your refrigerator doors open (door swing) can be reversed, from left to right or right to left, by moving the door hinges from one side to the other. Reversing the door swing should be performed by a qualified person.
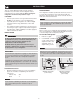
DOOR REMOVAL / REVERSAL INSTRUCTIONS NOTE TO REMOVE FREEZER HANDLE: (Handles may be easier to reverse while doors are off.) Some models have “pocket” handles, which are recessed into the sides of the door. On these models, only the hinges will need to be reversed. 1. 2. TO REMOVE FREEZER HANDLE: 3. (Handles may be easier to reverse while doors are off.) 1. Remove two screws attaching handle to bottom of freezer door. 2. Remove short trim piece by sliding trim straight up and off of handle bracket. 3.
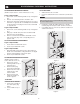
DOOR REMOVAL / REVERSAL INSTRUCTIONS TO REMOVE REFRIGERATOR HANDLE: TO ATTACH TRIM: (Handles may be easier to reverse while doors are off.) 1. 2. Figure 1 Style Handles 1. 2. 3. Remove two screws attaching handle to top of refrigerator door. Remove screw attaching bottom of handle to door. Remove two hole plugs and hinge pin plug on top of door and install on opposite side.
DOOR REMOVAL / REVERSAL INSTRUCTIONS REMOVING STAINLESS STEEL DOORS AND HANDLES 5. Remove center hinge and shim by removing inside screw and loosening two outside screws enough to allow hinge to slide out. 6. Remove bottom hinge. Reinsert two outside screws in holes and tighten. 7. Reverse steps 1 - 6 to reinstall doors CAUTION Use care when using tools near surface of stainless steel doors to avoid scratching. To Remove Doors Stainless steel doors are not reversible. Follow these steps to remove doors.
TEMPERATURE CONTROLS COOL DOWN PERIOD TEMPERATURE ADJUSTMENT To ensure safe food storage, allow the refrigerator to operate with the doors closed for at least 8 to 12 hours before loading it with food. • • • REFRIGERATOR & FREEZER CONTROLS NOTE Adjust temperature gradually: move the knob in small increments, allowing the temperature to stabilize. For colder temperatures, turn the knob towards Colder. For warmer temperatures, turn the knob towards Cold.
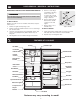
LOOKING INSIDE DOOR STORAGE CAUTION Door bins, shelves, and racks are provided for convenient storage of jars, bottles, and cans. Frequently used items can be quickly selected. To avoid personal injury or property damage, handle tempered glass shelves carefully. Shelves may break suddenly if nicked, scratched, or exposed to sudden temperature change. Some models have door racks or bins that can accommodate gallon-sized plastic drink containers and economy-sized jars and containers.
LOOKING INSIDE (CONTINUED) SPECIAL ITEM RACK (SOME MODELS) FREEZER TILT OUT DOOR RACK The innovative design of the Special Item Rack allows you to store a six-pack of 12 ounce drink cans, a bottle of wine, a two-liter soft drink bottle, or a carton of eggs. The Special Item Rack mounts on the left side of your refrigerator. To install, just slide the Special Item Rack onto any shelf as shown in the drawing.
FOOD STORAGE & ENERGY SAVING IDEAS ENERGY SAVING IDEAS FOOD STORAGE IDEAS • Fresh Food Storage • • The fresh food compartment should be kept between 34°F and 40° F with an optimum temperature of 37° F. Avoid overcrowding the refrigerator shelves. This reduces the circulation of air around the food and results in uneven cooling. Fruits and Vegetables • Storage in the crisper drawers traps moisture to help preserve the fruit and vegetable quality for longer time periods.
ICE SERVICE If your refrigerator has an automatic ice maker, it will provide a sufficient supply of ice for normal use. During the initial startup of your refrigerator, no ice will be produced during the first 24 hours of operation. Air in new plumbing lines may cause the ice maker to cycle two or three times before making a full tray of ice. With no usage, it will take approximately one to two days to fill the ice container.
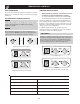
NORMAL OPERATING SOUNDS & SIGHTS UNDERSTANDING THE SOUNDS YOU MAY HEAR A. Evaporator The flow of refrigerant through the evaporator may create a boiling or gurgling sound. Your new high-efficiency refrigerator may make unfamiliar sounds. These are all normal sounds and soon will become familiar to you. They also indicate your refrigerator is operating as designed. Hard surfaces, such as vinyl or wood floors, walls, and kitchen cabinets may make sounds more noticeable.
CARE & CLEANING Keep your refrigerator and freezer clean to prevent odor build-up. Wipe up any spills immediately and clean both sections at least twice a year. Never use any type of scouring pads, brushes, abrasive cleaners or strong alkaline solutions on any surface. Do not wash any removable parts in a dishwasher. Always unplug the electrical power cord from the wall outlet before cleaning. CAUTION • • • When moving the refrigerator, pull straight out.
CARE & CLEANING (CONTINUED) NEVER CLEAN CONDENSER (SOME MODELS) CAUTION If your refrigerator is equipped with a Never Clean condenser, there’s no need to clean the condenser under normal operating conditions. If the refrigerator is operated under particularly dusty or greasy conditions, or if there is significant Defrost Water Pan (some models) pet traffic in your home, it may be necessary to periodically clean the condenser for maximum efficiency. Avoid cuts when replacing light bulbs, wear gloves.
WARRANTY REFRIGERATOR WARRANTY Your refrigerator is protected by this warranty FULL ONE-YEAR WARRANTY WARRANTY PERIOD THROUGH OUR AUTHORIZED SERVICERS, WE WILL: One year from original purchase date Pay all costs for repairing or replacing any parts of this appliance which prove to be defective in materials or workmanship. Excludes original and replacement Ice & Water filter cartridges (if equipped). Original and replacement cartridges are warranted for 30 days (parts only).
BEFORE YOU CALL 1-800-944-9044 (United States) Visit our web site at www.crosley.com. 1-800-668-4606 (Canada) Common Occurrences Before calling for service, review this list. It may save you time and expense. This list includes common occurrences that are not the result of defective workmanship or materials in this appliance. • • • • Ensure plug is tightly pushed into electrical outlet. Check/replace fuse with a 15 amp time-delay fuse. Reset circuit breaker. The temperature control is turned to "O".