
Operation Manual


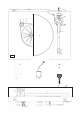

Cartridge Downforce Adjustment
The counterweight (5) supplied is suitable for cartridges weighing between 3.5 - 5.5g. Adjust the downforce prior to
installing the anti-skating weight (14).
- Gently push and turn the counterweight (5) onto the rear of the tonearm. Remove the cartridge protection cap.
Lower the tonearm lift and position the cartridge in the space between tonearm rest and platter. Carefully rotate the
counterweight (5) until the tonearm balances out. The tonearm should return to the balanced position if it is moved up or
down. This adjustment must be done carefully.
- Once the tonearm is correctly balanced return it to its’ rest. Hold the counterweight (5) without moving it, and gently
rotate the downforce scale ring (5a) until the zero is in line with white line on the rear of the tonearm (15). Check
whether the arm still balances out.
- Rotate the counterweight counter clockwise (seen from the front) to adjust the downforce according to the cartridge
manufacturer’s recommendations. One mark on the scale represents 1 mN (= 0.1g / 0.1 Pond) of downforce.
NOTE: The recommended downforce for the factory fitted cartridge is 17.5mN.
Anti-skating Force Adjustment
The anti-skating force must be adjusted according to the mass of the cartridge as follows:
Anti-skating Force Groove in the Stub (15)
10 - 15mN 1st from bearing rings
15 - 20mN 2nd from bearing rings (Recommended setting for factory installed cartridge)
20mN and bigger 3rd from bearing rings
Slip the loop of the anti-skating weight’s thread over the second groove of the stub to set the correct anti-skating force
for the factory-fitted cartridge. Feed the thread through the loop of the wire support (15).
Connection to the Amplifier
The Crosley C10 uses a moving magnetic cartridge. Connect the phono out cables (12) to the phono input on your
amplifier or pre-amplifier (phono stage). Line inputs such as CD, Tuner, Tape, or Video are not suitable for
phono inputs. Make sure the amplification of the selected input matches the type of cartridge being used. The factory
installed cartridge is 47k ohms / MM-input.
NOTE: If your amplifier does not have an input suitable for phono cartridges, you will need to purchase a separate
phono amplifier for moving magnetic cartridges. This separate phono amplifier will then connect between your turntable
and your amplifier.
Main Power Connection
The power adaptor (20) is in a small white box located in the foam packing material. Unpack the power adaptor and
plug the small end into the power input jack (11) located at the underside of the turntable on the back side. Plug the
power adaptor into your power outlet.
Installing the Lid
Install the lid (9) carefully over the hinge prongs and adjust the screws until the lid stays open where you want it to
without being too stiff to open or close.
Switching On and Off
The power switch is located on the bottom of the front left corner of your turntable. Pressing the power switch (16)
alternately starts or stops the motor.
Changing Playback Speed
To play records at 45 RPM, first remove the platter (4). Using the belt hook (2a) provided, hook the belt (2) over the
larger diameter part of the motor pulley (1). Refit the platter. To revert to 33
1/3
RPM repeat the proceedings using the
smaller step on the pulley.