
Operation Manual


Maintenance and Cleaning
Your turntable requires little or no regular maintenance. Remove dust with a slightly damp antistatic cloth. Never use a
dry cloth, this will create static electricity and attract more dust! Antistatic cleaning agents are available at specialist
stores, but must be applied sparingly to avoid damage to rubber parts. It is recommended to install the needle cover
before cleaning or maintenance is carried out to avoid damage.
If the turntable is not used over a long period of time, the drive belt should be removed to prevent unequal stretching.
NOTE: Always disconnect the record player from the power supply as a precaution before maintenance!
Useful Tips
The turntable should be positioned on a low-resonance surface such as wood or multiple layer ply board to avoid
structural vibrations disturbing playback.
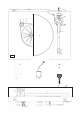
Installing New Cartridges
All cartridges with half inch mounting holes can be installed on this turntable. To install a new cartridge, start by
removing the two screws on the headshell, then remove the factory installed cartridge. Carefully remove the wire leads
from the factory cartridge, taking care not to damage the wire leads. Leaving the protective cover on, position the new
cartridge under the headshell, aligning the screw holes. Insert one screw in each hole and very lightly tighten (you will
need to rotate the cartridge for final adjustment before fully tightening). Connect the wire leads to the new cartridge as
listed below.
White Left channel positive (L+)
Red Right channel positive (R+)
Green Right channel negative (R-)
Blue Left channel negative (L-)
To achieve the best sound reproduction, the cartridge must be precisely aligned on the headshell. Position the included
paper alignment tool over the spindle. Carefully lift the tonearm and place the tip of the stylus on the points marked
130mm and 250mm. When the tip of the stylus is placed precisely on these points, the cartridge should be perfectly
parallel with the reference lines on the alignment tool. If necessary, gently rotate the cartridge on the headshell until the
cartridge is parallel with the reference lines at the two points. Once the new cartridge is positioned correctly, tighten the
cartridge mounting screws.
NOTE: If you are unfamiliar or uncomfortable with completing this procedure, we recommend consulting with a
professional to perform the installation.
Adjusting the Azimuth
The cartridge needle must be vertical in the record groove in order to track the groove wall modulations correctly. We
recommend the following adjustments to be made by a professional.
A small screw at the bearing end of the tonearm allows incorrect azimuth to be corrected if your needle is not mounted
exactly perpendicular to the cartridge body (which is often the case).
Loosen the screw just enough to be able to rotate the tonearm without applying force.
NOTE: Do not remove the screw completely!
When you are satisfied that the needle is vertical, retighten the screw carefully.
NOTE: Under no circumstances should the tonearm be adjusted with the needle still in the record groove! Permanent
damage may be caused to the cantilever suspension! The tonearm must be lifted each time an adjustment is made and
lowered afterwards to check the adjustment.