INSTRUCTIONS FOR USE CROSLEY C100
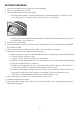
IMPORTANT SAFETY INSTRUCTION // CONSIGNES DE SÉCURITÉ IMPORTANTES The lightning flash with arrowhead symbol within the equilateral triangle is intended to alert the use to the presence of un-insulated “dangerous voltage” within the product’s enclosure that may be of sufficient magnitude to constitute a risk of electric shock.
ENGLISH IMPORTANT SAFETY INSTRUCTION 1. 2. 3. 4. 5. PLEASE READ CAREFULLY ALL THE FOLLOWING IMPORTANT SAFEGUARDS THAT ARE APPLICABLE TO YOUR EQUIPMENT Read Instructions - All the safety and operating instructions should be read before the product is operated. Retain instructions - The safety and operating instructions should be retained for future reference. Heed Warnings - All warnings on the product and in the operating Instructions should be adhered to.
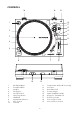
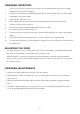
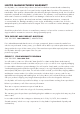
CONTROLS 15 16 16 1 14 17 13 2 12 11 3 10 4 9 5 6 7 18 1 2 3 4 5 6 7 8 9 10 8 19 45 RPM Adaptor Turntable Platter Spindle Strobe Dots On/Off Switch Start/Stop Button Headshell Speed Select Buttons Pitch Control Tonearm 11 12 13 14 15 16 17 18 19 2 Tonearm Rest and Hold Down Clip Cue Lever Anti-skate Knob Counterweight Spare Headshell Holder Hinges for Turntable Lid Downforce Scale Line out/Phono Jack Line out/Phono Switch
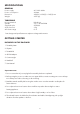
SPECIFICATIONS GENERAL Power supply Power consumption Dimension Weight AC 120V~60Hz 8 Watts 450(W) x 350(D) x 145(H) mm 4.55 Kgs TURNTABLE Driving Method Speeds Supplied stylus Stylus Pressure Anti-skate range Belt driven 331/3 and 45RPM AT3600L 3.
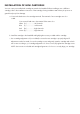
GETTING PREPARED 1 Remove the turntable from the box and remove the packaging. 2 Put the 45-rpm adaptor into its holder. 3 Set the turntable platter onto the center spindle. a. Once the turntable platter is in place rotate the platter so that the large window is that the top right corner, allowing you to access the pulley on the drive motor as shown below. 4 5 6 7 8 9 10 b.
INSTALLATION OF NEW CARTRIDGE Your unit comes pre-installed with cartridge mounted to the headshell. When installing a new or different cartridge, refer to the installation instructions of that cartridge. During installation attach the stylus protector to guard the stylus tip from damage. a. Connect the lead wires to the cartridge terminals. The terminals of most cartridges are color coded. Connect each lead wire to the terminal of the same color. White (L+) ....................
TURNTABLE OPERATION 1 Turn the On/Off Switch clockwise to turn on the power, the speed indicator light, which is located beneath the On/Off switch, will light up. 2 Place a record on the slip mat. When playing a 45-rpm record with a large center hole, place the 45rpm adapter on the center spindle. 3 Set the speed to match the record. 4 Remove the stylus protector from the stylus, and release the lock clip from the Tonearm Rest. 5 Set the cueing lever to the up position.
TROUBLESHOOTING Crosley turntables are manufactured to the highest standards and undergo strict quality controls before leaving the factory. Faults that may possibly occur are not necessarily due to material or production faults but can sometimes be caused by incorrect use or unfortunate circumstances. Therefore the following list of common fault symptoms is included. The platter doesn ’t turn although the unit is switched on: - The unit is not connected to the main power supply. - No power at the outlet.
LIMITED MANUFACTURERS WARRANTY Crosley Radio, Inc. warrants the product to be free from defects in material and workmanship under normal use for a period of one year from the original date of purchase. This warranty is not transferable. If the product is determined to be defective during the warranty period, the unit will be repaired or replaced at Crosley Radio’s sole discretion.