
Operating Instructions
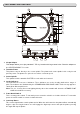
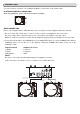

7. Headshell
The included HEADSHELL is used to connect your stylus with the tonearm.
8. Speed Select Button
The button is used to switch the platter rotation between 33 or 45 RPM. When the 33 RPM is engaged, the
red LED will light up; when the 45 RPM is engaged, the green LED will light up.
9. Pairing Button/ Indicator
Enables/disables the BLUETOOTH function.
Press for about 2 seconds and release to turn on your turntable's pairing mode.
The indicator lights blue while the turntable is connected to the BLUETOOTH wireless technology enabled
playback device with the BLUETOOTH function.
The indicator rapidly flashes blue while the turntable is in pairing mode, and turns off when the BLUETOOTH
function is disabled.
If there are no devices nearby that have already been paired when you press the PAIRING button with the
BLUETOOTH function disabled, the indicator lights red and the turntable goes into standby.
10. Pitch Control Slider
This slider is used to adjust the playback pitch percentage (platter speed).
11. Tonearm
12. Arm Rest Clamp and Rest
Use this rest to safely hold the tonearm in position during non use and transportation.
13. Tonearm Lever
This lever is used to safely elevate the tonearm above a record surface without endangering a records
surface.
14. Anti-skate Knob
The anti-skate applies inward force to the tonearm to prevent outward skipping across the record due to
the centrifugal force cause by platter rotation. The anti-skate value should be equally to that of the stylus
counterweight pressure.
15. Counterweight
Use the counterweight to balance the tonearm and to adjust the stylus pressure.
16. Extra Headshell Holder
This cutout has been designed to safely store an extra headshell.
17. DUST COVER HINGE HOLDERs
Attachment points for dust cover hinges.
18. RCA output jack
The output is switchable PHONO/LINE output. Depending on the position of the phono/line switch, you can
connect the turntable to any phono or line input. Connect the RCA-cables (white=left channel, red=right
channel) with the Phono-sockets of your amplifier or mixer.
19. Ground terminal (GND)
Connect the ground lead with the ground terminal of your amplifier or mixer.
20. Phono/Line Switch
This switch is used to change the mode of PHONO OUTPUT or LINE OUTPUT.
21. DC IN Jack
PART NAMES and FUNCTIONS