
Manual


Install SMART-MOUNT '_Tray Assembly in Wall Opening
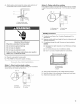
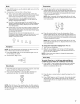
1. From inside, place SMART-MOUNTTMtray, support legs facing
down, in the wall opening. Match the holes in tray side with
the predrilled holes in wall opening.
Right Side
-_2
A. #10 - !2 x ! _" slot-head wood screw
NOTE: If the exterior of building can be damaged by support
legs, place a board between the wall and support legs.
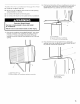
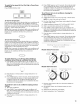
3. With tray center pushed away from the wall opening, place a
level on the angled edge of tray side. Be sure level is against
notch on tray side. Adjust SMART-MOUNT TMtray until bubble
indicates the tray is level.
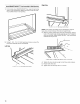
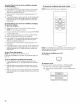
2. Using 2 - #10 - 12 x 11/2"slot-head wood screws, secure the
tray-frame assembly to the wall opening.
Left Side
A
A. #10 - 12x 1_" slot-head wood screw
A. Place level on angled edge against notch on tray side.
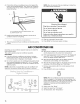
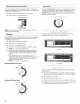
4. Tighten the hex nut just enough to hold tray center in place.
5. Repeat with other side.
6. Tighten hex nuts securely with 7_6"wrench.
14