AIR CONDITIONER For questions about features, operation/performance, accessories or service call: 1-800-253-1301 par[s, Table of Contents ................................................
TABLEOF CONTENTS AIR CONDITIONER SAFETY ......................................................... INSTALLATION REQUIREMENTS ................................................ Tools and Parts ............................................................................ 2 3 3 Location Requirements ................................................................ 3 Electrical Requirements ............................................................... 4 INSTALLATION INSTRUCTIONS .................................
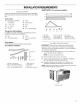
INSTALLATIONREQUIREMENTS SMART-MOUNT _ tray assembly installation Gather the required tools and parts before starting installation. Read and follow the instructions provided with any tools listed here, A_ B _ ...........
Window Installation Window opening measurements: • 27" (68.6 cm) minimum to 40" (101.6 cm) maximum opening width. • 19" (48.3 cm) minimum opening height. HH Electrical Shock Hazard Plug into a grounded Do not remove 3 prong outlet. ground prong. Do not use an adapter. B Do not use an extension V h A. 27" (68.6cm) minimum, 40" (101.6 cm) maximum B. !9" (48.
Power Supply Cord INSTALLATIONINSTRUCTIONS NOTE: Your unit's device may differ from the one shown. A i_ _d ¸_ Excessive Weight Hazard Use two or more people to move and install air conditioner. Failure to do so can result in back or other injury. A. Test button B. Reset button This room air conditioner is equipped with a power supply cord required by UL. This power supply cord contains state-of-the-art electronics that sense leakage current.
Using the tray back as a template, against outside edge of stool. center in windowsill 1. To assemble the tray frame, insert tab on tray back into slot on tray side. Check to see that the tab is engaged and the 2 pieces are aligned. Insert 2 - #8 - 18 x ¼" hex-head screws to secure. 2. Repeat with other tray side. C / A. Tray back B. Windowsill C. Outside edge of stool 2. A. Tray back B.
2= 3. Insert carriage bolt up through slot on tray-frame support leg. side and Install SMART-MOUNT _ Tray Assembly in Window 1. From inside, place SMART-MOUNT _ tray, support legs facing down, in the window. Match the holes in tray side with the predrilled holes in windowsill. 2. Using 2 - #10 - 12 x 11/2"slot-head tray frame to the window. wood screws, secure the Place one end of tray center over carriage bolt. A.
,*_,.,£_1% ,,_, _ ,,_, P_',.+ _,, _'_'_"_" Corse" "l_OtS@l __"_ Install Side Curtains o,',_,,_ Top View NOTE: Attach curtains to unit before placing unit in window. 1. Insert curtain into curtain frame. Make sure curtain end locks into curtain frame. Top View Bottom View Side View 5= 2. Push curtain in all the way. 3. Pull curtain toward open end of curtain frame. Extend right-hand curtain outward so you may insert the first screw through the middle hole of the curtain.
Incorrect • Handle air conditioner gently. • Be sure your air conditioner does not fall out of the opening during installation or removal. • Do not block the louvers on the front panel. • Do not block the louvers on the outside of the air conditioner. Excessive Weight Installation Hazard Use two or more people to move and install air conditioner. A. Window sash Failure to do so can result in back or other injury. B. Top channel C. Air conditioner Put air conditioner on SMART-MOUNT _ tray.
Top View B .................... E1 C Electrical Shock Hazard A. Side curtain against window channel B. Window channel C, #8 x _" round-head screw Plug into a grounded Do not remove 3 prong outlet. ground prong. Do not use an adapter. Complete 1. Installation Do not use an extension Insert foam seal behind the top of the lower window sash and against the glass of the upper window. Failure to follow these instructions fire, or electrical shock. 4, A. Lower window sash B.
Install Wood Frame 1. Construct wood frame, See "Location Requirements" dimensions. for 2. Measure outside width and height of frame to determine wall opening dimensions. 3. Cut opening through the wall. Remove and save insulation. NOTES: • Dimension for depth depends on wall thickness and type of molding. • Do not block louvers in air conditioner • Use 1" (2.5 cm) or thicker lumber for wood frame. cabinet, A. Inside screw holes B. Indoor side of wall opening A -_ 9. Remove the tray back.
4. Attach 1. Support Legs Then place flat washer, lock washer and hex nut. NOTE: Do not tighten. The leg must be able to move freely to adjust angle when installed. Determine the correct slots on the tray side from the type of exterior construction of the building. .......A Thin wall construction (vinyl, wood, etc.) ,, _s,, y,, C A ...... iii:ii: ........... A. Hex nut B. Lock washer C. Flat washer A. First and second slots Thick wall construction 5= (brick} D. Tray center E.
2. Using 2 - #10 - 12 x 11/2"slot-head wood screws, secure the tray-frame assembly to the wall opening. Left Side A. Angled edge on top of the tray side B. Notch 4. A Adjust SMART-MOUNT _ tray until bubble indicates the angled edge on top of the tray side is level. IMPORTANT: The tray must slope downward slightly toward the outside to provide proper drainage for the air conditioner. A. #10 - 12x 1_" slot-head wood screw Right Side //,f A. #10 - 12 x 1½" slot-head wood screw A.
2= If the feet on the bottom of the air conditioner do not rest on the wood strip, remove the air conditioner and adjust the SMART-MOUNT _ tray until feet rest on the wood strip. and adjust angle of tray until air conditioner sits against the bottom of the tray. IMPORTANT: The tray must slope downward slightly toward the outside to provide proper drainage for the air conditioner. O vN I I ....................... C A. Air conditioner B. Feet on bottom of air conditioner A.
AIR CONDITIONER USE Operating your air conditioner best possible results. properly helps you to obtain the Do not try to operate your air conditioner in the cooling mode when outside temperature is below 65°F (18°C). The inside evaporator coil will freeze up, and the air conditioner will not operate properly. This section explains proper air conditioner operation. IMPORTANT: • If you turn off the air conditioner, wait at least 3 minutes before turning it back on.
To set the Timer to turn on the air conditioner, previous settings: 1. Turn off air conditioner. Temperature Press the plus button to raise the temperature. Room indicator light will turn off, and Set indicator light will turn on, Display shows the Temperature control setting, Each time you press or hold the plus button, the temperature will increase 1° until it reaches 86°F (30°C), NOTE: After 3 seconds, Set indicator light will turn off, and Room indicator light will turn on.
To Operate Air Conditioner with Remote Control NOTE: Remote control may vary in appearance. "h To raise the temperature: Press the plus button. Room indicator light on air conditioner will turn off, and Set indicator light on air conditioner will turn on. Display on air conditioner shows the Temperature control setting. Each time you press or hold the plus button, the temperature will increase 1° until it reaches 86°F (30°C).
To set Timer to turn on air conditioner, previous settings: 1. Turn on air conditioner. 2. changing the 6. Press TIMER. Timer indicator light on air conditioner will flash. Hour indicator light on air conditioner will turn on, and display on air conditioner will show remaining hours before air conditioner will turn on. 7. Press the plus or minus button to change delay time (1 to 24 hours). 8. Press TIMER again or wait 10 seconds. Timer indicator light on air conditioner will remain on.
ModelsWithoutPowerSaver FAN SPEED Roll the wheel to direct the air right or left. Rotate the whole cartridge to direct air up, down or straight ahead, Tufb0 C001 Models With Power Saver FAN Wait A, Wheel SPEED three minutes F_n bd0r,__sta__ Save[ r_ P°wer Low C0ol High C001 A. Cartridge Temperature Turn the TEMPERATURE control to a mid-setting. Adjust the air conditioner's performance by turning the Temperature control clockwise for maximum cooling.
AIR CONDITIONER CARE Your new air conditioner is designed to give you many years of dependable service. This section tells you how to clean and care for your air conditioner properly. Call your local authorized dealer for an annual checkup. Remember... the cost of this service call is your responsibility. S_ _ _ ,_ _% ,, 3. Use a vacuum cleaner to clean air filter. If air filter is very dirty, wash it in warm water with a mild detergent.
TROUBLESHOOTING Before calling for service, try the suggestions below to see whether you can solve your problem without outside help. Air conditioner will not operate Air conditioner blows fuses or trips circuit breakers Electrical Shock Hazard Plug into a grounded 3 prong outlet. Do not use an adapter. Do not use an extension cord. can result in death, The power supply cord is unplugged. Plug into a grounded 3 prong outlet.
Air conditioner cool • The temperature of the room you are trying to cool is extremely hot. Allow extra time for the air conditioner to cool off a very hot room. • Windows or doors to the outside windows and doors. • The Exhaust control is set to OPEN (on some models). Push the Exhaust control CLOSED for maximum cooling. • Depending on model, the Tempf'l'ime or Temperature control is not at a cool enough setting.
ASSISTANCEOR SERVICE Before calling for assistance or service, please check "Troubleshooting." It may save you the cost of a service call. If you still need help, follow the instructions below. When calling, please know the purchase date and the complete model and serial number of your appliance. This information will help us to better respond to your request. Call the Customer eXperience Center toll free: 1-800-253-1301.
1188226B © 2005. AIIrightsreserved. SMART-MOUNT is a trademark of Whirlpool, U.S.A. 12/05 Printed in U.S.A.