PART LIST Top Panel Left Side Panel | Right Side Panel Middle Panel Left Door 1PC 1PC 1PC 1PC 1PC Right Door Rail Bottom Panel Back Panel | Adjustable Shelf 1pPC 1pPC 1PC PCS PCS HARDWARE LIST 5/8"x Short Bolt Spring Washer Flat Washer Allen Wrench Wood Dowel 15 PCS (Extra 1) | 20 PCS (Extra 1)| 20 PCS (Extra 1) 1PC 5 PCS (Extra 1/8"x 5/8'L 1"x Shelf Holder Screw Knob Round Head Door Magnet Bolt 17 PCS (Extra 1) | 9 PCS (Extra 1) 2PC8 3 PCS (Extra 1) 4 PCS Safety Strap Long Bolt Kit 18ET 5 PCS (Extra 1) ADD
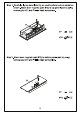
Step 1. Carefully lay top panel (part A) on a soft surface such as carpet as shown. Attach door magnets (part #10) to top panel (part A) using screws (part #7) and Phillips head screwdriver. Step 2. Attach door magnets (part #10) to bottom panel (part H) using screws (part #7) and Phillips head screwdriver.
Step 3. Attach rail (part G) to bottom panel (part H) using short bolts (part #1), spring washers (part #2), flat washers (part #3) and Allen wrench (part #4). Step 4. Open drawers on top panel (part A) as shown. Attach left side panel (part B) and right side panel (part C) to top panel (part A) using short bolts (part #1) , long bolts (part #12) , spring washers (part #2), flat washers (part #3) and Allen wrench (part #4).
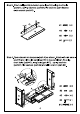
Step 5. Attach middle panel (part D) to top panel (part A) using short bolts (part #1), spring washers (part #2), flat washers (part #3), wood dowels (part #5) and Allen wrench (part #4). Step 6. Slide back panels (part |) into grooves of left side panel (part B), right side panel (part C), and middle panel {part D) as shown below.
Step 7. Attach bottom panel (part H) and rail (part G) to left side panel (part B), right side panel (part C) and middle panel (part D) using short bolt (part #1), spring washers (part #2), flat washers (part #3), wood dowels (part #5) and Allen wrench (part #4). Step 8. Carefully turn the unit upright.
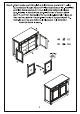
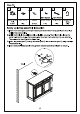
Step 9. Attach knobs (part #8) to left and right doors (parts E & F) using round head bolts (part #9) and Phillips head screwdriver. Install left and right doors (parts placing the bottom pin hinges (per-installed in doors) in the per-drilled holes of bottom panel (part H), and then depressing the top spring-loaded pin hinges so they can be placed in the per-drilled holes of top panel (part A). Note: Be sure top and bottom pin hinges are fully extended to secure doors in place.
Step 5/8"x #3xD8 | ¢4xD8 Safety Strap | Wall Anchor Bracket Short Screw | Long Screw | Safety Wall Kit Strap 18ET 1PC PCS 1PC 1PC 1PC Safety wall strap assembly instruction 1). Insert short screw (part C) through bracket (part B) and attach fo top panel (part A) using a fillips head screwdriver. 2). Drill a 6mm hole in the wall where this unit will be secured. The drilled hole will be at the same height as the hole in the top panel (part A) where the bracket (part B) was attached.