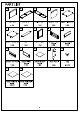
PART LIST Top Panel Left Panel Right Panel Bottom Panel |Upper Fixed Shelf 1PC 1PC 1PC 1PC 1PC Lower Fixed Shelf Rail Door Panel Drawer Front Drawer Back Panel Panel 1PC 1PC 1PC 1PC 1PC Drawer Left Panel | Drawer Right Drawer Bottom Back Panel Leg Panel Panel 1PC 1PC 1PC 1PC 4 PCS P Q Upper Adjustable | Lower Adjustable Shelf Shelf PCS 1PC
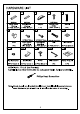
HARDWARE LIST 28*30mm @6*30mm Large Wood Small Wood Magnet Round Head Handle Dowel Dowel Screw 10 PCS (Extra 1)| 4 PCS (Extra 1) 1PC 2 PCS (Extra 1) 1PC #5 #1 #g | Knob Short Round Long Round Bolt Flat Washer Head Bolt Head Bolt 1PC 1 PC (Extra 1) 2 PCS (Extra 1) [12 PCS (Extra 1) | 4 PCS (Extra Spring Washer Shelf Holder Screw Allen Wrench Safety Strap Kit 4 PCS (Extra 1) | 12 PCS (Extra 1) | 20 PCS (Extra 1) 1PC 1PC ADDITIONAL TOOLS (Not Provided) Note: It is not recommended to use power tools during asse
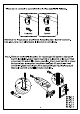
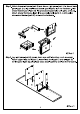
Please do not use tools to assemble this unit unless specifically indicated. Unlocked Locked Reference the images above any time the instructions state "lock the hardware”. Note: Be sure to check all hardware is locked when completed. Step 1. There are two installation options for magnet (part #3) based on door panel (part H) installation. Attach magnet (part #3) to rail (part G) using round head screws (part #4) and fillips head screwdriver.
Step 2. Attach drawer left panel (part K) and drawer right panel (part L) to drawer back panel (part J) using small wood dowels (part #2) and lock the hardware. Slide drawer bottom panel (part M) into grooves of assembled unit (parts Attach drawer front panel (part |) to assembled unit (parts using small wood dowels (part #2) and lock the hardware. #2%x4 Step 3. Lay right panel (part C) upside down on a soft flat surface, such as carpet.
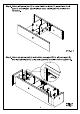
Step 4. Attach left panel (part B) to upper fixed shelf (part E), lower fixed shelf (part F) and rail (part G) using large wood dowel (part #1) and lock the hardware. #1 x1 Step 5. Attach top panel (part A) and bottom panel (part D) to left panel (part B) and right panel (part C) using bolts (part #9) and Allen wrench (part #14).
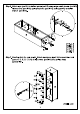
Step 6. Attach legs (part O) to bottom panel (part D) using large wood dowels (part #1), flat washers (part #10), spring washers (part #11), bolts (part #9) and Allen wrench (part #14). #15 x8 #9%%x 4 2 #100x 4 0 #11.x 4 #145x 1 Step 7. Carefully turn the unit upright. Attach back panel (part N) to assembled unit (parts using screws (part #13) and fillips head screwdriver.
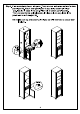
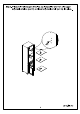
Step 8. Slide assembled drawer into place. There are two installation options for door panel (part H). Attach door panel (part H) by placing bottom pin hinge (per-installed in door) in the per-drilled hole of bottom panel (part D). Then depress the top spring-loaded pin hinge so it can be placed in the per-drilled hole of rail (part G). NOTE: Be sure top and bottom pin hinges are fully extended to secure door in place.
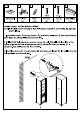
Step 9. Place shelf holders (part #12) into desired position and then slide upper adjustable shelves (part P) and lower adjustable shelf (part Q) into place.
#15) Dea” Safety Strap Kit Wall Anchor Washer Short Screw Long Screw Safety Wall Strap 1PC 1PC PCS 1PC 1PC 1PC SAFETY WALL STRAP INSTALLATION Note: It is highly recommended to install this safety strap kit to prevent tipping, damage and/or injury. 1.Insert short screw (C) through washer (B) and safety wall strap (E) and attach to back panel (part N) using fillips head screwdriver. 2.Drill a 11/32" hole where you want to secure the unit.