015 & 1015 SLIMLINE USER MANUAL V1.
Contents 1) Introduction 2) Taking Delivery / Transit Mode 3) Inserting title cards and compact discs 4) Playing the jukebox 5) Connecting external audio devices 6) Adding additional speakers 7) Adjusting amplifier settings 8) Diamond pack lighting 9) Bluetooth receiver 10)Troubleshooting 2 Pg 3 Pg 5 Pg 8 Pg 12 Pg 14 Pg 16 Pg 17 Pg 20 Pg 22 Pg 25
1. Introduction Thank you for purchasing a Classic Jukebox from Crosley Brands, manufactured by Sound Leisure, the world’s premier jukebox manufacturer. This product has been designed and built to give you many years of enjoyment and trouble free use. This owner’s guide provides all the information you will need to install and operate the jukebox safely. Important Safety Instructions 1. 2. 3. 4. 5. 6. 7. Read these instructions. Keep these instructions. Heed all warnings. Follow all instructions.
Additionally This jukebox contains high voltage & high temperature parts. Do not attempt to carry out any work that is not specifically instructed in this manual. If the jukebox fails to operate correctly, switch off and consult the trouble shooting guide at the end of this manual. No user serviceable parts inside. This jukebox is heavy. DO NOT attempt to lift the unit. DO NOT attempt to move the jukebox with the front door open. The jukebox is top heavy and may tip forwards if moved with the door open.
2. Taking Delivery / Transit Mode Once the jukebox has been positioned in its designated space the following instructions will allow you to prepare it for use. The keys to open the jukebox will be found attached to the rear of the cabinet. The keys will open the side lock and the rear cabinet lock. See below (FIG 1) The key will also open the cash box located inside the jukebox. (Not available in 1015 slimline) LOCK LOCATIONS MAIN CABINET LOCK.
Upon delivery the Jukebox will be in Transit mode. Follow the guide below to put the Jukebox into Operation mode. i) Unlock the side lock, and open the front door of the jukebox. ii) Remove the horizontal transit bar (see fig. 2) by unscrewing the black capped retaining screws at either end. Re-insert the screws once the bar is removed. iii) Remove the vertical transit bar by twisting it counter clockwise. These transit bars should be retained for future use.
iii) Locate the 4 wing nuts underneath the CD mechanism shelf. (see below fig. 3) Unscrew the wing nuts until they spin freely, (this helps the mechanism ‘float’, for optimum performance). iv) Plug the jukebox in and switch the mains power switch on. (location of power switch is shown in Fig 1 on page 5) The front LED display (located on the shelf in front of the CD mechanism) will show “TRANSIT”. v) Locate the transit switch on the inside right of the cabinet. (see fig.
Moving the Jukebox If you are moving the Jukebox over a distance, over uneven surfaces or intend tipping the machine, it is recommended that it is placed back in Transit mode.There is no need to remove CD’s as the horizontal transit bar will hold them in position. Follow the guide below to put the Jukebox back into Transit mode. i) Open the front door while the Jukebox is switched on. ii) Put the transit switch (see Fig 3 - page 7) back into the Transit position.
SL SPLIT - 2 part title card for use in the title rack of your Jukebox The title cards start at selection no. 100 and finish at 179. The following guide instructs how to change the title cards in the title card rack.
i) Unlock and open the jukebox door. On the inner side of the door you will find the title rack holder. ii) Gently release the wiring from the title rack wiring clips. iii) Slide the brass bolts shown in Fig 4 across to the unlocked position. iv) Remove the title rack from the jukebox as shown in fig 5. FIG 5 Image shows the title rack holder removed from the jukebox cabinet. v) With the title rack removed from the jukebox you can now insert the title cards into the title rack.
Compact Discs The rack that holds the CDs is numbered to correspond with the title selection cards. Slot 00 = title card 100 Slot 01 = title card 101 Slot 02 = title card 102 etc. Insert the CDs with the CD label facing to the right, (see fig 6). FIG 6 Fig 6 : Note the CD’s are facing with their labels to the RIGHT The mechanism holds 80CDs. CDs Disc’s Compact CDsDisc’s Compact PLEASE ENSURE THAT THE CDs ARE INSERTED ABSOLUTELY STRAIGHT.
4) Playing the jukebox Making Selections When the discs and labels are installed, selections can be made using the keyboard at the front of the jukebox or via the remote control. To “flip” the title rack pages press the red button located underneath the number “0” on the jukebox button bank. To play a track, select the 3 digit number for the disc, and then the 2 digit number of the individual track. These numbers will show up on the display as they are entered.
FIG 7 INFRA RED REMOTE CONTROL Please note the standby button is not yet implemented.
5) Connecting external audio devices The Jukebox has the facility to connect to external audio devices. Audio sources, such as DAB radios or MP3 players can be connected to the auxiliary inputs to allow them to play through the Jukebox speakers. An audio output is provided to allow the Jukebox to play through another amplifier, such as Surround Sound or Multi-room audio system. Connect a stereo phono lead to the audio output on the break-out connections located on the rear of the jukebox (fig 9).
FIG 8 VIEW OF D4 DIGITAL AMPLIFIER Microphone Input 6.35mm Jack Auxiliary inputs x 2 pairs. (Aux 1 left and right / Aux 2 left and right) Phono Digital Amp menu selection buttons.
6) Adding additional speakers The D4 Digital Amplifier has 4 independent outputs, configured as 2 stereo pairs. 2 outputs are used to drive the Jukebox’s internal speakers (Shown on amplifier as Channel 1) leaving 2 outputs (left and right) free for the connection of additional speakers (Shown on amplifier as Channel 3). If you have a D2 amplifier channels 3/4 are unavailable. FIG 10.
7) Adjusting amplifier settings It is possible to adjust the audio equalisation of the amplifier to suit a specific environment or taste. There are separate settings for the internal Jukebox speakers (Channel 1/2) and any additional speakers that may be connected (Channel 3/4). Pressing the ‘MENU UP’ or ‘MENU DOWN’ buttons on the D4 amplifier will cycle through the available menus. Pressing the ‘+’ or ‘-‘ buttons will increment or decrement the value of the current menu.
Aux Input 1 This Menu sets the master volume level for Auxiliary Input 1. This allows the volume of the Auxiliary input to be balanced against the volume of the CD mechanism. Aux Input 2 This Menu sets the master volume level for Auxiliary Input 2. See Aux Input 1 for description. Aux Input Auto/Manual Changes from auto input selection to manual input selection. Contact Crosley Brands for more information.
Line Out Voiceover / Karaoke If karaoke is selected the Line Out music and microphone will be heard together. If voiceover is selected, whenever the microphone is used the Line Out music will be muted, the music will un-mute when the microphone is no longer being used. Loudness When switched on the loudness control will provide a dynamic boost to the bass and treble when the Jukebox is used at low volume, the lower the volume the higher the boost.
8) Diamond Pack The Diamond Pack is a full LED lighting system that allows the user to select a lighting pattern from 10 pre-loaded patterns or pause the program on any colour to create a custom Jukebox illumination. To use the Diamond Pack, press the “COLOUR ON” button on the remote control. This turns on the lower left display panel situated below the title rack.
Should you wish to hold a pattern on a specific colour, press the “Hold On” button on the remote control when the Jukebox has the desired illumination. The lower left display panel will change to a ‘H’ to indicate a pattern is held as shown below In Fig 12. FIG 12. Further changes to the pattern cannot be carried out until the hold is released by pressing the “Hold Off” button on the remote control.
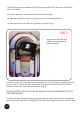
9) Bluetooth Installing the Bluetooth receiver: The Bluetooth receiver is an accessory and therefore may not be installed at the time of purchase. No tools are required to install the Bluetooth receiver. 1. The audio cables (phono) and power connections are already installed. Upon delivery these cables will be located on the lock side of the shelf that is situated underneath the player mechanism. (shown in step 1 below.) The Bluetooth receiver will also be packaged inside the jukebox. 2.
The Bluetooth accessory allows most Bluetooth enabled devices to wirelessly stream audio directly to the Jukebox. To pair an audio device to the Bluetooth accessory: 1 Ensure the LED on the front of the Bluetooth accessory is solid red. If the LED is not solid red, press the button on the front of the accessory to enter pairing mode. 2. Turn on the Bluetooth connection on your audio device and begin searching for devices (refer to your audio device manual for instruction on how to do this). 3.
Bluetooth unit located on the shelf inside the jukebox front door.
10) Trouble shooting If the fault you have is not covered below or occurs repeatedly please contact Crosley Brands on the phone or email address shown on the back of this manual. Fault : CD mechanism stuck or vibrating Solution : Possible CD obstruction, switch off the Jukebox and remove CD’s around the CD lift arm. Switch the Jukebox back on using the reset procedure outlined on the next page. Fault : Display showing multiple digits along the top line of the LED display and selections cannot be made.
Reset Procedure Occasionally if the machine has not been used for a long period of time or has experienced voltage spikes or CD mechanism jams, it may be necessary to reset the Jukebox. The reset procedure re-synchronises the various electronic parts of the Jukebox and will clear any data corruption that may have occurred. To reset the Jukebox: i) Switch off the Jukebox and ensure the front door is closed and locked. ii) Hold down the Jukebox Reset button on the back of the machine (fig 9 - page 15).
This product is proudly manufactured in the UK under license to Crosley Brands by Sound Leisure Limited 27
Crosley Brands 1220 east oak Street Louisville, KY 40204 United States Phone : 618-427-3761 Email: retailsales@crosleybrands.com www.crosleyradio.