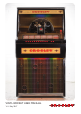
VINYL ROCKET USER MANUAL V1.
Contents 1) 2) 3) 4) 5) 6) 7) 8) 9) Introduction Taking delivery / Transit mode Inserting title cards Loading records Playing the jukebox Connecting external audio devices Adding additional speakers Adjusting amplifier settings Bluetooth connection Pg 3 Pg 5 Pg 8 Pg 9 Pg 11 Pg 14 Pg 16 Pg 17 Pg 20 Free Inside... Included in the welcome pack supplied with your jukebox is a FREE 12 month subscription to Sound Leisure’s Label Magic title card printing software.
1. Introduction Thank you for purchasing a Classic Jukebox from Crosley Brands, manufactured by Sound Leisure, the worlds premier jukebox manufacturer. This product has been designed and built to give you many years of enjoyment and trouble free use. This owner’s guide provides all the information you will need to install and operate the jukebox safely. Important Safety Instructions 1. 2. 3. 4. 5. 6. 7. Read these instructions. Keep these instructions. Heed all warnings. Follow all instructions.
Additionally This jukebox contains high voltage & high temperature parts. Do not attempt to carry out any work that is not specifically instructed in this manual. If the jukebox fails to operate correctly, switch off and consult the trouble shooting guide at the end of this manual. No user serviceable parts inside. This jukebox is heavy. DO NOT attempt to lift the unit. DO NOT attempt to move the jukebox with the front glass open.
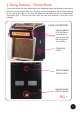
2. Taking Delivery / Transit Mode Once the jukebox has been positioned in its designated space the following instructions will allow you to prepare it for use. The keys to open the jukebox will be found attached to the rear of the cabinet. The keys will open the side locks and the rear cabinet lock. See below (FIG 1) The key will also open the cash box located on the side of the jukebox. LOCK LOCATIONS MAIN CABINET LOCKS. Please note there is a lock on both the left and right of the jukebox.
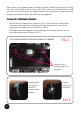
Upon delivery the Jukebox player mechanism will be locked into position by 4 wing nuts that are located under the play deck. These must be loosened before initial operation. The loosening of the wingnuts allows the mechanism to float freely and dampen any vibrations which may effect the vinyl playback. To loosen the retaining bolt wingnuts : - Unlock the rear cabinet door (shown in FIG 1) and remove the cabinet door. Locate the retaining bolts and wingnuts.
With the retaining wingnuts loosened the jukebox is ready to be switched on. - Close and lock the rear cabinet door. - Plug the jukebox in and switch the power switch on. (location of power switch is shown in FIG 1 on page 5). The Jukebox is now in play mode. Powering OFF the jukebox: - WARNING : Eject any record prior to powering OFF the jukebox. - Switch the power input switch on the rear of the jukebox to OFF Failure to eject any record prior to powering OFF can damage the mechanism.
3) Inserting title cards Title card rotation buttons Title cards Perforated blank title cards and Sound Leisure’s Label Magic printing software are included in your jukebox welcome pack. For further details on installing your software and your FREE 12 month subscription code please see the postcard included in the welcome pack or visit : label-magic.com/crosley This will assist you in designing and printing title cards. Additional cards are available to purchase.
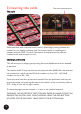
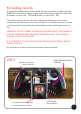
4) Loading records As previously mentioned the jukebox holds 70 vinyl records and can play both sides (A&B). Each record has a number to play side A and another number for side B. Side A numbers run from 100 - 169. Side B numbers run from 200 - 269. The jukebox selects a chosen record by rotating the mechanism to the chosen number and then offering that record to the stylus. It is therefore important to make sure the records are inserted in the correct basket number and facing the correct way.
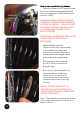
How to load records into the jukebox GRASP AND ROTATE TO LEFT - When the jukebox is NOT playing. Rotate the record mechanism by grasping the belt drive and rotating to the left (anticlockwise) (shown in FIG5) WARNING! DOING THIS WILL ROTATE THE BASKET. PLEASE ENUSRE THERE ARE NO ITEMS IN THE WAY - SUCH AS LOOSE CLOTHING / FINGERS / JEWELLRY THAT COULD BECOME CAUGHT AS THE BASKET ROTATES. DO NOT PLAY WARPED RECORDS AS THIS COULD DAMAGE THE PLAYING MECHANISM.
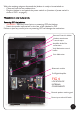
5) Playing the jukebox Making Selections When the records and labels are installed, selections can be made using the keyboard at the front of the jukebox or via the remote control. To rotate the title rack pages press the red buttons located on the far right hand side of the button bank. < or > To play a record via the jukebox buttons, select the 3 digit number as specified on the title card. For instance 124 (side A) or 224 (side B).
Ejecting a Record A record that is playing can be ejected at any point by pressing the “eject disc” button or “eject track” button on the remote control. Adjusting the volume To increase or decrease the volume level of the jukebox press the VOL 1 buttons on the remote up and down. The ‘VOL 2’ volume keys on the remote are used to adjust the volume of any external speakers connected to the jukebox. Please refer to section 6 “Adding additional speakers”.
FIG 7 INFRA RED REMOTE CONTROL Eject track Numeric selection keys. Used to make track selection Eject disc Keyboard cancel Please note the standby button is not yet implemented.
6) Connecting external audio devices The Jukebox has the facility to connect to external audio devices. The Vinyl Rocket also features a Bluetooth module that is, by default connected to the Aux 1 input. For instructions on playing through Bluetooth see section 8. Audio sources, such as DAB radios or MP3 players can be connected to Aux 2 to allow them to play through the Jukebox speakers.
FIG 8 VIEW OF D4 DIGITAL AMPLIFIER Microphone Input 6.35mm Jack Auxiliary inputs x 2 pairs. (Aux 1 left and right / Aux 2 left and right) Phono Digital Amp menu selection buttons.
7) Adding additional speakers The D4 Digital Amplifier has 4 independent outputs, configured as 2 stereo pairs. 2 outputs are used to drive the Jukebox’s internal speakers (Shown on amplifier as Channel 1) leaving 2 outputs (left and right) free for the connection of additional speakers (Shown on amplifier as Channel 3). If you have a D2 amplifier channels 3/4 are unavailable. FIG 10.
8) Adjusting amplifier settings It is possible to adjust the audio equalisation of the amplifier to suit a specific environment or taste. There are separate settings for the internal Jukebox speakers (Channel 1/2) and any additional speakers that may be connected (Channel 3/4). Pressing the ‘MENU UP’ or ‘MENU DOWN’ buttons on the D4 amplifier will cycle through the available menus. Pressing the ‘+’ or ‘-‘ buttons will increment or decrement the value of the current menu.
Aux Input 1 This Menu sets the master volume level for Auxiliary Input 1. This allows the volume of the Auxiliary input to be balanced against the volume of the vinyl mechanism. Aux Input 2 This Menu sets the master volume level for Auxiliary Input 2. See Aux Input 1 for description. Aux Input Auto/Manual Changes from auto input selection to manual input selection. Contact Sound Leisure for more information.
Line Out Microphone Volume This menu sets the volume of the microphone sent to the Line Output. Line Out Voiceover / Karaoke If karaoke is selected the Line Out music and microphone will be heard together. If voiceover is selected, whenever the microphone is used the Line Out music will be muted, the music will un-mute when the microphone is no longer being used.
9) Bluetooth The Bluetooth accessory allows most Bluetooth enabled devices to wirelessly stream audio directly to the Jukebox. To pair an audio device to the Bluetooth accessory: 1 Ensure the LED on the front of the Bluetooth module is solid red. If the LED is not solid red, press the button on the front of the accessory to enter pairing mode. 2. Turn on the Bluetooth connection on your audio device and begin searching for devices (refer to your audio device manual for instruction on how to do this). 3.
Bluetooth unit located in rear of the jukebox cabinet LED Display Pairing button FIG 11 21
This product is proudly manufactured in the UK under license to Crosley Brands by Sound Leisure Limited 22
Crosley Brands 1220 east oak Street Louisville, KY 40204 United States Phone : +27 11 465 3746 Email: retailsales@crosleybrands.com www.crosleyradio.