CR42C
1
6
Basic Operation Included in the package: - Lancaster - 45RPM Adaptor - 3.
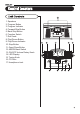
1. Speakers 2. Program Button 3. Program Indicator 4. Forward Skip Button 5. Back Skip Button 6. Function Switch 7. Dail Scale 8. Play/Pause Button 9. Play/Pause Indicator 10. Stop Button 11. Open/Close Button 12. AM/FM Band Switch 13. ON/OFF-Volume Rotary Knob 14. LED Display 15. Tuning Knob 16. CD Door 17.
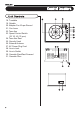
18. Turntable 19. Spindle 20. Adapter For 45 rpm Record 21. Cue Lever 22. Tone Arm 23. Speed Control Switch (33 1/3, 45, 78 rpm) 24. Tone Arm Rest 25. Security Hook 26. External Antenna 27. AC Power Plug Cord 28. Line in Jack 29. Line in Switch 30. Cassette Eject/Fast Forward 31.
Press the PLAY/PAUSE BUTTON (8) to start playback.The PLAY/PAUSE INDICATOR (9) will light up. To pause playback, press the PLAY/PAUSE BUTTON (8).The PLAY/PAUSE INDICATOR (9) will flash. Press the PLAY/PAUSE BUTTON (8) again to resume playback. To stop playback, press the STOP BUTTON (10). The PLAY/PAUSE INDICATOR (9) will go off.
Limited Manufacturer’s Warranty Crosley Radio, Inc. warrants the product to be free from defects in material and workmanship under normal use for a period of one year from the original date of purchase. This warranty is not transferable. If the product is determined to be defective during the warranty period, the unit will be repaired or replaced at Crosley Radio's sole discretion.
CR42C
1
2
Merci d'avoir acheté l'appareil Crosley Lancaster (CR42C). Avant d'utiliser cet appareil, veuillez lire attentivement ce manuel et conservez-le comme référence. Pour commencer Emplacement des commandes. 4, 5 Déballage........................... 6 Source d'alimentation…….. 6 Utilisation de base Les instructions contenues dans ce manuel décrivent les fonctions de commande du CR42C. Inclus dans l'emballage : - Lancaster - Adaptateur 45 tours - Câble stéréo 3,5 mm Utilisation du tourne-disque..
Emplacement des commandes Commandes de l'appareil 1. 2. 3. 4. 5. 6. 7. 8. 9. 10. 11. 12. 13. 14. 15. 16. 17.
Emplacement des commandes Commandes de l'appareil 18. 19. 20. 21. 22. 23. 24. 25. 26. 27. 28. 29. Tourne-disque Broche Adaptateur pour disque 45 tours Levier de déplacement Bras de lecture Sélecteur de vitesse (33⅓, 45 ou 78 tours) Support du bras de lecture Crochet de sécurité Antenne externe Cordon d'alimentation CA Prise d'entrée de ligne Sélecteur d'entrée de ligne 30. Éjection de la cassette/Avance rapide 31.
Pour commencer Source d'alimentation Déballage 1 Retirez le matériel d'emballage de l'appareil. REMARQUE : conservez tout le maté riel d'emballage. 2 Retirez le sac en plastique couvrant la radio. 1 Déroulez le CORDON D'ALIMENTATION CA (27) à l'arrière. 2 Branchez le cordon CA dans une prise appropriée. 3 Retirez le capuchon de sécurité en plastique de la fiche CA. 4 Retirez les attaches du cordon CA et détachez le fil de l'antenne à l'arrière de la radio.
Utilisation du tourne-disque Utilisation du tourne-disque Allumez l'appareil en tournant le BOUTON ON/OFF-VOLUME (13) situé sur la face avant en position ON (MARCHE). 1 Réglez le SÉLECTEUR DE FONCTION (6) sur PH pour le mode PHONO. 2 Réglez le SÉLECTEUR DE VITESSE (23) à la bonne vitesse (33⅓ , 45 ou 78 tours). Placez le disque sur le tourne-disque. 3 Utilisez le LEVIER DE DÉPLACEMENT (21) pour soulever le bras de lecture hors de son support. Tirez le BRAS DE LECTURE (22) doucement vers la gauche.
Utilisation du lecteur de cassettes et de la radio Utilisation du lecteur de cassettes Utilisation de la radio 1 Réglez le SÉLECTEUR DE FONCTION (6) sur TA pour le mode CASSETTE. 1 Réglez le SÉLECTEUR DE FONCTION (6) sur RA pour le mode RADIO. 2 Insérez une cassette préenregistrée par la PORTE DU COMPARTIMENT CASSETTE (31). La cassette glisse à l'intérieur du mécanisme à cassette et sa lecture commence. 2 Réglez le SÉLECTEUR AM/FM (12) sur la bande désirée (AM ou FM).
Utilisation du lecteur CD Accès à la piste suivante ou précédente Lecture d'un CD 1 Réglez le SÉLECTEUR DE FONCTION (6) sur CD pour le mode CD. 2 Appuyez sur le BOUTONOUVRIR/FERMER (11) pour ouvrir la PORTE DU COMPARTIMENT CD (16). Placez un disque sur le plateau, la face personnalisée tournée vers le haut. 3 4 Appuyez à nouveau sur le BOUTON OUVRIR/FERMER (11) pour fermer la PORTE DU COMPARTIMENT CD (16).
Utilisation du lecteur CD Lecture programmée 1 Appuyez sur le BOUTON DE PROGRAMMATION(2). L'affichage indique «01» et l'INDICATEUR DE PROGRAMME (3) se met à clignoter. 2 Appuyez sur le BOUTON SUIVANT (4) ou le BOUTON PRÉCÉDENT (8) pour sélectionner une piste. 3 Appuyez une nouvelle fois sur le BOUTON DE PROGRAMMATION (2) pour enregistrer le numéro de piste sélectionné. 4 Répétez l'étape 2 et 3 ci-dessus pour programmer d'autres pistes. 5 Appuyez sur le BOUTON LECTURE (8) pour lire la programmation.
Branchement d'un équipement en option Dépannage Entrée auxiliaire 1 2 Vous pouvez connecter des composants externes à votre appareil en utilisant l'entrée auxiliaire. Branchez le câble auxiliaire dans la PRISE D'ENTRÉE DE LIGNE (14) située à l'arrière de l'appareil. 3 Changez la position du SÉLECTEUR D'ENTRÉE DE LIGNE (28) situé à l'arrière de votre appareil. 4 Branchez l'autre extrémité du câble auxiliaire dans la prise de sortie du composant externe souhaité.
CR42C
1
2
Bienvenido Gracias por adquirir el tocadiscos Lancaster (CR42C) de Crosley. Antes de operar esta unidad, lea atentamente este manual y consérvelo para el futuro. Acerca de este manual Las instrucciones de este manual describen las funciones de los controles del CR42C. Este paquete incluye: - Lancaster - Adaptador de 45 rpm - Cable estéreo de 3.5 mm Índice Inicio Localizadores de controles.4, 5 Desembalaje…………......... 6 Fuente de alimentación….. 6 Funcionamiento básico Funcionamiento del tocadiscos.
Localizadores de controles Controles de la unidad 1. 2. 3. 4. 5. 6. 7. 8. 9. 10. 11. 12. 13. 14. 15. 16. 17.
Localizadores de controles Controles de la unidad 18. 19. 20. 21. 22. 23. 24. 25. 26. 27. 28. 29. 30. 31.
Inicio Desembalaje 1 Quite los materiales de em-balaje de la unidad. NOTA: Conserve todos los materiales de embalaje. 2 Quite la bolsa de plástico que cubre la radio. 3 Quite la tapa plástica de seguridad del enchufe de C/A. 4 Quite la atadura del cable de C/A y suelte el cable de la antena en la parte trasera de la radio. 5 Abra la tapa y retire el material de en-víode poliestireno extruido del tocadiscos. 6 Retire la banda de sujeción negra situa-da debajo del brazo del tocadis-cos.
Funcionamiento del tocadiscos Funcionamiento del tocadiscos Encienda la unidad girando la PERILLA GIRATORIA DE VOLUMEN - ENCENDIDO/APA GADO (13) situada en el panel frontal a la posición de ENCENDIDO. 1 Ajuste el INTERRUPTOR DE FUNCIONES (6) en PH para el modo GRAMÓFONO. 2 Ajuste el INTERRUPTOR DE CONTROL DE VELOCIDAD (23) a la velocidad deseada (33 1/3 ,45 o 78 rpm). Coloque el disco sobre el tocadiscos. 3 Use la PALANCA DE INDICACIÓN (21) para levantar el brazo del tocadiscos de su soporte.
Operación de radio y casete Operación de casete 1 Ajuste el INTERRUPTOR DE FUNCIONES (6) en TA para el modo CASETE. 2 Inserte una cinta pregrabada a través de la PUERTA PARA CASETE (31). La cinta se deslizará hacia el mecanismo de casete y comenzará la reproducción. 3 4 Ajuste el nivel de volumen girando la PERILLA DE VOLUMEN (13). Para el avance rápido, presione EXPULSAR CASETE/AVANCE RÁPIDO (30) hasta la mitad.
Funcionamiento del CD Para reproducir un CD 1 Ajuste el INTERRUPTOR DE FUNCIONES (6) en CD para el modo CD. 2 Presione el BOTÓN DE ABRIR/CERRAR (11) para abrir la PUERTA PARA CD (16). Coloque un disco en la bandeja con el lado de la etiqueta hacia arriba. 3 Presione el BOTÓN DE ABRIR/CERRAR (11) y vuelva a cerrar la PUERTA PARA CD (16). La pantalla mostrará “—” durante unos pocos segundos y luego mostrará el número total de pistas en el disco.
Funcionamiento del CD Reproducción programada 1 Presione el BOTÓN DE PROGRAMA (2). Se mostrará “01” en la pantalla y el INDICADOR DE PROGRAMA (3) parpadeará. 2 Presione el BOTÓN DE SALTO ADELANTE (4) o el BOTÓN DE SALTO ATRÁS (8) para elegir una pista. 3 Presione nuevamente el BOTÓN DE PROGRAMA (2) para almacenar el número de pista seleccionado. 4 Repita los pasos 2 y 3 anteriores para programar otras pistas. 5 Presione el BOTÓN DE REPRODUCCIÓN (8) para iniciar la reproducción programada.
Conexión de equipo opcional Entrada auxiliar Solución de problemas Puede conectar componentes externos a su unidad mediante la entrada auxiliar. No recibe corriente. 1 Asegúrese de que la radio esté enchufada correctamente. 2 Enchufe el cable auxiliar al CONECTOR DE ENTRADA (14) ubicado en la parte trasera de la unidad. 2 Verifique que la unidad esté encendida presionando el botón de alimentación. 3 Conmute el INTERRUPTOR DE ENTRADA (28) en la parte posterior de la unidad.