SIDEBYSIDE REFRIGERATOR Table of Contents ................................................. www.crosley.
TABLEOF CONTENTS REFRIGERATOR SAFETY ............................................................. 3 Proper Disposal of Your Old Refrigerator .................................... 3 INSTALLATION INSTRUCTIONS .................................................. 4 Unpacking .................................................................................... 4 Location Requirements ................................................................ 4 Electrical Requirements ..........................................
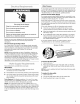
REFRIGERATOR SAFETY Your safety and the safety of others are very important. We have provided many important safety messages in this manual and on your appliance, Always read and obey all safety messages.
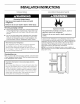
INSTALLATION INSTRUCTIONS Excessive Weight Hazard Use two or more people to move and install refrigerator. Failure to do so can result in back or other injury. Removing packaging materials • Remove tape and glue residue from surfaces before turning on the refrigerator. Rub a small amount of liquid dish soap over the adhesive with your fingers. Wipe with warm water and dry. Do not use sharp instruments, rubbing alcohol, flammable fluids, or abrasive cleaners to remove tape or glue.
Water Pressure A cold water supply with water pressure of between 30 and 120 psi (207-827 kPa) is required to operate the water dispenser and ice maker. If you have questions about your water pressure, see "Troubleshooting" or call a licensed, qualified plumber. Reverse Osmosis Water Supply If a reverse osmosis water filtration system is connected to your cold water supply, the water pressure to the system needs to be a minimum of 40 to 60 psi (276 - 414 kPa).
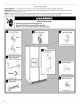
TOOLS NEEDED: 1/4 in.hex-head socketwrench, %6in.hex-head socketwrench andaflat-blade screwdriver. IMPORTANT: Before youbegin,turntherefrigerator control OFEunplug refrigerator ordisconnect power. Remove foodandany adjustable doororutilitybinsfromdoors. NOTE: It mayonlybenecessary toremove eitherthedoorhandle orthedoorstogetyourproduct through thedoorway ofyour residence. Measure thedooropening todetermine whether toremove therefrigerator handles orthedoors.
6. Handle Removal 1. (optional) Apply firm pressure with your hand on the face of trim. Slide top trim up and bottom trim down away from handle. Lift trim pieces off shoulder screws (see Graphic 1). Disconnect wiring: Style 1 • Disconnect • wiring plug. Remove green ground wire screw to disconnect ground wires. 3 NOTE: Some models include accent pieces between the handle and the handle trim.
4. Alignandreplace thetoplefthingeasshown(seeGraphic 4). Tighten screws. Use a hex-head socket wrench to adjust the leveling screws. Turn the leveling screw to the right to raise that side of the refrigerator or turn the leveling screw to the left to lower that side. It may take several turns of the leveling screws to adjust the tilt of the refrigerator (see Graphic 8). NOTE: Having someone push against the top of the refrigerator takes some weight off the leveling screws and rollers.
NOTE: Allow 24 hours to produce the first batch of ice. Allow 3 days to completely fill ice container. Connecting to Refrigerator Style 1 1. Unplug refrigerator or disconnect 2. 3. 4. 5. Style 3 1. Unplug refrigerator or disconnect power. power. Attach the copper tubeto the valve inlet using a compression nut and sleeve as shown. Tighten the compression nut. Do not overtighten. Use the tube clamp on the back of the refrigerator to secure the tubing to the refrigerator as shown.
2= Use a sturdy container to depress the water dispenser bar until the water begins to flow. Flush the water system by dispensing and discarding 2 to 3 gal. (8 to 12 L) of water. Cleaning the system will take approximately 6 to 7 minutes and will help clear air from the line. Additional flushing may be required in some households. NOTE: As air is cleared from the system, water may spurt out of the dispenser. 3= Open the freezer door and turn on the ice maker by lowering the wire shutoff arm.
Adjusting Some models dispense both cubed and crushed ice. Before dispensing ice, select which type of ice you prefer. The button controls are designed for easy use and cleaning. Controls If you need to adjust temperatures, temperature first. adjust the refrigerator ICE NOTE: Wait at least 24 hours between adjustments recheck the temperatures. and then Turn the control right (clockwise) to make the compartment colder. Turn the control left (counterclockwise) to make it less cold.
The Dispenser Light The dispenser area has a light. It can be turned on manually by pressing the ON button (touchpad or rocker switch). On some models: Whenever you use the dispenser, the lever will automatically turn the light on. NOTE: Do not use with water that is microbiologically or of unknown quality without adequate disinfection or after the system. LIGHT OFF Changing ON NOTE: See the "Changing the Light Bulbs" section for information on changing the dispenser light bulb.
5= With cartridge cap in the vertical position, push the new filter cartridge into the base grille until it stops. Rotate the cartridge cap clockwise to a horizontal position. Flush the water system (see "Flushing the Water System After Replacing Filter" later in this section). To increase ice production Normal Ice Production: In normal ice production mode, the ice maker should produce approximately 7 to 9 batches of ice in a 24-hour period.
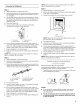
REFRIGERATOR FEATURES Your model may have some or all of these features. Features that can be purchased separately as product accessories are labeled with the word "Accessory." Not all accessories will fit all models. If you are interested in purchasing one of the accessories, please call the toll-free number on the cover or in the "Accessories" section. Important information covers: To raise or lower the shelf: 1.
Meat Storage Guide Store most meat in original wrapping as long as it is airtight and moisture-proof. Rewrap if necessary. See the following chart for storage times. When storing meat longer than the times given, freeze the meat. Crisper and Convertible Vegetable Meat Drawers To remove and replace drawers: 1. Slide crisper or meat drawer straight out to the stop. Lift the front of drawer with one hand while supporting the bottom of drawer with other hand and slide the drawer out the rest of the way. 2.
FREEZER FEATURES Your model may have some or all of these features. Features that can be purchased separately as product accessories are labeled with the word "Accessory." Not all accessories will fit all models. If you are interested in purchasing one of the accessories, please call the toll-free number on the cover or in the "Accessories" section. DOOR FEATURES Your model may have some or all of these features.
REFRIGERATOR CARE IMPORTANT: This cleaner is for Stainless Steel parts only! Do not allow the Stainless Steel Cleaner & Polish to come into contact with any plastic parts such as the trim pieces, dispenser covers or door gaskets. If accidental contact does occur, clean plastic part with a sponge and mild detergent in warm water. Dry thoroughly with a soft cloth. To order the cleaner, see the "Accessories" section. There is no need for routine condenser cleaning in normal home operating environments.
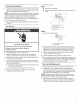
Crisper Lights • If necessary, remove the top crisper drawer to access the crisper light shield. Remove the light shield by lifting the ends out of the brackets as shown. • Replace the light shield by inserting the ends into the brackets. If necessary, replace the top crisper drawer. Style 2 - Behind Freezer Basket • Depending on your model, remove the top freezer basket or top freezer basket shelf. Remove light shield by removing the Phillips screw on the top of the shield.
Moving There is water in the defrost drain pan When you are moving your refrigerator to a new home, follow these steps to prepare it for the move. • Is the refrigerator defrosting? The water will evaporate. It is normal for water to drip into the defrost pan. 1. • is it more humid than normal? When it is humid, expect that the water in the defrost pan will take longer to evaporate.
Is an ice cube jammed in the ice maker ejector arm? For models with a standard ice storage bin, remove the ice from the ejector arm with a plastic utensil. For models with an ice storage bin on the freezer door, access the ice maker by depressing the ice sensor door on the upper left side of the freezer interior. While depressing the sensor door, lift the ice maker service door and remove the ice from the ejector with a plastic utensil. See "Ice Maker and Storage Bin.
Is there a water filter installed on the refrigerator? The water filtration system may have air in the lines, causing water to drip. Additional flushing may help clear air from the lines. Normal dispenser use should flush air from the lines within 24 to 72 hours. Is the food packaged correctly? Check that all food is securely wrapped. Wipe off damp food containers before placing in the refrigerator. Are the controls set correctly for the surrounding conditions? See "Using the Controls.
n the Call the Whirlpool Customer toll free: 1-800-253-1301. Our consultants WATERFILTER CERTIFICATIONS Interaction Center provide assistance with: • Features and specifications • Installation information. on our full line of appliances. • Use and maintenance • Accessory and repair parts sales. • Specialized customer assistance (Spanish speaking, hearing impaired, limited vision, etc.). • Referrals to local dealers, repair parts distributors, and service companies.
PRODUCTDATASHEETS Base Grille Water Filtration System Model WF-NL300/NL300 capacity 300 Gallons (1136 Liters) Model WF-L500/L500 capacity 500 Gallons (1893 Liters) @ System tested and certified by NSF International against ANSI/NSF Standard 53 for the reduction of Lead; and against Standard ANSt/NSF 42 for the reduction of Taste and Odor, Chlorine Class I. This system has been tested according to ANSl/NSF 42/53 for the reduction of the substances listed below.
CROSLEYREFRIGERATOR WARRANTY ONE-YEAR FULL WARRANTY ON REFRIGERATOR For one year from the date of purchase, when this refrigerator (excluding the water filter) is operated and maintained according to instructions attached to or furnished with the product, Whirlpool Corporation will pay for factory specified replacement parts and repair labor costs to correct defects in materials or workmanship. Service must be provided by a Whirlpool designated service company.