Outdoor Wicker Arm Chair CO7146
PART LIST A C B Arm Panel 2 PCS F Back Panel 1 PC G E D Seat Panel 1 PC Lower Front Panel 1 PC Cover of Seat Cushion * 1 PC H *Please note cushion covers will ship separately.
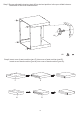
Step 1. Lay arm panel (part A) down on a soft flat surface,such as carpet,as shown below. Attach back panel (part B) to arm panel (part A) using medium bolts(part #2), washers (part #5),nuts(part #4),wrench(part #6) and allen key (part #7). NOTE:Please do not fully tighten bolts until unit is fully assembled. #7 #2 #5 #5 #4 #6 #2 #4 #5 #6 #7 x2 x2 x4 x1 x1 Step 2.
Step 3. Attach lower front panel (part D) to arm panel (part A) and seat panel (part C) using short bolts (part #1),long bolts (part #3),washers (part #5) ,nuts (part #4),wrench (part #6) and allen key (part #7). NOTE:Please do not fully tighten bolts until unit is fully assembled. #7 #7 #1 #5 #3 #5 D C #5 B A #4 #1 #6 #3 #4 #5 #6 #7 Step 4.
Step 5. Screw adjustable levelers (part #8) to desired position in the pre-drilled holes on the bottom of the chair where shown. #8 #8 Step 6.Insert core of seat cushion ( part F ) into cover of seat cushion ( part E). lnsert core of back cushion (part H) into cover of back cushion (part G).
Step 7. Carefully turn the assembled chair upright and add cushions as shown below.