Bradenton Outdoor Wicker Bar CO7221
PART LIST A Wicker Top 1 PC D C B Center Panel 1 PC E Left Side Panel R ight Side Panel 1 PC 1 PC Wicker Shelf 2 PCS F Glass Top 1 PC HARDWARE LIST #1 #2 M6*40mm M6*65mm Long Bolt 6 PCS Short Bolt 12 PCS #6 #3 #4 M6mm Washer 24 PCS #5 M6mm M6mm Nut 6 PCS Allen Key 1 PC #7 M6mm Wrench 1 PC M6mm Adjustable Leveler 4 PCS EXTRA HARDWARE LIST #1 #2 M6*40mm Short Bolt 3 PCS #3 M6*65mm Long Bolt 1 PC #7 #4 M6mm Washer 3 PCS 2 M6mm M6mm Nut 2 PCS Adjustable Leveler 1 PC
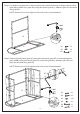
Step 1.Lay wicker top (part #A) on a flat surface with underside facing up.Attach center panel (part #B) to wicker top (part #A) using short bolts (part #1), washers (part #3) and allen key (part #5). NOTE:Please do not fully tighten bolts until unit is fully assembled. #5 #1 #3 B A #1 x2 #3 x2 #5 x1 Step 2.
Step 3.Attach one shelf (part #E) to assembled parts (part #B,C&D) using short bolts (part #1), washers (part #3) and allen key (part #5). NOTE:Please do not fully tighten bolts until unit is fully assembled. D B #1 #3 #5 C E #1 x4 #3 x4 #5 x1 Step 4.Attach another shelf (part #E) to assembled parts (part #B,C&D) using short bolts (part #1), washers (part #3) and allen key (part #5). NOTE: Please fully tighten all bolts at this time.
Step 5. Screw the adjustable levelers (part #7) into the pre-drilled holes to the desired position on the bottom of the bar. #7 #7 Step 6.Carefully turn the bar upright and place the glass (part #F) on the bar top.