® TOP-MOUNT REFRIGERATOR Use & Care Guide Table of Contents.............................................................2 www.crosley.
TABLE OF CONTENTS REFRIGERATOR SAFETY .......................................................... 3 Proper Disposal of Your Old Refrigerator....................................3 INSTALLING YOUR REFRIGERATOR ..........................................4 Unpacking Your Refrigerator .......................................................4 Location Requirements ................................................................4 Electrical Requirements ...............................................................
REFRIGERATOR SAFETY Your safety and the safety of others are very important. We have provided many important safety messages in this manual and on your appliance. Always read and obey all safety messages. This is the safety alert symbol. This symbol alerts you to potential hazards that can kill or hurt you and others. All safety messages will follow the safety alert symbol and either the word “DANGER” or “WARNING.
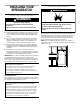
INSTALLING YOUR REFRIGERATOR Location Requirements WARNING Unpacking Your Refrigerator WARNING Excessive Weight Hazard Use two or more people to move and install refrigerator. Explosion Hazard Keep flammable materials and vapors, such as gasoline, away from refrigerator. Failure to do so can result in back or other injury. Failure to do so can result in death, explosion, or fire. Removing packaging materials ■ Remove tape and glue residue from surfaces before turning on the refrigerator.
Cold water supply Electrical Requirements WARNING Electrical Shock Hazard Plug into a grounded 3 prong outlet. Do not remove ground prong. Do not use an adapter. Do not use an extension cord. Failure to follow these instructions can result in death, fire, or electrical shock. Connect the ice maker to a cold water line with water pressure between 30 and 120 psi. If you have questions about your water pressure, call your utility company. Connecting to water line: 1.
3. The ice maker is equipped with a built-in water strainer. If your water conditions require a second water strainer, install it in the ¹⁄₄ in. (6.35 mm) water line at either tube connection. Obtain a water strainer from your nearest appliance dealer. 4. Plug in refrigerator or reconnect power. Refrigerator Doors: Removing, Reversing (optional) and Replacing TOOLS NEEDED: ⁵⁄₁₆ in. hex-head socket wrench, No. 2 Phillips screwdriver, flat-head screwdriver, ⁵⁄₁₆ in. open-end wrench, flat 2 in. putty knife.
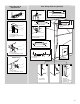
Door Removal & Replacement Door Swing Reversal (optional) 1-2 2 Base Grille 1 1 1. Cabinet Hinge Hole Plugs 2 3 1-1 1 Top Hinge 11 1. Door Hinge Hole Plug 1 1. 5/16" Hex-Head Hinge Screws 2 3 1 1. Top Hinge Cover 2. 5/16 " Hex-Head Hinge Screws 3. Top Hinge 1. Flat-Head Handle Screws 2. Freezer Handle 4 Center Hinge 1 7 1 1. Door Handle Sealing Screws 2 Side View Front View 5 1. Center Hinge 2. 5/16" Hex-Head Hinge Screws 1. Door Stop Screw 2. Door Stop Bottom Hinge 1 1.
Door Closing and Alignment Door Closing Your refrigerator has two front adjustable rollers – one on the right and one on the left. If your refrigerator seems unsteady or you want the doors to close easier, adjust the refrigerator's tilt using the instructions below: 1. Plug into a grounded 3 prong outlet. 2. Move the refrigerator into its final position. 3. Remove the base grille (see “Base Grille” earlier in this section).
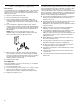
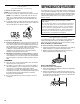
Mid-setting “4” USING YOUR REFRIGERATOR Ensuring Proper Air Circulation In order to ensure proper temperatures, you need to permit airflow between the refrigerator and freezer sections. As shown in the illustration, cool air enters through the bottom of the freezer section and moves up. Most of the air then flows through the freezer section vents and recirculates under the freezer floor. The rest of the air enters the refrigerator section through the top vent. REFRIGERATOR 4 4 FREEZER .
Ice Maker (on some models - Accessory) To turn the ice maker on/off: NOTE: Do not force the wire shut-off arm up or down. ■ To turn the ice maker on, simply lower the wire shut-off arm. NOTE: Your ice maker has an automatic shut-off. As ice is made, the ice cubes will fill the ice storage bin and the ice cubes will raise the wire shut-off arm to the OFF (arm up) position.
Lateral Adjustable Shelf Crispers and Meat Drawers (on some models) (on some models) To slide the shelf from side to side, lift up on the front of shelf and slide to the desired location. Lower shelf to the level position. NOTE: You do not have to remove small items from the shelf before moving it from side to side. You may need to remove larger items. Drawers To remove and replace a drawer: 1. Slide drawer straight out to the stop. Lift the front of the drawer and slide it out the rest of the way. 2.
To remove and replace the meat drawer cover (Style 2 plastic): 1. Remove the meat drawer. Tilt the cover up at the front and pull it forward and out. 2. Replace the meat drawer cover by fitting the notches and rear edge of the cover over rear and center crossbars on the shelf. Lower cover into place and replace the meat drawer. Chilled Meat Drawer (on some models) Slide the meat drawer temperature control forward to make the meat drawer less cold or backward to make the drawer more cold.
FREEZER FEATURES Your model may have some or all of these features. Features that can be purchased separately as product accessories are labeled with the word “Accessory.” Not all accessories will fit all models. If you are interested in purchasing one of the accessories, please call the toll-free number on the cover or in the "Assistance or Service" section. Adjustable Half-width Freezer Shelf (on some models) To remove and replace the shelf: 1.
DOOR FEATURES Your model may have some or all of these features. Features that can be purchased separately as product accessories are labeled with the word “Accessory.” Not all accessories will fit all models. If you are interested in purchasing one of the accessories, please call the toll-free number on the cover or in the "Assistance or Service" section. Door Rails The door rails may be removed for easier cleaning.
CARING FOR YOUR REFRIGERATOR 5. Clean the condenser coils regularly. Coils may need to be cleaned as often as every other month. This may help save energy. Style 1 - Condenser coils behind base grille: Cleaning Your Refrigerator ■ Remove the base grille (see the “Door Removal” section). ■ Use a vacuum with an extended attachment to clean the condenser coils when they are dusty or dirty. ■ Replace the base grille when finished.
TROUBLESHOOTING The refrigerator seems to make too much noise ■ Try the solutions suggested here first in order to avoid the cost of an unnecessary service call. Your refrigerator will not operate ■ Is the power cord unplugged? Plug into a grounded 3 prong outlet. ■ Has a household fuse or circuit breaker tripped? Replace the fuse or reset the circuit breaker. ■ Is the Refrigerator Control turned to the OFF position? See the “Setting the Control(s)” section.
■ Has a large amount of food just been added to the refrigerator or freezer? Adding a large amount of food warms the refrigerator. It can take several hours for the refrigerator to return to the normal temperature. ■ Are the controls set correctly for the surrounding conditions? See the “Setting the Controls” section. The water dispenser will not operate properly ■ ■ ■ ■ Has the water system not filled? The water system needs to be filled the first time it is used.
ASSISTANCE OR SERVICE Before calling for assistance or service, please check “Troubleshooting.” It may save you the cost of a service call. If you still need help, follow the instructions below. When calling, please know the purchase date and the complete model and serial number of your appliance. This information will help us to better respond to your request. If you need replacement parts If you need to order replacement parts, we recommend that you only use factory specified replacement parts.
Notes 19
CROSLEY® REFRIGERATOR WARRANTY ONE-YEAR FULL WARRANTY ON REFRIGERATOR For one year from the date of purchase, when this refrigerator (excluding the water filter) is operated and maintained according to instructions attached to or furnished with the product, Whirlpool Corporation will pay for factory specified replacement parts and repair labor costs to correct defects in materials or workmanship. Service must be provided by a Whirlpool designated service company.