CR66 ROCHESTER www.crosleyradio.
IMPORTANT SAFETY INSTRUCTION PLEASE READ CAREFULLY ALL THE FOLLOWING IMPORTANT SAFEGUARDS THAT ARE APPLICABLE TO YOUR EQUIPMENT 1. 2. 3. 4. 5. Read Instructions - All the safety and operating instructions should be read before the product is operated. Retain instructions - The safety and operating instructions should be retained for future reference. Heed Warnings - All warnings on the product and in the operating Instructions should be adhered to.
WARNING: To reduce the risk of fire or electric shock, do not expose this appliance to rain or moisture. CAUTION: Use of controls or adjustments or performance of procedures other than those specified may result in hazardous radiation exposure. CAUTION RISK OF ELECTRIC SHOCK DO NOT OPEN CAUTION: TO REDUCE THE RISK OF ELECTRIC SHOCK, DO NOT REMOVE COVER (OR BACK). NO USER - SERVICEABLE PARTS INSIDE. REFER SERVICING TO QUALIFIED SERVICE PERSONNEL.
Welcome Thank you for purchasing the Crosley Rochester (CR66). Before operating this unit, please read this manual thoroughly and retain it for future reference. About This Manual Instructions in this manual describe the control functions of the CR66. Table of Contents Getting Started Control Locators....................... 4,5 Unpacking................................. 6 Power Source........................... 6 Base Operation Turntable Operation.................. 7 Accessory: Adapter for 45 rpm .......
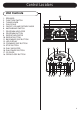
Control Locators Unit Controls 1 1. SPEAKER 2. FUNCTION SWITCH 3. TUNING KNOB 4. DIAL SCALE 5. ON/OFF-VOLUME ROTARY KNOB 6. AM/FM BAND SWITCH 7. PROGRAM INDICATOR 8. PROGRAM BUTTON 9. REPEAT INDICATOR 10. REPEAT BUTTON 11. BACKWARD SKIP BUTTON 12. LED DISPLAY 13. FORWARD SKIP BUTTON 14. STOP BUTTON 15. PLAY INDICATOR 16. PLAY/PAUSE BUTTON 17. CD DOOR 18. OPEN/CLOSE BUTTON TAPE RADIO CD VOLUME PHONO ON MAX. OFF AM FM PROG. REPEAT 3 2 TAPE RADIO B.SKIP 8. 8. F.
Control Locators Unit Controls 19 19. TURNTABLE 20. SPINDLE 21. ADAPTER FOR 45 RPM RECORD 22. CUE LEVER 23. TONE ARM 24. SPEED CONTROL SWITCH (331/3, 45, 78 RPM) 25. TONE ARM REST 26. SECURITY HOOK 27. EXTERNAL ANTENNA 28. AC POWER PLUG CORD 29. LINE IN JACK 30. LINE IN SWITCH 31. CASSETTE EJECT / FAST FORWARD 32.
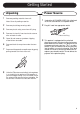
Getting Started Unpacking 1 Remove packing materials from unit. Note: Save all packing materials. 2 Remove plastic bag covering radio. 3 Remove plastic safety cover from A/C plug. 4 Remove tie from A/C cord and untie antenna wire on back of radio. 5 Open lid and remove styrofoam shipping material from turntable. 6 Remove black tie-wrap from under the tone arm. 7 Remove white protective needle cover by gently pulling towards the front of the unit.
Turntable Operation Accessory: ADAPTER FOR 45 RPM Turntable Operation Turn the unit on by rotating the ON/OFF-VOLUME ROTARY KNOB (5) located on the front panel to the ON position. 1 Rotate the FUNCTION SWITCH (2) to select PHONO mode. 2 Set the SPEED CONTROL SWITCH (24) to desire speed (33 1/3,45 or 78 rpm). Place the record on the turntable. 3 Use the CUE LEVER (22) to raise the tone arm off its rest.
Cassette & Radio Operation Radio Operation Cassette Operation 1 Rotate the FUNCTION SWITCH (2) to TAPE position. 1 Rotate the FUNCTION SWITCH (2) to select RADIO mode. 2 Insert a prerecorded tape through the CASSETTE DOOR (32). Tape will slide into the cassette mechanism and start playing. 2 Set the AM/FM BAND SWITCH (6) to the desired band (AM or FM). 3 Adjust the volume level by turning the VOLUME KNOB (5).
CD Operation Playing A CD Skip Forward And Skip Reverse 1 Rotate the FUNCTION SWITCH (2) to CD mode. 1 2 Press the OPEN/CLOSE BUTTON (18) to open the CD DOOR (17). Place a disc in the tray with the labeled side of the disc facing up. Press the FORWARD SKIP BUTTON (13) or the BACKWARD SKIP BUTTON (11) to select a track. 2 Press the PLAY BUTTON (16) to start playing the selected track 3 Press the OPEN/CLOSE BUTTON (18) again close the CD DOOR (17).
CD Operation Repeat Playback 1 2 3 To repeat a single track, choose the track that you want to repeat, then press the PLAY BUTTON(16) to start the track. Press the REPEAT BUTTON(10) once to repeat this track.The REPEAT INDICATOR(9) will flash. To repeat all tracks, press the PLAY BUTTON (16) to start the CD. Press the REPEAT BUTTON (10) twice to repeat all tracks. Once the CD ends, it will start over again from the beginning of the CD. The REPEAT INDICATOR (9) will remain on.
Connecting Optional Equipment Auxiliary Input 1 Troubleshooting You can connect external components to your unit by using the Auxiliary Input. There is no Power 1 The AC plugged is not well connected. 2 Plug Auxiliary cable into the LINE IN JACK (29) on the back of your unit. 2 Check to see that the ON/OFF volume knob is in the on position. 3 Switch the LINE IN SWITCH (30) to the ON position.
LIMITED MANUFACTURERS WARRANTY Crosley Radio, Inc. warrants the product to be free from defects in material and workmanship under normal use for a period of one year from the original date of purchase. This warranty is not transferable. If the product is determined to be defective during the warranty period, the unit will be repaired or replaced at Crosley Radio’s sole discretion.