
User Manual


- 3 -
d. Record on the box and also enter the ID number into a log.
e. Edit the joinmap.xtbl file so that the SSN IDs match the numbering scheme for each hole
f. Note the new ID number on the box and the hole/location that it is detained for.
g. Restart the RZ wireless processes and restart the SSN. The new ID should be “beeped-out”.
h. The SSN is now ready to be installed.
3. Installing each SSN
Steps:
a. Using the site survey, confirm the specific SSN location with Site superintendent or
designee.
b. If the location is changed, redline site survey to indicate new location and note the reason
for change.
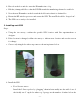
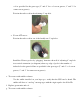
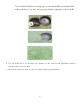
c. Cut two adjoining holes with a cup cutter as shown in pictures below.
d. Install the SSN.
• For a Stevens sensor:
Install the 2 Sensor probes by “plugging” them in horizontally into the wall of one of
the freshly cut 4” cup holes where top 2 prongs are the number of inches below the