
Installation Manual


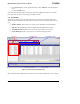
Table Of Contents
- About This Document
- 1 Introduction
- 2 Quick Start for the OEM Kit Users
- 3 Product Overview
- 4 IRIS OEM Reference Board
- 5 Power
- 6 Radios
- 7 Antennas
- 8 Flash Data Logger and Serial ID Chip
- 9 Atmega1281 Fuses
- 10 Sensor Boards & Expansion Connectors
- 11 USB Programming Pod
- 12 Appendix A. Warranty and Support Information

IRIS OEM Edition Hardware Reference Manual
Page 6 Doc. # 7430-0549-01 Rev. B
2.1.2 Installing the USB drivers for the MIB520 Programming Pod
When you plug an MIB520 into your PC for the first time, Windows detects and reports it as
new hardware. Do the following steps.
1. Connect one end of the USB extension cable to an available USB port on your PC.
Connect the other to the MIB520’s USB connector. In a few moments your PC will
identify the MIB520 as a new hardware.
2. When the PC directs you to search for a suitable driver select “Install from a list or
specific location (Advanced).”
3. Browse to “
MIB520 Drivers” folder of the MoteWorks Support Tools CDROM.
4. Follow the FTDI InstallShield Wizard through the rest of the installation process. Up to
four different installations will take place.
When the drivers are installed, you will see two serial ports associated with the MIB520. Before
programming or listening to Motes using the MIB520, you need to see which ports were
assigned to the MIB520. To find out do the following:
5. Click on Start > Control Panel > System > Hardware > Device Manager > Ports (COM & LPT).
6. Make a note of the assigned COM port numbers.
; NOTE: The two virtual serial ports for MIB520 are com<x> and com<x+1>
com<x> is for Mote programming, and
com<x+1> is for Mote communication.
2.1.3 Setting up the OEM Reference Motes with the XMDA300 Board
1. The OEM reference Motes are numbered from 0 to 3. Identify the Motes labeled one
(“1”) through three (“3”). Attach the MDA300 boards to each of these to Motes via the
mating 51-pin connectors. Turn the Motes on by putting the switch at SW2 to “ON.”
(Remember to install two of the AA alkaline batteries included in your kit.)
2. Identify the OEM reference Mote labeled as number zero (“0”) and attach it to the
MIB520 programming pod via the mating 51-pin adapter.
2.1.4 Setting up MoteView
All the visualization tools in MoteView require being connected to a database. The database is in
your PC (“localhost”), but can also be a remote PC/server. Instructions for logging and viewing
data locally are described next.
1. Start MoteView by double-clicking the icon on the desktop.
2. Open the Connection Wizard window from the menu
File > Connect > Connect to WSN.
3. Select the
Mode tab, check on Acquire Live Data as operation mode and Local as acquisition
type and click on
Next >>.
4. In the
Gateway tab, select MIB520 as the interface board, and change the Serial Port port
to the higher of the two com numbers assigned to the MIB520 during the driver
installation. For example if the COM ports on the MIB520 are COM8 and COM9, then
select in COM9 from the Serial Port drop-down box. Select the “
57600” for the Baud rate
from drop-down box and click on
Next >>.