
User's Manual

1
2
3
DECT ULE-MAG
MAGNETIC CONTACT
CR-DU-MAG EURO
CR-DU-MAG USA
ELECTRONIC ENGINEERING LTD.
INSTALLATION INSTRUCTIONS
P/N 7105190 REV. B (O.Z.)
Issue Date: July 6
th
, 2015
INTRODUCTION
This DECT ULE MAG detector is an advanced, fully
supervised low-current wireless detector that
includes a DECT ULE transceiver for reliable
system operation.
A built-in reed switch is applied in this device.
This DECT ULE MAG uses smart message control,
which verifies that all messages are successfully
transmitted, so that no intrusion event will be
uninformed to the system.
This DECT ULE MAG detector includes series of
messages for full communication administration
(Keep Alive, Tamper Status, Battery Status, Alert,
Configuration, etc.) as well as test transmission
signals.
FEATURES
DECT ULE RF protocol.
Low current Technology.
Powered by a single 3V Lithium battery.
Battery life: up to 4 years.
Frequency Band: All DECT Standard Bands.
Contact Open/Close transmission.
Tamper Open/Close transmission.
Keep Alive transmission.
Battery status transmission.
Bi-Color LED indications for monitoring &
Pairing.
Range up to 500m on open space.
Back tamper.
Alarm trigger by an internal reed switch.
Remotely configurable.
Friendly Pairing and Installation processes.
4
5
6
OPERATION
The DECT ULE MAG detector transmits the
following events data:
KEEP ALIVE – A periodical transmission
indicating detector’s presence. The time interval is
configurable – the minimum value is 3 seconds.
ALARM – Alarm transmission triggered by the
device indicating intrusion detection. The Red LED
will blink once.
LOW BAT – Whenever the battery reaches a pre-
set low level (~2.5V) Battery Low signal will be
sent. When Battery level drops below Cut Off level
(~2.3V) the device will stop functioning and the
Red LED will constantly light On.
TAMPER – Whenever the cover is removed from
Bracket or the device is tear off from the wall, a
message will be transmitted with “Tamper ON”
signal. When cover will be returned a “Tamper
OFF” signal will be transmitted.
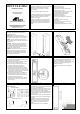
FIGURE 1 – SEPARATE FROM BRACKET
FIGURE 2 – BATTERY PLACEMENT
7
8
9
PAIRING PROCESS
1. Open the screw cover and unscrew the holding
screw as shown in Figure 1.
2. Separate the device from the Bracket by tilting
the front cover as shown in Figure 1.
3. Place a battery as instructed in Figure 2 and
wait until the Red LED stops blinking.
4. Initiate the Base Station pairing process.
5. Initiate the device pairing process by pressing
the pairing button for 5 seconds – the pairing
button is shown in Figure 3. The Green LED will
constantly turn On. When the Green LED starts
blinking release the pairing button.
6. The device should register to the Base Station.
7. When registration process is successfully
completed the Green LED will constantly light
On for 3 seconds and then turn off.
8. If registration process failed the Red LED will
blink (remove the battery and run the pairing
process again).
FIGURE 3 - PAIRING
SELECT MOUNTING LOCATION
As the device is a wireless transceiver, and in order
to take full advantage of it’s sophisticated
operation, do not install the detector in areas where
large metal objects could interfere with the
transmission of signals.
Installation is not allowed on a ferromagnetic
surface.
10
11
12
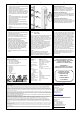
FIGURE 4 – WAY OF INSTALLATION
Opening Direction Axis:
X-Y or X-Z
WAY OF INSTALLATION
It is recommended to mount the device vertically on
a flat area to get maximum range.
It is recommended to attach the transmitter to the
fixed frame and the small magnet to the moveable
part (door or window), as shown on Figure 4.
It is very important to mount the small Magnet part
as closes as possible to the transmitter part and in
the correct location.
On the transmitter there are 2 knobs emphasizing
the relatively correct location of the small magnet –
see Figure 5.
The height of the small magnet relatively to the
transmitter part should be no more than 10mm
lower or higher or to the side of the transmitter.
This, of course, depend the Window / Door
structure.
Figures 5 illustrate one option of installation.
FIGURE 5 – MOUNTING THE DEVICE
Door / Window
DECT ULE-MAG
Magnet unit