
User's Manual


CopyDisc Duplicator Series
41
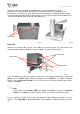
Unscrew and remove the 4 screws and washers positioned on the top of the CopyDisc.Turn the
printer with plate the correct way up and place the printer and plate over the top of the CopyDisc,
matching up the corresponding holes in each corner of the plate with those in each corner of the
CopyDisc unit and then loosely screw into place with the four screws and washers just removed,
(figure F3).
Note:
Do not tighten the screws at this point, as some adjustments to the plate’s position may be
required.
Power On
1. Connect the parallel cable and serial cable to the back of the CopyDisc and then to the
back of the printer (figure F4).
2. Connect the printer to the CopyDisc unit using the power connector cable.
3. Now connect the power cable to the back of CopyDisc printer and connect to the mains
(figure F4).
4. Press the power on switch on the printer, located at the back of the printer followed by the
power on switch at the back of your CopyDisc. When switching off your CopyDisc
Autoprinter, switch-off the printer first followed by the CopyDisc.
Fig. F3
Fig. F2
Parallel Cable
Power Cable
Power Cable
Printer Power On