
User's Manual


CopyDisc Duplicator Series
42
Adjusting the Printer Position
Your CopyDisc Autoprinter Platinum now needs to be aligned so that when a disc is released into
the printer it fits snugly in the printer tray.
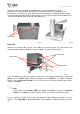
1. Switch on the Prism printer followed by the CopyDisc.
2. Open the printer tray by pressing the key on the front of the printer (figure F5)
3. On the LCD panel on the front of the CopyDisc unit move the > cursor using the arrow
keys until it is level with the Utilities and press the > key. Now scroll down to Loader
Utilities and press the > key.
4. Move the > cursor to Calibrate and press the > key. The robotic arm re-sets itself.
5. Place a disc onto the Input spindle, move the > cursor to Input Bin to Printer and press
the > key. The robotic arm picks the disc from the Input spindle and places it into the
printer tray. Check to see if the disc is situated in the correct position within the tray. The
disc should sit on the rubber pad between the two alignment pins and the centring pin
(figure G6). If the disc is resting on the alignment pins, the printer will not close or print.
6. If the disc does not fit within the alignment and centring pins, the printer’s position in
relation to the CopyDisc unit needs to be adjusted. Loosen the printer plate screws (do not
remove them completely) and gently tap the plate in the direction required to align the
printer.
7. Once again, place a disc onto the Input spindle, move the > cursor to Input Bin To
Printer and press the > key. The robotic arm picks and places the disc from the Input
spindle and places it into the printer drawer. Continue this process until the disc is placed
correctly into the printer tray.
Fig. F6
Open Printer Tray
Alignment Pins
Centering Pins
Fig. F4
CopyDisc Power On
Fig. F5
Open printer tray