
User's Manual


CopyDisc Duplicator Series
46
4 washers and screws provided. Do not tighten the screws completely at this point.
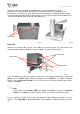
Remove the TEAC P-55 from its packaging. You will notice that the base of the printer has
location holes, (see figure F2), which directly mirror the location pins situated on the printer plate.
Carefully position the printer onto the printer plate (see figure F3) ensuring that the location pins fit
snugly into the location holes on the base of printer itself.
Power On
Connect the parallel cable and the serial cable to the printer (figure F4). Now connect the
respective Power Cables to the printer and the CopyDisc and connect to the mains.
Press the “power on” button on the back of the printer. The display on the printer should read
Ready. Press the Select button until the LCD display shows Interface…. The printer should be
factory set to read Interface Parallel. If this is the case, press the Select button again until the
screen reads Ready.
Note:
If the printer reads Interface USB, press Enter then Select to change it to Interface
Parallel. Press Enter. You will now need to power off the printer and power on again.
Press the “power on” button on the back of the CopyDisc which will then go through a series of
self-tests. The - Home Menu - prompt will appear on the CopyDisc’s LCD panel within a minute or
so.
Fig. F2 Fig. F3
Fig. F4
Locator holes
Power cables
Parallel Cable
Serial Cable