
User's Manual


CopyDisc Duplicator Series
47
Adjusting the Printer Position
Your CopyDisc P-55 now needs to be aligned so that when a CD is released into the printer it fits
into the correct position in the CD drawer.
1. Switch on your TEAC P-55 printer and CopyDisc autoloader.
2. Open the printer drawer by pressing the Load/Eject button on the printer.
3. On the LCD panel on the front of the CopyDisc unit move the > cursor using the arrow keys
until it is level with the Utilities Menu and press Enter. Now scroll down to Loader Utilities
and press Enter.
4. Move the > cursor to Calibrate and press Enter. The robotic arm re-sets itself.
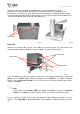
5. Place a disc onto the Input spindle, move the > cursor to Insert and press Enter. The
robotic arm picks the disc from the Input spindle and places it into the printer CD drawer.
The disc should sit on the CD drawer so that the 3 centering pins are in the middle of the
disc (see figure F5).
6. If the disc does sit centrally, the printer position in relation to the CopyDisc unit needs to be
adjusted. Gently tap the plate in the direction required to align the printer.
7. Once again, place a disc onto the Input spindle, move the > cursor to Insert and press
Enter.
8. The robotic arm picks and places the disc from the Input spindle and places it into the CD
drawer. Continue this process until the CD is placed correctly into the CD drawer.
9. Once the printer plate is in position, tighten the screws on the plate.
Note:
Only tiny movements to the printer plate are required. Use your hand to tap the printer
plate into position bit by bit.
Loading the TEAC P-55 Driver
1. Place the TEAC P-55 Driver software CD into your PCs CD-ROM.
2. Select Start and Setting then open the Printers folder.
3. Click the Add Printer icon. The Add Printer Wizard appears. Click Next
4. Select Local Printer and ensure that the box next to Automatically detect & install my
plug & play printer is unselected.
5. Continue selecting Next.
6. In the ‘Install Printer Software’ screen, click Have Disk and browser to your CD-Rom or
DVD drive and select the win 2000 folder. Click OK.
Fig. F5
3 pins