
Specifications


Power-Tech .1 Series Power Amplifiers
page 8 Operation Manual
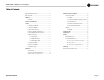
3.6 Wire Your System
Turn down the Level controls (fully counter-
clockwise) and turn off the amplifier before wir-
ing it as described below. Refer to Figure 3.6.
3.6.1 Stereo Mode
Set the back panel stereo/mono switch to Stereo.
INPUTS: Connect input wiring to both channels.
OUTPUTS: Maintain proper polarity (+/–) on
output connectors.
Connect Channel 1 positive (+) speaker load to
Channel 1 positive terminal of amp; repeat for
negative (–). Repeat Channel 2 wiring as for
Channel 1.
3.6.2 Bridge-Mono Mode
Set the back panel stereo/mono switch to
Bridge-Mono.
INPUTS: Connect input wiring to Channel 1
only.
OUTPUTS: Connect the speaker across the posi-
tive terminals of each channel. Do not use the
negative terminals when the amp is being oper-
ated in Bridge-Mono mode.
NOTE: The Channel 2 level control should
be set fully counter-clockwise when oper-
ating the amplifier in Bridge-Mono mode.
3.6.3 Parallel-Mono Mode
CAUTION: Parallel-Mono wiring requires
installation of a jumper wire. Do not
switch to Stereo or Bridge-Mono mode
until this output jumper wire is removed.
IMPORTANT: The Channel 2 IOC indicator
will remain lit when operating in Paral-
lel-Mono mode.
Set the back panel stereo/mono switch to
Parallel-Mono.
INPUTS: Connect input wiring to Channel 1
only.
OUTPUTS: Add a 14 AWG gauge (or larger)
jumper between the red(+) Channel 1 and Chan-
nel 2 binding posts. Connect the speaker posi-
tive (+) lead to the Channel 1 red (+) terminal.
Connect the speaker negative (–) lead to the
Channel 1 black (–) terminal.
NOTE: Use only the Channel 1 level con-
trol.
NOTE: Crown provides a reference of wiring pin
assignments for commonly used connector
types in the Crown Amplifier Application Guide,
available online at www.crownaudio.com.
3 Setup
Figure 3.6 Three System Connection Methods