
Specifications


Page 15
CE-Series
Amps with an Attitude!
Page 14
CE-Series
Amps with an Attitude!
Reference Manual
Reference Manual
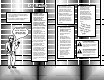
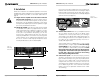
Fig. 2.1
Mounting
Dimensions
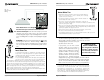
Fig. 2.2
Mode Switch
2 Installation
Follow these instructions for a detailed explanation of CE-Series
installation procedures and options. If you just want to get up and
running as quickly as possible, see the Quick Start section on
page 6.
2.1—Begin with the amplifier turned off and disconnected
from the power receptacle. The CE-Series power switch is
located on the left side of the front panel; it is off (“O”) when
depressed on the left. Equipment that will be connected to
the inputs of the amplifier (such as mixers,equalizers or signal
processors) should also be turned off.
2.2—Mount the amplifier. Your CE-Series amp can be mounted
in a standard, 19-inch (48.3-cm) equipment rack, or it can be
simply stacked with other equipment. And since your CE-
Series amp is not as deep as many amplifiers (only 12.25
inches (31.11 cm) behind the front panel), you can also
mount it in the shallow, wall-mount racks. The CE-Series
amps are provided with a convenient 3- foot (1-meter) power
cord to minimize excess cordage when installed in a rack.
Do not use extension cords. Properly wired power outlets
must be provided close to the mounted amplifier.
If you choose to mount your amp in a rack, you should secure
the back of the rack as well as the front. Securing the amp at
both front and rear will assure that the amp stays in place,
even when the rack is transported or accidentally dropped
(which we know never happens).
2.3—Set the mode switch. Make sure your amplifier is turned
off (“O”) before moving this switch. The Mode switch
should be in the “Stereo” position when you’re running in
Stereo Mode. Stereo Mode allows independent inputs on
the left and right channels to feed separate speakers at
the output. It’s the configuration typically chosen for ev-
eryday audio applications.
Turn the Mode switch to “Bridge-Mono” to have a single
input that feeds to a single output with twice the voltage
of Stereo Mode. Use this configuration if you want to give up
stereo capabilities in order to drive your speakers
louder.
Note that the wiring will also need to be adjusted for this
configuration—that includes both input and output wir-
ing. See Step 5 later in this section for correct wiring
when running in Bridge-Mono mode.
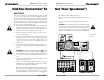
2.4—Connect the inputs of the CE-Series
amp to your mixer,
equalizers, or signal processors ahead of the amp. Three
types of balanced input connectors are provided, allow-
ing you to choose barrier strip,
1
/4-inch (6.35-mm) phone
or 3-pin XLR connectors.* You can also choose to use
either balanced or unbalanced wiring. (See the informa-
tion on “Balancing the Line” in the Crown Pro Information
Guide section for an explanation of balanced vs. unbal-
anced wiring.)
*Optional SST crossover may provide other input connector options.